Move an Object Across a PowerPoint Slide Using Motion Path or Entrance Animations
by Avantix Learning Team | Updated May 28, 2021
Applies to: Microsoft® PowerPoint® 2013, 2016, 2019 and 365 (Windows)
You can move a shape, image or other object across a PowerPoint slide during a slide show using motion path or entrance animations. When you run a slide show, the object will move across the screen (on click or automatically).
Recommended article: How to Print PowerPoint Presentations with Notes
Do you want to learn more about PowerPoint? Check out our virtual classroom or live classroom PowerPoint courses >
To apply animations, use the Animations tab in the Ribbon:
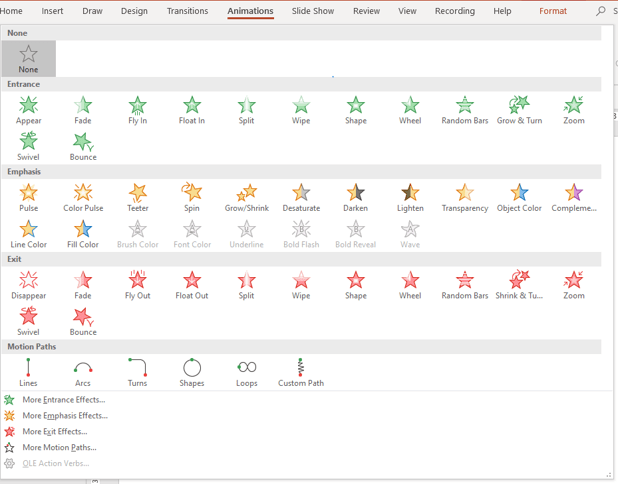
You can use entrance or motion path animations to move an object across a slide but you'll need to expand the Animations Gallery to access motion path animations.
If you want to apply more than one animation to an object, you will need to use Add Animation in the Advanced Animation group.
Animations are typically added to objects in Normal View but can be applied in Slide Master View.
Adding a motion path animation to make an object move across a slide
To apply a motion path animation to make an object move across a slide on click:
- Select an object. For text objects, click in the text box or placeholder or click its edge.
- Click the Animations tab in the Ribbon.
- In the Animations group, click the More down arrow on the bottom right of the Animations Gallery.
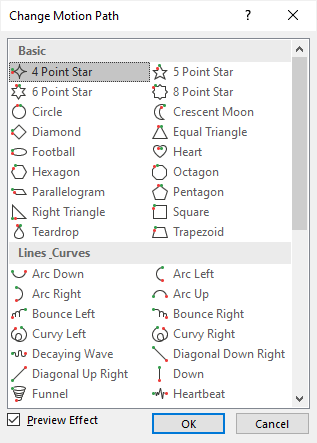
- Click the Line motion path animation in the Motion Paths group. If you click More Motion Paths, you can choose another motion path animation such as Funnel. For some motion paths, such as Custom Path, drag on the slide to create the path and then double-click to end it (see below for more information on custom paths).
- Click Effect Options on the Animations tab and select a direction such as Up, Down, Left or Right. Effect Options change depending on the type of animation.
- Click the motion path and drag the starting point (green dot or green arrow) or ending point (red dot or red arrow) to change the beginning or end of the path. The starting point begins in the middle of the object and the ending point ends in the middle of the object. In 2013 and later versions, a "ghost copy" of the object at its ending location appears on screen. You can drag the "ghost copy" to change the end point of the path.
- Drag the sizing handles (white circles) to resize the path.
The expanded Animations Gallery appears when you click the More down arrow in the Animations group (note the Entrance and Motion Paths categories):
If you select More Motion Paths in the Animation Gallery, the following dialog box appears (scroll down for more options):
You can also apply a motion path animation by clicking Add Animation on the Animations tab in the Advanced Animation group.
Custom paths behave differently from simple line motion paths. Intially, if you click Custom Path, you can drag on the screen to create the path. However, to make straight lines, simply click once at each desired point in the path rather than dragging. If you later want to change to a freeform path, click once again to switch to freeform mode and drag to continue the path. Click once to return to drawing straight lines. When you are finished drawing the path, double-click to end it.
By default, the object will appear on click during a slide show and follow the path.
You can select other motion path options in Effect Options on the Animations tab in the Ribbon:
- Sequence options can be used with some objects such as text boxes or placeholders with multiple bullet points or paragraphs. For example, you can choose to move paragraphs or bullets one at a time or as one object.
- Locked, in the Origin category, can be selected when a motion path is unlocked (which is the default). If the path is unlocked, it will move with the object. If you lock the path or origin, when you move the object, the motion path will remain in the same location. You can unlock a motion path that is locked.
- Edit Points is available for all motion paths except Line. If you select Edit Points, points will appear along the motion path and you can drag them to change the path. You can Ctrl-click a point to delete it or Ctrl-click on the path to add a new point.
- Reverse Path Direction will switch the start and end point of the motion path.
You can also combine motion path animations with other animations like Grow / Shrink using Add Animation.
Adding an entrance animation to make an object move across a slide
To apply an entrance animation to make an object move across a slide on click:
- Select an object. For text objects, click in the text box or placeholder or click its edge.
- Click the Animations tab in the Ribbon.
- In the Animations group, click the More down arrow on the bottom right of the Animations Gallery.
- Click the Fly In entrance animation in the Entrance group. If you click More Entrance Effects, you can choose another animation such as Spiral In or Bounce.
- Click Effect Options on the Animations tab and select a direction such as From Top or From Left.
You can also apply an entrance animation by clicking Add Animation on the Animations tab in the Advanced Animation group.
By default, the object will appear on click during a slide show.
Using the Animation Pane
If you're going to work with animations, it's helpful to display the Animation Pane so you can easily select and edit the animations.
To use the Animation Pane:
- Click the Animations tab in the Ribbon.
- Click Animation Pane in the Advanced Animations group. The Animation Pane appears on the right side of the screen.
- Click the animation in the Animation Pane and then select other options on the Animations tab. You can also click the drop-down menu that appears and select Effect Options.
Changing the way an object starts during a slide show
Animations are set by default to start on click during a slide show. If you want an animation to start automatically, you will need to change the start setting.
To start an animation automatically, you can start:
- After Previous – the animation sequence will begin once a previous animation effect or effects is completed. The start of a slide show is also a previous effect.
- With Previous – the animation sequence will begin at the same time as a previous animation effect or effects. The start of a slide show is also a previous effect.
To change the way an animation starts during a slide show:
- Select the animation effect in the Animation Pane.
- Click the Animations tab in the Ribbon.
- In the Timing group, select an option from the Start drop-down menu.
Setting timing
When you apply an animation, a timing is automatically set for the animation (in seconds). The default duration is different for each animation effect.
To set a speed or duration of an animation:
- Select the animation effect in the Animation Pane.
- Click the Animations tab in the Ribbon.
- In the Animations group, enter a time (in seconds) for the animation in the Duration area of the Timing group. You can click the up and down arrows to change the duration or type a duration.
Note the Duration on the Animations tab in the Ribbon below:
Viewing animations by running a slide show
You will need to run a slide show in order to see your object(s) move across the slide. Click the Slide Show button on the bottom right of the screen to run a show or press F5 (some users may need to press Fn + F5) to run the slide show from the beginning. Use the right and left arrows to move from slide to slide or start the animations.
In this article, we are using animations to make objects move across a slide. Check out the article How to Use Morph in PowerPoint to Design Engaging Presentations for other ways to make objects move on a slide during a slide show.
Subscribe to get more articles like this one
Did you find this article helpful? If you would like to receive new articles, join our email list.
More resources
PowerPoint Slide Show Shortcuts (50+ Shortcuts)
How to Get Design Ideas in PowerPoint Using Designer
How to Insert a Check Mark in PowerPoint (4 Ways with Shortcuts)
How to Use Morph in PowerPoint to Design Engaging Presentations
How to Crop an Image into a Circle in PowerPoint (Crop to Shape Method)
Related courses
Microsoft PowerPoint: Intermediate / Advanced
Microsoft PowerPoint: Design for Non-Designers
Microsoft PowerPoint: Animations Bootcamp
Our instructor-led courses are delivered in virtual classroom format or at our downtown Toronto location at 18 King Street East, Suite 1400, Toronto, Ontario, Canada (some in-person classroom courses may also be delivered at an alternate downtown Toronto location). Contact us at info@avantixlearning.ca if you'd like to arrange custom instructor-led virtual classroom or onsite training on a date that's convenient for you.
Copyright 2024 Avantix® Learning
You may also like
How to Insert or Type E with an Accent Mark in PowerPoint (È, É, Ê, Ë, è, é, ê, or ë)
You can insert or type e with an accent mark in PowerPoint using built-in tools or keyboard shortcuts (including Alt code shortcuts). The letter e can be inserted with an accent in both upper or lower case in text boxes or placeholders on slides, the slide master or layouts. The following are common accents in upper or lower case – È, É, Ê, Ë, è, é, ê, or ë.
How to Fade a Picture or Part of a Picture in PowerPoint (Using a Gradient)
You can fade a picture in PowerPoint by drawing a rectangle shape on top of the picture and then filling the rectangle with a gradient from opaque to transparent. This technique is often used to fade an image into the background of a slide. Since the rectangle is placed on top of the image and then text may be placed on top of the rectangle, you may need to reorder the objects.
How to Lock an Image, Shape or Other Object in PowerPoint
You can now lock an image, shape or other object in PowerPoint. Objects can be locked in Normal View or Slide Master View. Only PowerPoint 365 users can lock objects to prevent moving and resizing. This is helpful if you want to select and move other objects on the slide or prevent others from moving or resizing an object. You can lock items using the context menu or the Selection Pane.
Microsoft, the Microsoft logo, Microsoft Office and related Microsoft applications and logos are registered trademarks of Microsoft Corporation in Canada, US and other countries. All other trademarks are the property of the registered owners.
Avantix Learning |18 King Street East, Suite 1400, Toronto, Ontario, Canada M5C 1C4 | Contact us at info@avantixlearning.ca


