Insert or Type a Check Mark or Tick Mark Symbol in PowerPoint
by Avantix Learning Team | Updated September 7, 2023
Applies to: Microsoft® PowerPoint® 2013, 2016, 2019, 2021 and 365 (Windows)
You can insert or type a check mark or tick mark symbol in a PowerPoint presentation as a bullet, symbol character or icon. Check marks can be inserted using built-in commands or keyboard shortcuts.
In this article, we'll review 4 ways to insert a check mark symbol in PowerPoint in Normal View:
- Insert a check mark by inserting bullets
- Insert a check mark using Insert Symbol
- Insert or type a check mark using an Alt code shortcut
- Insert a check mark using icons
Recommended article: How to Print a PowerPoint Presentation with Notes
Do you want to learn more about PowerPoint? Check out our virtual classroom or in-person PowerPoint courses >
1. Insert a check mark by inserting bullets
If you want to insert a check mark at the beginning of one or more paragraphs on a PowerPoint slide, you can apply custom bullets using the Wingdings font (or a similar font).
To insert check marks as custom bullets to paragraphs in a text box or placeholder:
- Display the slide on which you want to insert check mark(s).
- Select the paragraph(s) in a text box or placeholder to which you want to add check marks (at the beginning of the paragraph).
- Click the Home tab in the Ribbon.
- In the Paragraph group, click the arrow beside the Bullets. A drop-down menu appears.
- Click Bullets and Numbering. A dialog box appears.
- Click Customize. A dialog box appears.
- Select Wingdings from the Font drop-down menu. Alternatively, you can select another font such as Wingdings 2 or Segoe UI Symbol.
- Scroll through the list of symbols until you find the check mark symbol you want to use and then click it.
- Click OK.
- Change the size and color of the bullet (check mark) if necessary.
- Click OK. The check marks will be added at the beginning of the paragraph(s).
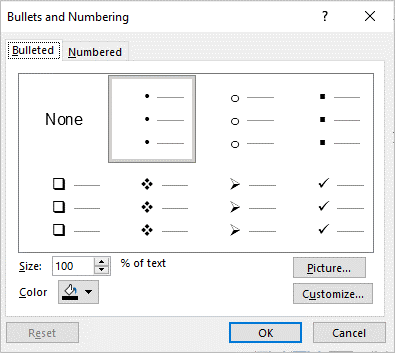
The Bullets and Numbering dialog box (below) offers multiple options for changing bullets:
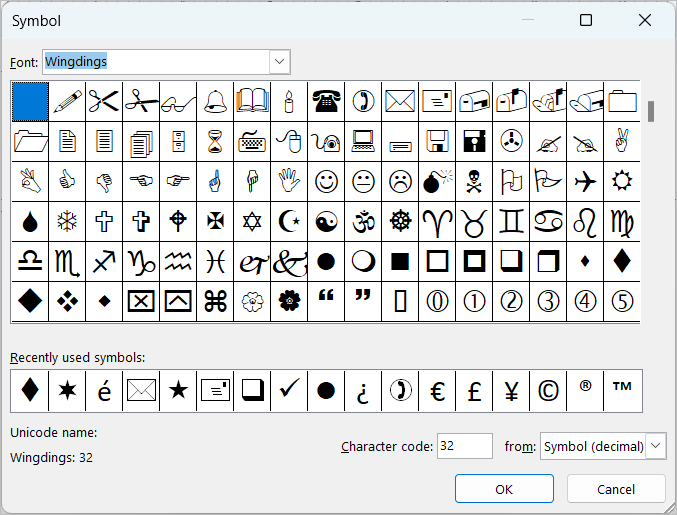
When you click Customize in the Bullets and Numbering dialog box, the Symbols dialog box appears as follows (with Wingdings selected as the Font):
In the Bullets and Numbering dialog box, you can also select Picture and then navigate to a picture you want to use as a bullet and then double-click it.
In the following example, check marks have been inserted as bullets on a slide:
You can also apply bullets in layouts in Slide Master View so that every slide using that layout would use custom bullets. Bullets can be added to level 1 paragraphs, level 2 and so on.
2. Insert a check mark using Insert Symbol
If you want to add a check mark in a line of text, at the end of a line of text, in a cell in a table or in a shape, you can use Insert Symbol.
To insert a check mark using Insert Symbol in PowerPoint:
- Display the slide on which you want to insert a check mark.
- Position the cursor in the text box or placeholder where you want to insert a check mark. You can also click in a cell in a table or click a shape.
- Click the Insert tab in the Ribbon.
- In the Symbols group, click Symbol. A dialog box appears.
- Select Wingdings from the Font drop-down menu. Alternatively, you can select another font such as Wingdings 2 or Segoe UI Symbol.
- Scroll through the list of symbols until you find the check mark symbol you want to use and then click it.
- Click Insert.
- Click Close.
Once the check mark has been inserted, you can change its font size or color using the Home tab in the Ribbon or by right-clicking and selecting formatting options from the mini-toolbar.
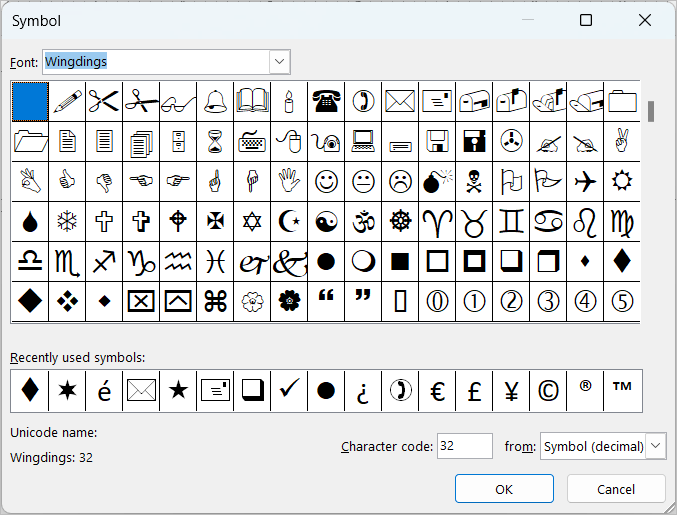
In the example below, Wingdings is selected in the Symbol dialog box (this is the same dialog box that appears when you customize bullets):
In the following example, check marks have been inserted in a table using Insert Symbol:
3. Insert or type a check mark using an Alt keyboard shortcut
You can press the Alt key in combination with numbers on the numeric keypad to insert a check mark symbol.
To insert or type a check mark symbol on a PowerPoint slide using Alt:
- Display the slide on which you want to insert a check mark.
- Position the cursor in a text box, placeholder, table cell or shape where you want to insert a check mark symbol.
- Press Alt + 0252 or Alt + 0254 on the numeric keypad. If the sequence doesn't work, press NumLock on the numeric keypad. PowerPoint will insert a different character.
- Select the character, click the Home tab in the Ribbon and select Wingdings from the Font drop-down menu.
4. Insert a check mark using icons
Starting in PowerPoint 2016, you can insert icons on your PowerPoint slides. These icons include check marks. Icons are inserted as graphics which can be moved around on the slide. They are not inserted inline within text.
To insert a check mark icon (in 2016 and later versions):
- Display the slide on which you want to insert a check mark.
- Click the Insert tab in the Ribbon.
- In the Illustrations group, click Icons. A dialog box appears.
- In the Search box, type check mark. The dialog box will display suggested icons.
- Click the check mark you want to use.
- Click Insert.
- Click Close.
The Insert Icon dialog box displays a gallery of icons as follows (screenshot from PowerPoint 365):
After inserting an icon, you can move it and apply formatting to it. These icons are provided by Microsoft and are available as part of Stock Images if you have a 365 subscription.
In the following example, check marks have been inserted as icons on a PowerPoint slide:
You can also get icons from online sources and copy them into PowerPoint.
This article was first published on August 24, 2021 and has been updated for clarity and content.
Subscribe to get more articles like this one
Did you find this article helpful? If you would like to receive new articles, JOIN our email list.
More resources
PowerPoint Slide Show Shortcuts (50+ Shortcuts)
How to Use the Built-in Laser Pointer in PowerPoint (with Shortcuts)
10 Ways to Compress PowerPoint Presentations to Reduce File Size
How to Quickly Remove All Speaker Notes in a PowerPoint Presentation
How to Add Animation in PowerPoint (Animate Images, Text or Other Objects)
Related courses
Microsoft PowerPoint: Intermediate / Advanced
Microsoft PowerPoint: Design for Non-Designers
Microsoft PowerPoint: Animations Bootcamp
Our instructor-led courses are delivered in virtual classroom format or at our downtown Toronto location at 18 King Street East, Suite 1400, Toronto, Ontario, Canada (some in-person classroom courses may also be delivered at an alternate downtown Toronto location). Contact us at info@avantixlearning.ca if you'd like to arrange custom instructor-led virtual classroom or onsite training on a date that's convenient for you.
Copyright 2024 Avantix® Learning
You may also like
How to Insert or Type E with an Accent Mark in PowerPoint (È, É, Ê, Ë, è, é, ê, or ë)
You can insert or type e with an accent mark in PowerPoint using built-in tools or keyboard shortcuts (including Alt code shortcuts). The letter e can be inserted with an accent in both upper or lower case in text boxes or placeholders on slides, the slide master or layouts. The following are common accents in upper or lower case – È, É, Ê, Ë, è, é, ê, or ë.
How to Fade a Picture or Part of a Picture in PowerPoint (Using a Gradient)
You can fade a picture in PowerPoint by drawing a rectangle shape on top of the picture and then filling the rectangle with a gradient from opaque to transparent. This technique is often used to fade an image into the background of a slide. Since the rectangle is placed on top of the image and then text may be placed on top of the rectangle, you may need to reorder the objects.
How to Lock an Image, Shape or Other Object in PowerPoint
You can now lock an image, shape or other object in PowerPoint. Objects can be locked in Normal View or Slide Master View. Only PowerPoint 365 users can lock objects to prevent moving and resizing. This is helpful if you want to select and move other objects on the slide or prevent others from moving or resizing an object. You can lock items using the context menu or the Selection Pane.
Microsoft, the Microsoft logo, Microsoft Office and related Microsoft applications and logos are registered trademarks of Microsoft Corporation in Canada, US and other countries. All other trademarks are the property of the registered owners.
Avantix Learning |18 King Street East, Suite 1400, Toronto, Ontario, Canada M5C 1C4 | Contact us at info@avantixlearning.ca


