Lock Objects in PowerPoint to Prevent Moving and Resizing
by Avantix Learning Team | Updated August 25, 2023
Applies to: Microsoft® PowerPoint® 365 (Windows)
You can now lock an image, shape or other object in PowerPoint. Objects can be locked in Normal View or Slide Master View. Only PowerPoint 365 users can lock objects to prevent moving and resizing. This is helpful if you want to select and move other objects on the slide or prevent others from moving or resizing an object. You can lock items using the context menu or the Selection Pane.
Recommended article: PowerPoint vs Google Slides (Full Feature Comparison + Benefits)
Do you want to learn more about PowerPoint? Check out our virtual classroom or in-person PowerPoint courses >
In this article, we'll review how to:
- Lock an image, shape or other object using a drop-down menu
- Unlock an image, shape or other object using a drop-down menu
- Lock an image, shape or other object using the Selection Pane
- Unlock an image, shape or other object using the Selection Pane
- Lock an image, shape or other object using third-party tools
Although you cannot move (change position) or resize a locked object, you can still make editing changes to some objects such as changing the font color of text, changing the fill color of a shape or adjusting brightness, color and contrast of an image. Some objects, like SmartArt, cannot be edited once they are locked.
You can also lock video and audio files, SmartArt, tables and charts.
Background images (created using Format Background) cannot be moved by dragging so they don't need to be locked.
When you lock an image, shape or other object, a different type of border appears when you select it if it's locked. In the following example, note the border around the locked image:
Lock an image, shape or other object using a drop-down menu
To lock an image, shape or other object by right-clicking:
- In Normal View, select the object on the slide that you want to lock. If you want to select a text placeholder or text box, click its edge. You can also select an object on the Slide Master or on a slide layout in Slide Master View.
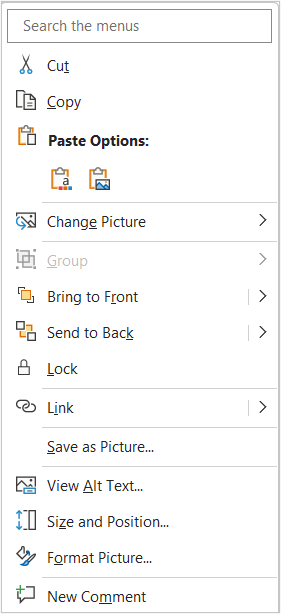
- Right-click the object and select Lock from the drop-down menu.
To lock an image, shape or other object using a keyboard shortcut:
- In Normal View, select the object on the slide that you want to lock. If you want to select a text placeholder or text box, click its edge. You can also select an object on the Slide Master or on a slide layout in Slide Master View.
- Press the Context button on your keyboard or press Shift + F10 to display the drop-down menu. Some users may also need to press Fn at the same time as Shift + F10.
- Press the down arrow key to select Lock.
- Press Enter.
The context menu appears as follows when you right-click an unlocked object (or use the keyboard shortcut method above):
Unlock an image, shape or other object using a drop-down menu
To unlock an image, shape or other object using a drop-down menu:
- In Normal View, select the object on the slide that you want to unlock. If you want to select a text placeholder or text box, click its edge. You can also select an object on the Slide Master or on a slide layout in Slide Master View.
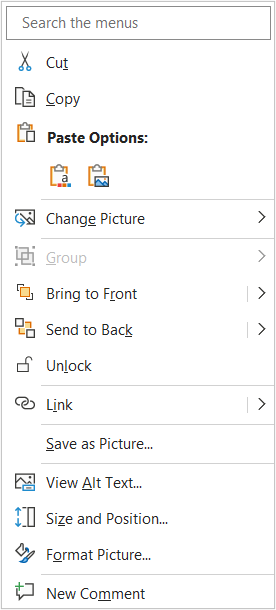
- Right-click the object and select Unlock from the drop-down menu. Alternatively, press the Context button or press Shift + F10 to display the drop-down menu, use your arrow keys to select Unlock and press Enter.
The context menu appears as follows when you right-click a locked object:
Lock an image, shape or other object using the Selection Pane
The Selection Pane is a fantastic tool in PowerPoint for selecting and manipulating objects.
To lock an image, shape or other object using the Selection Pane:
- If the Selection Pane is not displayed, click the Home tab in the Ribbon and click Select in the Editing group. You can also display the Selection Pane using the Format tab in the Ribbon if a Picture or Shape is selected.
- From the drop-down menu, click Selection Pane. The Selection Pane appears on the right side of the screen. You can also display the Selection Pane by pressing Alt + F10 (some users may need to press Fn + Alt + F10).
- In Normal View, display the slide with the object(s) you want to lock. Alternatively, display the Slide Master or slide layout with the object(s) you want to lock.
- Click the Lock icon that appears to the right of the object you want to lock until is appears as a closed lock.
- Repeat for other objects.
The Selection Pane appears as follows with locked and unlocked objects:
Unlock an image, shape or other object using the Selection Pane
To unlock an image, shape or other object using the Selection Pane:
- If the Selection Pane is not displayed, click the Home tab in the Ribbon and click Select in the Editing group.
- From the drop-down menu, click Selection Pane. The Selection Pane appears on the right side of the screen. You can also display the Selection Pane by pressing Alt + F10 (some users may need to press Fn + Alt + F10).
- In Normal View, display the slide with the object(s) you want to unlock. Alternatively, display the Slide Master or slide layout with the object(s) you want to unlock.
- Click the Lock icon that appears to the right of the object you want to unlock until is appears as an open lock.
- Repeat for other objects.
The Selection Pane appears as follows with unlocked objects:
Lock an image, shape or other object using third-party tools
If you have an older version of PowerPoint, there are some third-party add-ins you can get to lock objects. Since they are add-ins, you would need to install them.
To get add-ins:
- Click the Insert tab in the Ribbon.
- In the Add-Ins group, select Get Add-ins. A Microsoft Store dialog box appears.
- In the Store dialog box, enter PowerPoint in the Search box and press Enter. PowerPoint add-ins will appear on the right.
- Click the add-in you want and then click Add.
- Select the option to agree to the terms.
- Click OK.
Installed add-ins will be listed under My Add-Ins on the Insert tab in the Ribbon. When using an add-in, you may be prompted to set up an account with the add-in developer.
Some add-ins are premium and you will need to pay an additional charge.
You can also search for PowerPoint add-ins online.
Subscribe to get more articles like this one
Did you find this article helpful? If you would like to receive new articles, JOIN our email list.
More resources
How to Print a PowerPoint Presentation with Notes
How to Remove the Background of an Image in PowerPoint
How to Make a Picture Transparent in PowerPoint (3 Ways)
How to Add Animation in PowerPoint (Animate Text, Images and Other Objects)
How to Use the Selection Pane in PowerPoint to Select, Reorder, Rename and Hide Objects
Related courses
Microsoft PowerPoint: Intermediate / Advanced
Microsoft PowerPoint: Design for Non-Designers
Microsoft PowerPoint: Animations Bootcamp
Microsoft Excel: Intermediate / Advanced
Our instructor-led courses are delivered in virtual classroom format or at our downtown Toronto location at 18 King Street East, Suite 1400, Toronto, Ontario, Canada (some in-person classroom courses may also be delivered at an alternate downtown Toronto location). Contact us at info@avantixlearning.ca if you'd like to arrange custom instructor-led virtual classroom or onsite training on a date that's convenient for you.
Copyright 2024 Avantix® Learning
You may also like
How to Insert or Type E with an Accent Mark in PowerPoint (È, É, Ê, Ë, è, é, ê, or ë)
You can insert or type e with an accent mark in PowerPoint using built-in tools or keyboard shortcuts (including Alt code shortcuts). The letter e can be inserted with an accent in both upper or lower case in text boxes or placeholders on slides, the slide master or layouts. The following are common accents in upper or lower case – È, É, Ê, Ë, è, é, ê, or ë.
How to Fade a Picture or Part of a Picture in PowerPoint (Using a Gradient)
You can fade a picture in PowerPoint by drawing a rectangle shape on top of the picture and then filling the rectangle with a gradient from opaque to transparent. This technique is often used to fade an image into the background of a slide. Since the rectangle is placed on top of the image and then text may be placed on top of the rectangle, you may need to reorder the objects.
PowerPoint vs Google Slides (Full Feature Comparison + Benefits)
When comparing PowerPoint vs Google Slides (and trying to decide which is the better choice for your needs), you will need to consider versions when you compare the two applications. In this article, we'll compare the desktop or downloadable version of PowerPoint vs Google Slides, an online program that works in a browser. The key difference then if you are comparing PowerPoint vs Google Slides is that PowerPoint must be downloaded and runs on your desktop and Google Slides runs online. The desktop version of PowerPoint is a robust, full-featured program with many advanced features. You can buy PowerPoint as a stand-alone version or as part of a Microsoft 365 subscription. If you are a 365 subscriber, new features roll out on a regular basis.
Microsoft, the Microsoft logo, Microsoft Office and related Microsoft applications and logos are registered trademarks of Microsoft Corporation in Canada, US and other countries. All other trademarks are the property of the registered owners.
Avantix Learning |18 King Street East, Suite 1400, Toronto, Ontario, Canada M5C 1C4 | Contact us at info@avantixlearning.ca


