Crop a Picture into a Circle on a PowerPoint Slide Using Crop to Shape
by Avantix Learning Team | Updated September 12, 2023
Applies to: Microsoft® PowerPoint® 2010, 2013, 2016, 2019, 2021 and 365 (Windows)
If you want to crop an image into a circle in PowerPoint, you will need to combine cropping options. Crop options appear on the Picture Format or Picture Tools Format tab in the Ribbon. You can use these tools to crop a picture into an oval and then crop again to change the aspect ratio so the oval changes into a circle. In PowerPoint, you can achieve some great effects by cropping images to different shapes.
To crop an image into a circle in PowerPoint (typically in Normal View), you'll need to:
- Crop the image into an oval.
- Change the cropped image into a circle by changing the aspect ratio.
- Change the size, shape or position of the cropped image as required.
Recommended article: How to Crop an Image into a Circle in PowerPoint Using Merge Shapes
Do you want to learn more about PowerPoint? Check out our virtual classroom or in-person PowerPoint courses >
Note: Buttons and Ribbon tabs may display in a different way (with or without text) depending on your version of PowerPoint, the size of your screen and your Control Panel settings. For PowerPoint 365 users, Ribbon tabs may appear with different names. For example, the Picture Tools Format tab may appear as Picture Format.
Step 1: Crop the picture into an oval
To crop a picture into an oval on a PowerPoint slide:
- Select the picture you want to crop.
- Click the Picture Format or Picture Tools Format tab in the Ribbon.
- In the Size group, click the arrow below Crop. A drop-down menu will appear.
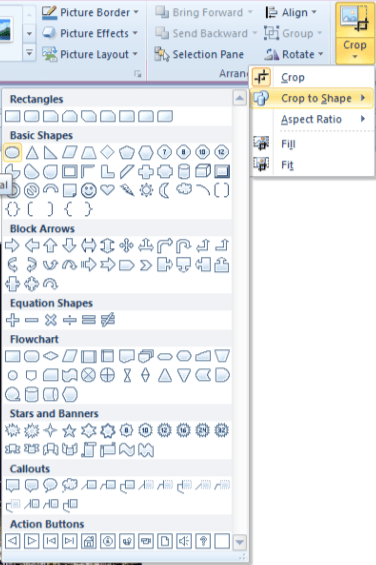
- Choose Crop to Shape. A fly-out gallery will appear.
- Click the oval.
Below is the Crop to Shape gallery:
Step 2: Change the cropped picture into a circle by changing the aspect ratio
To change the cropped picture (currently an oval) to a circle by changing the aspect ratio:
- Ensure the picture is selected.
- Click the Picture Format or Picture Tools Format tab in the Ribbon.
- In the Size group, click the arrow below Crop. A drop-down menu will appear.
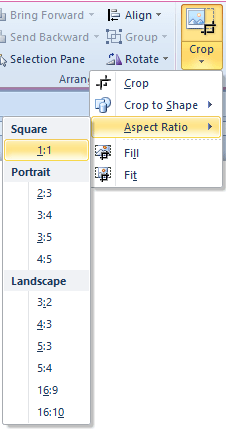
- Choose Aspect Ratio. A sub-menu will appear.
- Select 1:1 to crop the image into a circle (this changes the oval into a circle).
Below is the Crop menu with Aspect Ratio:
Step 3: Change the size, shape or position of the cropped picture
To change the size, shape or position of the cropped picture:
- Ensure the picture is selected on the PowerPoint slide.
- Click the Picture Format or Picture Tools Format tab in the Ribbon.
- In the Size group, click Crop. Cropping and sizing handles will appear.
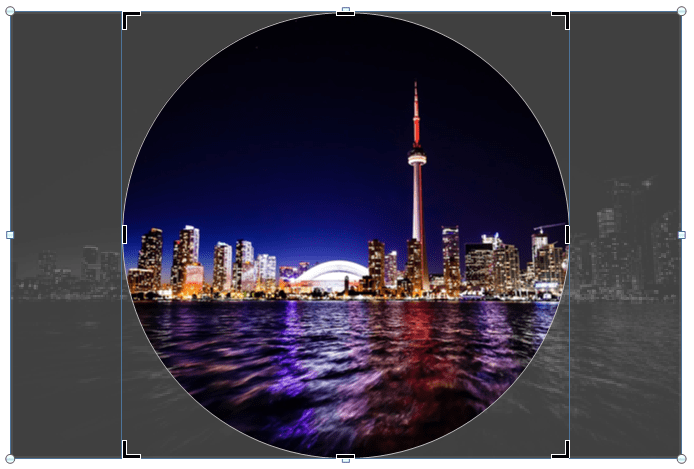
- Resize the cropped area by dragging the black crop handles. To ensure that the shape remains a circle, hold down Shift and drag a corner crop handle.
- Resize the picture by dragging the white circular handles. To ensure that the shape resizes proportionally, hold down Shift and drag a corner circle handle.
- Move the picture within the cropped area by dragging the image.
- Click outside the picture or click Crop again to exit crop mode.
Below is a picture that has been cropped into a circle in crop mode. Note the black crop handles and the white circular resizing handles:
You can create some really interesting effects in your PowerPoint decks when you try some of the more advanced cropping options.
This article was first published on March 28, 2019 and has been updated for clarity and content.
Subscribe to get more articles like this one
Did you find this article helpful? If you would like to receive new articles, join our email list.
More resources
How to Print a PowerPoint Presentation with Notes
How to Quickly Change Shapes on PowerPoint Slides
How to Group and Ungroup in PowerPoint (with Shortcuts)
How to Change Picture Brightness and Contrast in PowerPoint
How to Compress Images in PowerPoint to Reduce File Size (10 Strategies)
Related courses
Microsoft PowerPoint: Intermediate / Advanced
Microsoft PowerPoint: Design for Non-Designers
Microsoft PowerPoint: Accessible PowerPoint Presentations
Our instructor-led courses are delivered in virtual classroom format or at our downtown Toronto location at 18 King Street East, Suite 1400, Toronto, Ontario, Canada (some in-person classroom courses may also be delivered at an alternate downtown Toronto location). Contact us at info@avantixlearning.ca if you'd like to arrange custom instructor-led virtual classroom or onsite training on a date that's convenient for you.
Copyright 2024 Avantix® Learning
You may also like
10 Keyboard Shortcuts in PowerPoint's Outline View
The outline has been an integral part of Microsoft PowerPoint for many years. It is dynamically linked to slide placeholders and is organized in a hierarchical way.
How to Change the Thumbnail for a Video in PowerPoint (using the Poster Frame Tool)
If you have inserted a video on a PowerPoint slide, you can display a custom thumbnail (or Poster Frame) for the video during a slide show. The thumbnail will display when you run a PowerPoint slide show and disappears when you start the video. For most videos, the thumbnail that displays is the first frame of the video clip. You can use the Poster Frame command to display a different frame in the video clip or a picture from another source as a thumbnail. A picture thumbnail could be either an image or an icon.
How to Use the Built-in Laser Pointer in PowerPoint (with Shortcuts)
During a PowerPoint slide show, you can change your mouse into a laser pointer to focus attention on a specific area on your slide. You can show or hide the built-in laser pointer using keyboard shortcuts or by using the context menu.
Microsoft, the Microsoft logo, Microsoft Office and related Microsoft applications and logos are registered trademarks of Microsoft Corporation in Canada, US and other countries. All other trademarks are the property of the registered owners.
Avantix Learning |18 King Street East, Suite 1400, Toronto, Ontario, Canada M5C 1C4 | Contact us at info@avantixlearning.ca


