Add Audio in PowerPoint from a File on Your PC or Shared Drive
by Avantix Learning Team | Updated August 25, 2023
Applies to: Microsoft® PowerPoint® 2013, 2016, 2019, 2021 and 365 (Windows)
You can add audio in PowerPoint from a file on your PC or from a shared drive. Audio is played during a slide show and you can insert music, sound clips, or voice recordings. Since audio files are copied into PowerPoint presentations by default, they can increase file size and may need to be compressed. To play audio, your computer must be equipped with a sound card and speakers.
Recommended article: How to Compress Video (or Audio) Media in PowerPoint to Reduce File Size
Do you want to learn more about PowerPoint? Check out our virtual classroom or live classroom PowerPoint courses >
PowerPoint 2016 and later versions support common audio formats including mp3, mp4, m4a, wav and wma.
Note: Buttons and Ribbon tabs may display in a different way (with or without text) depending on your version of PowerPoint, the size of your screen and your Control Panel settings. For PowerPoint 365 users, Ribbon tabs may appear with different names. For example, the Audio Tools Playback tab may appear as Audio Playback. Screenshots in this article are from 365 but are similar in previous versions of PowerPoint.
Audio files are typically inserted on slides in Normal View. When you run a slide show, audio will play with settings you have applied on the Audio Tools Playback or Audio Playback tab in the Ribbon.
Insert audio from a file
To insert audio from a file and embed it on a slide:
- In Normal View, navigate to the slide where you want to insert the audio clip. This may be a music file, sound clip, or voice recording.
- Click the Insert tab in the Ribbon.
- Click Audio. A drop-down menu appears.
- Depending on your PowerPoint version, choose Audio My PC. A dialog box appears.
- Navigate to the folder where your audio file is saved and then click the file to select it.
- On the bottom right of the dialog box, click Insert to embed the audio. You can also double-click the audio file. If you click the drop-down menu beside Insert in the dialog box, you can choose Link to File. If you decide to link rather than embed, you may want to copy your audio file to the same folder as your presentation before you insert it on your slide. PowerPoint will place an audio icon in the center of the slide.
- In Normal View, click the audio icon and then click Play in the media controls that appear below the icon to play the audio.
After you insert an audio clip and click the audio icon, two tabs will appear in the Ribbon (AudioTools Playback and Format or Audio Playback and Format) in Normal View.
In the following example, an audio icon is selected in Normal View and media controls appear below the icon:
The Audio Tools Playback or Audio Playback tab appears as follows when you click an audio icon on a slide:
Control the way audio starts
To control the way audio starts during a slide show:
- In Normal View, click the audio icon on the slide.
- Click the Audio Tools Playback or Audio Playback tab in the Ribbon.
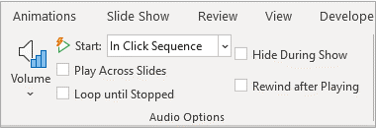
- In the Audio Options group, beside Start, choose In Click Sequence, When Clicked On or Automatically from the drop-down menu.
If you select When Clicked On, you must click directly on the audio icon when running a slide show.
The Start Settings appear in the Audio Options group on the Playback tab in PowerPoint:
Control audio volume
To control audio volume:
- In Normal View, click the audio icon on the slide.
- Click the Audio Tools Playback or Audio Playback tab in the Ribbon.
- In the Audio Options group, click Volume and then choose Low, Medium, High or Mute.
- You can also set the volume of an audio clip using the volume slider on the media controls below the icon.
If audio does not play as expected, you may need to check to be sure volume is on for your device (typically you would click the volume icon in the task bar at the bottom of your screen to turn volume on) or you may need to check the speaker device settings in your Windows Control Panel.
Hide an audio icon
When you run a slide show, you can hide the audio icon. This is common if you are playing audio automatically or the audio is set to start when you click on the slide.
To hide an audio icon during a slide show:
- In Normal View, click the audio icon on the slide.
- Click the Audio Tools Playback or Audio Playback tab in the Ribbon.
- In the Audio Options group, select the Hide While Not Playing check box.
Loop and rewind audio
To play audio continuously during a presentation, you can loop the audio:
- In Normal View, click the audio icon on the slide.
- Click the Audio Tools Playback or Audio Playback tab in the Ribbon.
- In the Audio Options group, select the Loop until Stopped check box. You will still be able to click the Play / Pause button to stop the audio file from playing.
To rewind audio after playing:
- In Normal View, click the audio icon on the slide.
- Click the Audio Tools Playback or Audio Playback tab in the Ribbon.
- In the Audio Options group, select the Rewind after Playing check box.
Fade audio in or out
You can start or end audio with a fade effect for a specific number of seconds.
To start or end audio with a fade effect:
- In Normal View, click the audio icon on the slide.
- Click the Audio Tools Playback or Audio Playback tab in the Ribbon.
- In the Editing group, under Fade Duration, choose or enter a duration for Fade In or Fade Out. To add a timed fade to the beginning of an audio clip, in the Fade In box, click the up and down arrows to increase or decrease the fade in time. To add a timed fade to the end of an audio clip, in the Fade Out box, click the up or down arrows to increase or decrease the fade out time.
Trim audio
You can trim an audio clip at the beginning and / or end of each clip so you can start at any point and end the clip earlier.
To trim an audio clip:
- In Normal View, click the audio icon on the slide.
- Click the Audio Tools Playback or Audio Playback tab in the Ribbon.
- In the Editing group, click Trim Audio. A dialog box appears.
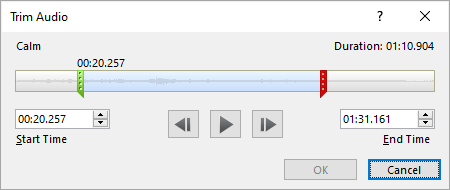
- To trim the beginning of the clip, click the start point (a green marker on the far left). When the pointer becomes a two-headed arrow, drag the arrow to the desired starting position.
- To trim the end of the clip, click the end point (a red marker on the right). When the pointer becomes a two-headed arrow, drag the arrow to the desired ending position.
- Click OK.
The Trim dialog box appears as follows (both the beginning and the end of the audio clip have been trimmed):
If you compress your PowerPoint file, the trimmed portions of the audio will be permanently deleted.
Show media controls during a slide show
To show media controls during a slide show:
- In Normal View, click the Slide Show tab in the Ribbon.
- In the Set up group, select the Show Media Controls check box.
Show Media Controls appears on the Slide Show tab in the Ribbon:
The Playback options for both embedded audio and video are very similar.
Subscribe to get more articles like this one
Did you find this article helpful? If you would like to receive new articles, JOIN our email list.
More resources
How to Embed a YouTube Video in PowerPoint
How to Get Design Ideas in PowerPoint Using Designer
How to Use Morph in PowerPoint to Design Engaging Presentations
How to Insert Video in PowerPoint (from a File on Your PC or Shared Drive)
PowerPoint Keyboard Shortcuts to Play and Control Video During a Slide Show
Related courses
Microsoft PowerPoint: Intermediate / Advanced
Microsoft PowerPoint: Design for Non-Designers
Microsoft PowerPoint: Accessible PowerPoint Presentations
Microsoft PowerPoint: Animations Bootcamp
Our instructor-led courses are delivered in virtual classroom format or at our downtown Toronto location at 18 King Street East, Suite 1400, Toronto, Ontario, Canada (some in-person classroom courses may also be delivered at an alternate downtown Toronto location). Contact us at info@avantixlearning.ca if you'd like to arrange custom instructor-led virtual classroom or onsite training on a date that's convenient for you.
Copyright 2024 Avantix® Learning
You may also like
10 Keyboard Shortcuts in PowerPoint's Outline View
The outline has been an integral part of Microsoft PowerPoint for many years. It is dynamically linked to slide placeholders and is organized in a hierarchical way.
How to Change the Thumbnail for a Video in PowerPoint (using the Poster Frame Tool)
If you have inserted a video on a PowerPoint slide, you can display a custom thumbnail (or Poster Frame) for the video during a slide show. The thumbnail will display when you run a PowerPoint slide show and disappears when you start the video. For most videos, the thumbnail that displays is the first frame of the video clip. You can use the Poster Frame command to display a different frame in the video clip or a picture from another source as a thumbnail. A picture thumbnail could be either an image or an icon.
How to Use the Built-in Laser Pointer in PowerPoint (with Shortcuts)
During a PowerPoint slide show, you can change your mouse into a laser pointer to focus attention on a specific area on your slide. You can show or hide the built-in laser pointer using keyboard shortcuts or by using the context menu.
Microsoft, the Microsoft logo, Microsoft Office and related Microsoft applications and logos are registered trademarks of Microsoft Corporation in Canada, US and other countries. All other trademarks are the property of the registered owners.
Avantix Learning |18 King Street East, Suite 1400, Toronto, Ontario, Canada M5C 1C4 | Contact us at info@avantixlearning.ca


