Compress Video and Audio Media in PowerPoint
by Avantix Learning Team | Updated April 6, 2021
Applies to: Microsoft® PowerPoint® 2013, 2016, 2019 and 365 (Windows)
You can compress video and audio media in a PowerPoint presentation to reduce file size. Since video and audio inserted into a PowerPoint file is embedded or copied into the presentation by default (starting in 2010), video and audio media can increase file size significantly. If you compress media, both video and audio media will be compressed.
When you compress media in PowerPoint, embedded subtitles and alternate audio tracks will be removed in the compression process. If you have trimmed media in PowerPoint, the trimmed portions will also be removed during compression.
Recommended article: How to Insert a Video in PowerPoint (From a File on Your PC or Shared Drive)
Do you want to learn more about PowerPoint? Check out our virtual classroom or live classroom PowerPoint courses >
Compressing video and audio media in PowerPoint
To compress video and audio media in a PowerPoint file:
- Save a copy of the presentation that contains the video and / or audio you want to compress. The media files must be embedded, not linked. Online videos (such as YouTube videos) will not be compressed.
- Open the copy of the presentation.
- Click the File tab in the Ribbon.
- Select Info.
- In the Media Size and Performance area, select Compress Media. A drop-down menu appears.
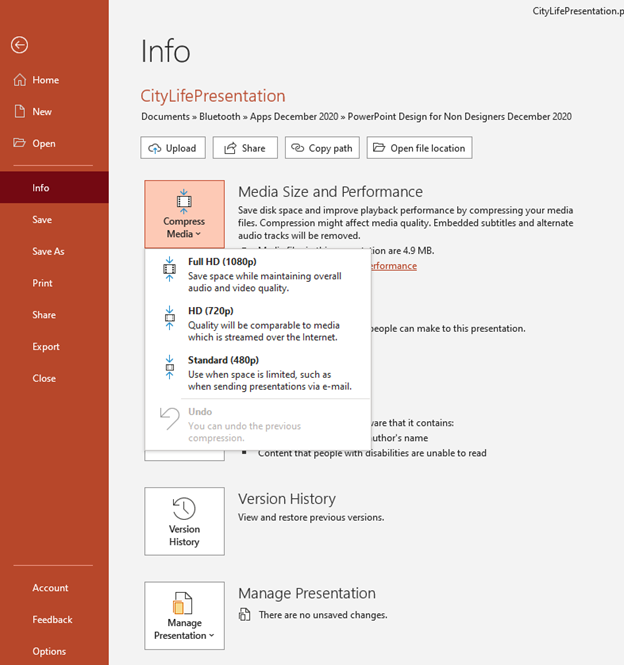
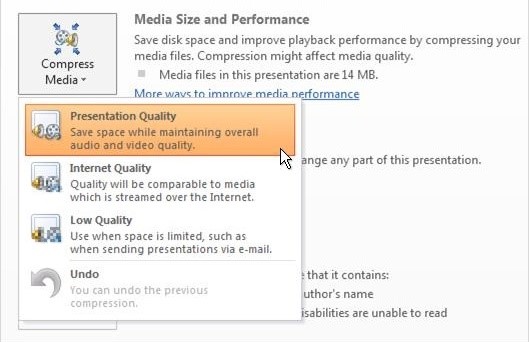
- Select a video quality. Options in 2019 and 365 include HD choices. Full HD (1080p) will save space while maintaining overall audio and video quality. HD (720p) will save space and the quality will be comparable to media streamed over the Internet. Standard (480p) will save the most space and may be used when sending presentations via email. In 2013 or 2016, the options are slightly different. Presentation Quality will save space and maintain the highest quality. Internet Quality will be comparable to media streamed over the internet. Low Quality is the lowest quality typically suited to email.
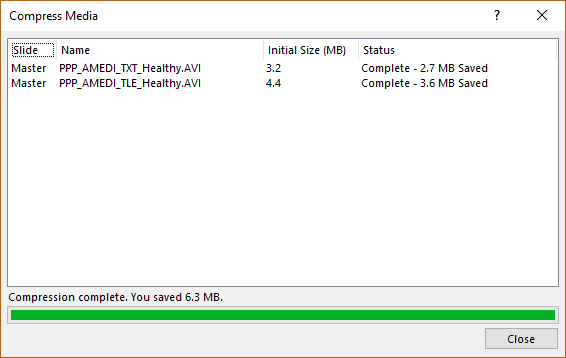
- Once you select a compression quality, a dialog box appears automatically. PowerPoint will begin the compression process and displays the status as well as the amount of space saved when completed. This process may take a while depending on media size and number of video and or audio files to compress.
- Click Close when compression is complete.
You will not be able to access Compress Media unless embedded media has been inserted into the presentation.
In PowerPoint 2019 or 365, the following drop-down menu appears when you click Compress Media:
In PowerPoint 2013 and 2016, the following drop-down menu appears when you click Compress Media:
After you select a compression option, the following dialog box appears with the status of the compression(s):
You can save a significant amount of space and reduce the file size of a PowerPoint presentation by compressing media in PowerPoint.
Subscribe to get more articles like this one
Did you find this article helpful? If you would like to receive new articles, join our email list.
More resources
How to Embed a YouTube Video in PowerPoint
PowerPoint Keyboard Shortcuts to Play and Control Video During a Slide Show
A Beginner's Guide to Video Formats in PowerPoint
How to Highlight Text in PowerPoint (5 Ways)
How to Compress Images in PowerPoint to Reduce File Size (10 Strategies)
Related courses
Microsoft PowerPoint: Intermediate / Advanced
Microsoft PowerPoint: Design for Non-Designers
Microsoft PowerPoint: Animations Bootcamp
Our instructor-led courses are delivered in virtual classroom format or at our downtown Toronto location at 18 King Street East, Suite 1400, Toronto, Ontario, Canada (some in-person classroom courses may also be delivered at an alternate downtown Toronto location). Contact us at info@avantixlearning.ca if you'd like to arrange custom instructor-led virtual classroom or onsite training on a date that's convenient for you.
Copyright 2024 Avantix® Learning
You may also like
How to Insert or Type E with an Accent Mark in PowerPoint (È, É, Ê, Ë, è, é, ê, or ë)
You can insert or type e with an accent mark in PowerPoint using built-in tools or keyboard shortcuts (including Alt code shortcuts). The letter e can be inserted with an accent in both upper or lower case in text boxes or placeholders on slides, the slide master or layouts. The following are common accents in upper or lower case – È, É, Ê, Ë, è, é, ê, or ë.
How to Fade a Picture or Part of a Picture in PowerPoint (Using a Gradient)
You can fade a picture in PowerPoint by drawing a rectangle shape on top of the picture and then filling the rectangle with a gradient from opaque to transparent. This technique is often used to fade an image into the background of a slide. Since the rectangle is placed on top of the image and then text may be placed on top of the rectangle, you may need to reorder the objects.
How to Lock an Image, Shape or Other Object in PowerPoint
You can now lock an image, shape or other object in PowerPoint. Objects can be locked in Normal View or Slide Master View. Only PowerPoint 365 users can lock objects to prevent moving and resizing. This is helpful if you want to select and move other objects on the slide or prevent others from moving or resizing an object. You can lock items using the context menu or the Selection Pane.
Microsoft, the Microsoft logo, Microsoft Office and related Microsoft applications and logos are registered trademarks of Microsoft Corporation in Canada, US and other countries. All other trademarks are the property of the registered owners.
Avantix Learning |18 King Street East, Suite 1400, Toronto, Ontario, Canada M5C 1C4 | Contact us at info@avantixlearning.ca


