Create a Pop-Up Effect When You Mouse Over an Object in PowerPoint
by Avantix Learning Team | Updated July 2, 2026
Applies to: Microsoft® PowerPoint® 2016, 2019, 2021, 2024 and 365 (Windows)
You can create a pop-up effect in PowerPoint when you hover over or mouse over text, pictures or other objects. When you hover over an object during a slide show, you can have PowerPoint jump to another slide to make it appear that an object is a pop-up. To create this type of effect, you'll need to use Action Settings and animations. The pop-up effect will occur when you hover over specific objects during a slide show.
Contents
- Create a hover over pop-up effect by linking to another slide
- Add animation to create a pop-up effect
- Preview the effect in a slide show
Recommended article: How to Group or Ungroup Objects in PowerPoint (with Shortcuts)
Do you want to learn more about PowerPoint? Check out our virtual classroom or live classroom PowerPoint courses >
Create a hover over pop-up effect by linking to another slide
You can create a hover over pop-up effect by creating a slide, duplicating it and then linking the two slides. The idea is that when you hover over an object during a slide show, the object that pops up is actually on another slide.
To create a hover over effect using two slides:
- In Normal View, display the slide with the object you want to hover over.
- Duplicate the slide (you can right-click the slide in the thumbnails and press Ctrl + D to duplicate it). The pop-up shape would be inserted on the duplicate. The shape may be a text box or a callout shape to resemble a pop-up.
- Add the shape you want to appear as a pop-up on the second slide.
- Go to the first slide and select the shape or other object that you want to hover over.
- Click the Insert tab in the Ribbon.
- In the Links group, select Action or Action Settings.
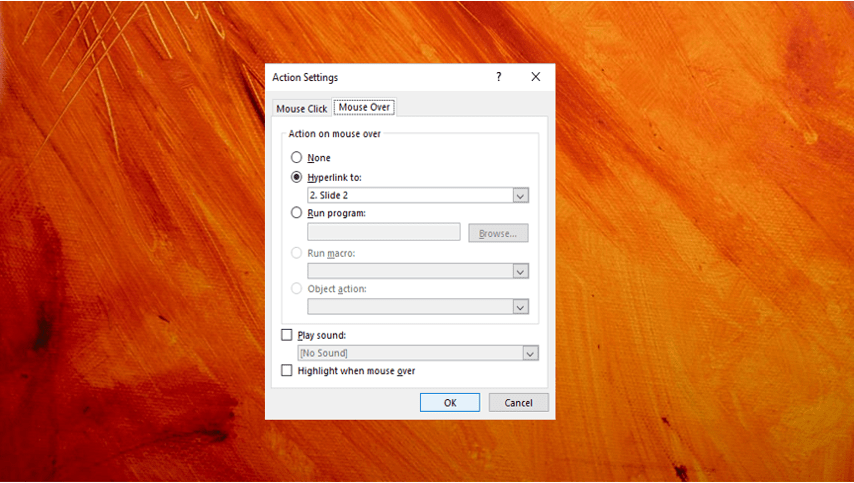
- In the Action Settings dialog box, click the Mouse Over tab.
- Select Slide … from the drop-down list under Hyperlink to. A dialog box appears.
- Select the second slide.
- Click OK twice.
- Go to the second slide and select the shape that you want to hover over.
- Click the Insert tab in the Ribbon.
- In the Links group, select Action or Action Settings.
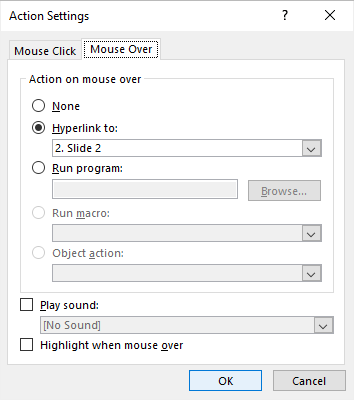
- In the Action Settings dialog box, click the Mouse Over tab.
- Select Last Slide Viewed from the drop-down list under Hyperlink to. This would return to the previous slide.
The Action Settings dialog box includes several options on the Mouse Over tab:
Add animation to create a pop-up effect
To create a hover over pop-up effect, you'll need to add an animation to the object on the second slide as follows:
- Go to the second slide and select the shape you added.
- Click the Animations tab in the Ribbon.
- In the Animations group, click the More down arrow on the bottom right of the Animations gallery.
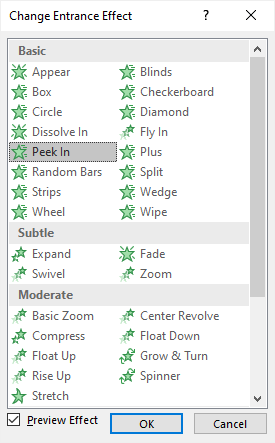
- Select More Entrance Effects from the drop-down menu. A dialog box appears.
- Click Peek In in the Basic group.
- Click OK.
- On the Animations tab, click Effect Options in the Animations group. A drop-down menu appears.
- Select From Bottom (so that the object pops up).
- On the Animations tab, in the Timing group, select With Previous from the Start drop-down menu.
Peek In appears in the More Entrance Effects dialog box:
Preview the effect in a slide show
The final step is to run the slide show to test the pop-up. Click the Slide Show button on the bottom right of the screen. Hover over the object on the first slide and then hover over the object on the second slide to test the effect.
Subscribe to get more articles like this one
Did you find this article helpful? If you would like to receive new articles, JOIN our email list.
More resources
How to Insert Slide Numbers in PowerPoint
How to Turn Off Automatic Text Resizing in PowerPoint
How to Get Design Ideas in PowerPoint Using Designer
How to Use Morph in PowerPoint to Design Engaging Presentations
How to Add Animation in PowerPoint (Animate Text, Images and Other Objects)
Related courses
Microsoft PowerPoint: Intermediate / Advanced
Microsoft PowerPoint: Design for Non-Designers
Microsoft PowerPoint: Animations Bootcamp
Our instructor-led courses are delivered in virtual classroom format or at our downtown Toronto location at 18 King Street East, Suite 1400, Toronto, Ontario, Canada (some in-person classroom courses may also be delivered at an alternate downtown Toronto location). Contact us at info@avantixlearning.ca if you'd like to arrange custom instructor-led virtual classroom or onsite training on a date that's convenient for you.
Copyright 2025 Avantix® Learning
You may also like

How to Show or Hide White Space in Word Documents
Show or Hide White Space in Microsoft Word Documents by Avantix Learning Team | Updated July 2, 2026 Applies to: Microsoft® Word® 2016, 2019, 2021, 2024 or 365 (Windows) You can show or hide white space at the top and bottom of pages in Microsoft Word documents. If...

10 Keyboard Shortcuts in PowerPoint's Outline View
Try These Handy PowerPoint Keyboard Shortcuts in Outline View by Avantix Learning Team | September 18, 2021 Applies to: Microsoft® PowerPoint® 2013, 2016, 2019 and 365 (Windows) The outline has been an integral part of Microsoft PowerPoint for many years. It is...

How to Hear a Word Document Using Speak (Text to Speech)
Turn On Speak Selected Text in Microsoft Word (All Versions) by Avantix Learning Team | Updated September 10, 2021 Applies to: Microsoft® Word® 2010, 2013, 2016, 2019 or 365 (Windows) In Microsoft Word, you can have Word speak or read a document to you. You will need...
Image credit(s) / application screenshot(s): Microsoft
Microsoft, the Microsoft logo, Microsoft Office and related Microsoft applications and logos are registered trademarks of Microsoft Corporation in Canada, US and other countries. All other trademarks are the property of the registered owners.
Avantix Learning |18 King Street East, Suite 1400, Toronto, Ontario, Canada M5C 1C4 | Contact us at info@avantixlearning.ca