Turn On Speak Selected Text in Microsoft Word (All Versions)
by Avantix Learning Team | Updated September 10, 2021
Applies to: Microsoft® Word® 2010, 2013, 2016, 2019 or 365 (Windows)
In Microsoft Word, you can have Word speak or read a document to you. You will need to add the Speak command to your Quick Access Toolbar or the Ribbon to use this feature. Once you've added the command, simply click Speak and Word will read the selected text aloud. This feature is available in all versions of Word (2010 and later).
For those with Word 2019 or 365, there is also a new Read Aloud feature on the Ribbon as an alternative to Speak.
Recommended article: 3 Simple Ways to Copy or Import Excel Data into Word (Linked or Unlinked)
Note: Buttons and Ribbon tabs may display in a different way (with or without text) depending on your version of Word, the size of your screen and your Control Panel settings. For Word 365 users, Ribbon tabs may appear with different names.
Do you want to learn more about Microsoft Word? Check out our virtual classroom or live classroom Word courses >
Adding Speak to the Quick Access Toolbar
You will need to add Speak to the Quick Access Toolbar (or the Ribbon) to use it.
It's usually easier to work with the Quick Access Toolbar if you display it below the Ribbon. If the Quick Access Toolbar is above the Ribbon, click the down arrow to the right of the Quick Access Toolbar and select Show Below the Ribbon from the drop-down menu.
To add Speak to the Quick Access Toolbar:
- Click the down arrow to the right of the Quick Access Toolbar. A drop-down menu appears.
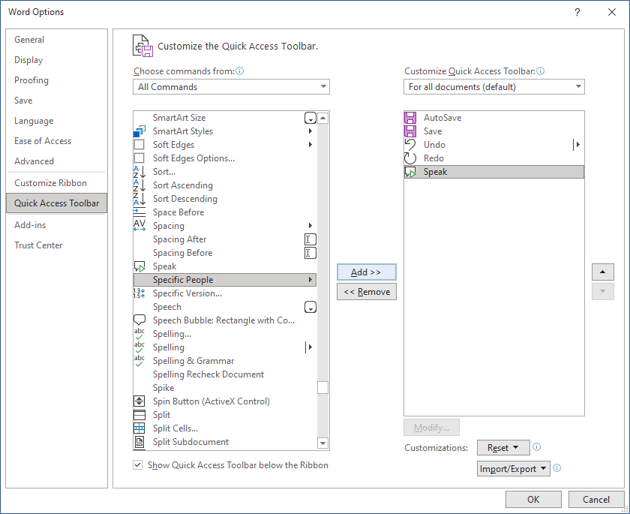
- Select More Commands. The Word Options dialog box appears. The Quick Access Toolbar category should be selected on the left.
- From the drop-down menu at the top of the dialog box below Choose commands from, select All Commands.
- In the list of commands, click Speak.
- Click Add.
- Click OK. The Speak command will be added to the Quick Access Toolbar.
In the example below, Speak has been added to the Quick Access Toolbar in the Word Options dialog box:
Speaking selected text
To speak selected text:
- Select the text you want to be read aloud. To select the entire document, press Ctrl + A to select all.
- Click Speak on the Quick Access Toolbar. Word will read the selected text (your sound must be turned on for your device).
- To turn off Speak, click the Speak again.
The voice used by Speak is set by default in your Windows Control Panel settings.
Subscribe to get more articles like this one
Did you find this article helpful? If you would like to receive new articles, join our email list.
More resources
How to Insert or Type the Delta Symbol in Word (Δ or δ)
How to Keep Text Together in Microsoft Word (Paragraphs, Lines or Words)
How to Create a Table of Contents in Word (Insert, Format and Update a TOC)
How to Insert Reusable Text Snippets in Word with Quick Parts (Great Timesaver)
How to Convert a PDF to Word in Microsoft Word (for Free – No Third Party Programs Needed)
Related courses
Microsoft Word: Intermediate / Advanced
Microsoft Excel: Intermediate / Advanced
Microsoft PowerPoint: Intermediate / Advanced
Microsoft Word: Long Documents Master Class
Microsoft Word: Styles, Templates and Tables of Contents
Microsoft Word: Designing Dynamic Word Documents Using Fields
Our instructor-led courses are delivered in virtual classroom format or at our downtown Toronto location at 18 King Street East, Suite 1400, Toronto, Ontario, Canada (some in-person classroom courses may also be delivered at an alternate downtown Toronto location). Contact us at info@avantixlearning.ca if you'd like to arrange custom instructor-led virtual classroom or onsite training on a date that's convenient for you.
Copyright 2024 Avantix® Learning
You may also like
How to Generate Random Text in Word
If you are creating a Microsoft Word document, template or mockup and you want to create placeholder text, you can generate random text using the built-in RAND function or LOREM function (which generates Latin or Lorem ipsum text).
How to Insert a Watermark in Word (like DRAFT)
You can insert a watermark in the background of one or more pages in a Microsoft Word document. Common watermarks are text such as DRAFT or CONFIDENTIAL but you can also add a picture watermark.
How to Show or Hide White Space in Word Documents
You can show or hide white space at the top and bottom of pages in Microsoft Word documents. If you hide white space, you won't be able to see headers or footers in Print Layout View or the gray space that typically appears at the top and bottom of pages as you scroll through your document.
Microsoft, the Microsoft logo, Microsoft Office and related Microsoft applications and logos are registered trademarks of Microsoft Corporation in Canada, US and other countries. All other trademarks are the property of the registered owners.
Avantix Learning |18 King Street East, Suite 1400, Toronto, Ontario, Canada M5C 1C4 | Contact us at info@avantixlearning.ca


