Make a Picture Transparent in PowerPoint
by Avantix Learning Team | Updated September 7, 2023
Applies to: Microsoft® PowerPoint® 2013, 2016, 2019, 2021 and 365 (Windows)
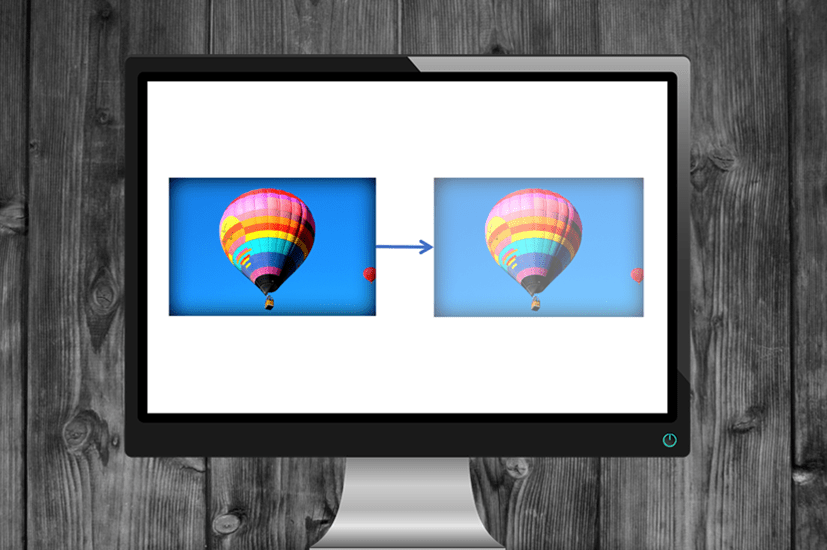
You can make a picture transparent or semi-transparent in PowerPoint in 3 ways. If you want to change the opacity of an image in newer versions of PowerPoint, you can use the Transparency command in the Ribbon or the Format Picture task pane to apply transparency. In older versions, you'll need to fill a shape with a picture and then make the shape transparent.
Note: Buttons and Ribbon tabs may display in a different way (with or without text) depending on your version of PowerPoint, the size of your screen and your Control Panel settings. For PowerPoint 365 users, Ribbon tabs may appear with different names. For example, the Picture Tools Format tab may appear as Picture Format and the Drawing Tools Format tab may appear as Drawing Format or Shape Format.
Recommended article: How to Change Picture Brightness or Contrast in PowerPoint
Do you want to learn more about PowerPoint? Check out our virtual classroom or in-person classroom PowerPoint courses >
Make a picture transparent using the Ribbon
In PowerPoint 2019, 2021 or 365, a Transparency command appears on the Picture Tools Format or Picture Format tab in the Ribbon when a picture is selected.
To make a picture transparent or semi-transparent in PowerPoint 2019, 2021 or 365:
- Select a picture on a slide in Normal View (you can also adjust a picture in Slide Master View).
- Click the Picture Tools Format or Picture Format tab in the Ribbon.
- In the Adjust group, click Transparency. A drop-down menu appears.
- Hover over the thumbnails to preview the effect and when you find the setting you want, click the thumbnail.
The Transparency drop-down menu appears as follows in the Ribbon:
Making a picture transparent using the Format Picture task pane
You can use the Format Picture task pane for more control over transparency settings.
To make a picture transparent or semi-transparent using the Format Picture task pane in PowerPoint 2019, 2021 or 365:
- Select the picture you want to adjust.
- Click the Picture Tools Format or Picture Format tab in the Ribbon.
- In the Adjust group, click Transparency. A drop-down menu appears.
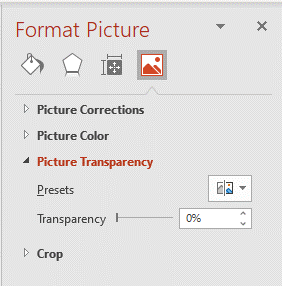
- Click More Picture Transparency Options. The Format Picture task pane appears. At the top of the task pane, the Picture icon should be selected.
- Click the arrow beside Picture Transparency to expand the area (if necessary).
- Drag the slider beside Transparency to change the settings. You can also enter a number in the box next to the slider.
The Format Picture task pane appears as follows:
Make a picture transparent by filling a shape with a picture
To make a picture transparent or semi-transparent in PowerPoint 2013 or 2016, you will need to create a shape, fill it with an image and then change its transparency settings. You will typically encounter an issue if you resize the shape as you may distort the picture. The following method will help prevent distorting or skewing the picture in the shape.
To make a picture transparent or semi-transparent in PowerPoint 2013 or 2016:
- Select a picture on a slide in Normal View (you can also adjust a picture in Slide Master View).
- Click the Insert tab in the Ribbon and then click Shapes. A drop-down menu appears.
- Select a shape (such as a rectangle) and drag on the slide to create the shape. Make sure the shape is the exact size of the picture.
- Click the rectangle or shape and click the Drawing Tools Format, Drawing Format or Shape Format tab.
- Click the picture and press Ctrl + X to cut it. It will be placed in the Clipboard.
- Right-click the rectangle or shape and choose Format Shape. The Format Shape task pane appears.
- Click Fill & Line at the top of the task pane.
- Click the arrow beside Fill to expand it.
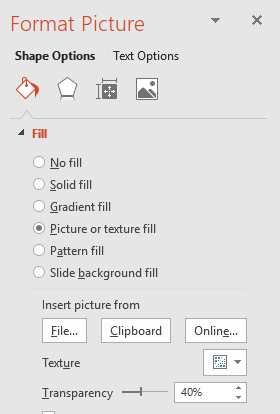
- Select Picture or texture fill.
- Click Clipboard. The image you cut will be placed in the shape.
- In the task pane, drag the Transparency slider to change the transparency settings. You can also click the up or down arrows to the right of the Transparency slider to increase or decrease the transparency or you can type directly in the Transparency value box.
- You may want to click Line in the task pane and select No Line.
- Click Size & Properties at the top of the task pane.
- Click the arrow beside Size to expand the area.
- Select Lock Aspect Ratio to lock the aspect ratio of the image to prevent distortion. The aspect ratio will be maintained if you drag a corner handle of the shape. This does not prevent users from dragging a side handle and distorting the picture. It's usually a good idea to get into the habit of holding down Shift and dragging a corner handle in case this setting has not been applied.
Below is the Format Picture task pane in PowerPoint 2013 and 2016 with Fill & Line selected:
This article was first published on May 19, 2018 and has been updated for clarity and content.
Subscribe to get more articles like this one
Did you find this article helpful? If you would like to receive new articles, JOIN our email list.
More resources
How to Highlight Text in PowerPoint (5 Ways)
How to Change Slide Background in PowerPoint
How to Lock an Image, Shape or Other Object in PowerPoint
How to Make an Object Appear and Disappear in PowerPoint
How to Remove the Background of a Picture in PowerPoint (2 Ways)
Related courses
Microsoft PowerPoint: Intermediate / Advanced
Microsoft PowerPoint: Design for Non-Designers
Our instructor-led courses are delivered in virtual classroom format or at our downtown Toronto location at 18 King Street East, Suite 1400, Toronto, Ontario, Canada (some in-person classroom courses may also be delivered at an alternate downtown Toronto location). Contact us at info@avantixlearning.ca if you'd like to arrange custom instructor-led virtual classroom or onsite training on a date that's convenient for you.
Copyright 2024 Avantix® Learning
You may also like
How to Insert or Type E with an Accent Mark in PowerPoint (È, É, Ê, Ë, è, é, ê, or ë)
You can insert or type e with an accent mark in PowerPoint using built-in tools or keyboard shortcuts (including Alt code shortcuts). The letter e can be inserted with an accent in both upper or lower case in text boxes or placeholders on slides, the slide master or layouts. The following are common accents in upper or lower case – È, É, Ê, Ë, è, é, ê, or ë.
How to Fade a Picture or Part of a Picture in PowerPoint (Using a Gradient)
You can fade a picture in PowerPoint by drawing a rectangle shape on top of the picture and then filling the rectangle with a gradient from opaque to transparent. This technique is often used to fade an image into the background of a slide. Since the rectangle is placed on top of the image and then text may be placed on top of the rectangle, you may need to reorder the objects.
How to Lock an Image, Shape or Other Object in PowerPoint
You can now lock an image, shape or other object in PowerPoint. Objects can be locked in Normal View or Slide Master View. Only PowerPoint 365 users can lock objects to prevent moving and resizing. This is helpful if you want to select and move other objects on the slide or prevent others from moving or resizing an object. You can lock items using the context menu or the Selection Pane.
Microsoft, the Microsoft logo, Microsoft Office and related Microsoft applications and logos are registered trademarks of Microsoft Corporation in Canada, US and other countries. All other trademarks are the property of the registered owners.
Avantix Learning |18 King Street East, Suite 1400, Toronto, Ontario, Canada M5C 1C4 | Contact us at info@avantixlearning.ca


