
Add, Format and View Speaker Notes in PowerPoint Decks
by Avantix Learning Team | Updated February 7, 2025
Applies to: Microsoft® PowerPoint® 2016, 2019, 2021 and 365 (Windows)
You can add speaker notes in your PowerPoint decks using the Notes pane in Normal View. Speaker notes may be viewed by a presenter during a slide show and may be printed as well. When you create your PowerPoint slides, you can add, edit and format notes. If you'd like to view notes during your presentation, you'll need to keep them short because there is a limited amount of space to view them in Presenter View. You can also format notes and they can be distributed as a standalone document as an alternative to traditional PowerPoint handouts.
Contents
- When to use speaker notes
- Add speaker notes
- Format speaker notes
- View speaker notes in Presenter View
- Turn Presenter View on or off
- Delete speaker notes
Recommended article: How to Export PowerPoint Speaker Notes to Microsoft Word
Do you want to learn more about PowerPoint? Check out our virtual classroom or live classroom PowerPoint courses >
When to use speaker notes
Speaker notes may be used for the following:
- Key talking points
- Reminders to tell an anecdote or story
- Optional and / or supporting information
- References or sources
- Links to related documents or web sites
- Reminders to start an animation or video
- Prompts to introduce or gesture to another speaker or member of the audience
- Reminders to take a break or pause
- Reminders for audience follow-up or call to action
Add speaker notes
In order to add notes, you may need to display the Notes pane first and then enter your notes.
To add speaker notes:
- Click Normal on the bottom right of the PowerPoint window to go to Normal View. You can also click the View tab in the Ribbon and select Normal in the Presentation Views group to go to Normal View.
- At the bottom of the window, if the Notes pane is not visible, click Notes in the Status Bar or click the View tab in the Ribbon and then click Notes Page.
- Click in the Notes pane and type your notes.
Depending on version, the Notes button appears in different locations in the Status Toolbar at the bottom of the PowerPoint window:
![]()
Below is a slide in Normal View. The Notes pane appears below the slide:

If your notes are longer than the Notes pane, a scroll bar appears on the right side of the pane. You can enlarge the Notes pane by positioning the mouse pointer on the top line of the pane until it turns into a double-headed arrow and then dragging upward.
Format speaker notes
You can format notes on individual slides in the Notes pane using commands on the Home tab in the Ribbon. However, it's best to format notes using the Notes Master if you want to format notes consistently throughout a presentation.
You can apply bullets in the Notes pane on individual slides in Normal View or in the Notes Master. Click Bullets on the Home tab in the Ribbon to add bullets.
If you want to format all notes, you can change the formatting of different levels in your notes and then change font size and other character formatting in the Notes Master. Bullets will appear in the Notes pane automatically but other formatting changes such as font size may not appear initially.
Below is the View tab in the Ribbon which includes the Notes Master command:

To format notes in the Notes Master:
- Click the View tab in the Ribbon.
- Click Notes Master in the Master Views group.
- Click in the Notes pane and then select each level of notes you want to format. You can press Ctrl + A to select all notes.
- Click the Home tab in the Ribbon.
- Select a font size and apply any other formatting you'd like in the Font group.
- Click the Normal button on the bottom right of the PowerPoint window to return to Normal view.
To view the formatting changes in 2013 and later versions:
- Click the View tab in the Ribbon.
- Click Outline View.
- Right-click in the Outline pane on the left side of the screen. A context menu appears.
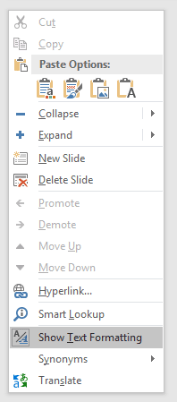
- From the menu, select Show Text Formatting. Formatting should now appear in the Notes pane.
Below is the context menu that appears when you right-click in the Outline pane:
To view notes formatting changes in 2010:
- In Normal View, click the Outline tab on the top left of the PowerPoint window.
- Right-click in the Outline pane on the left side of the screen. A context menu appears.
- From the menu, select Show Text Formatting. Formatting should now appear in the Notes pane.
Notes formatting also appears in Print Preview. To preview speaker notes:
- Click the File tab in the Ribbon and then click Print.
- Click Full Page Slides and then click Notes Pages for a preview of the notes with formatting.
View speaker notes in Presenter View
PowerPoint is set up by default to show notes to the speaker only when you run a slide show and your computer is connected to another output device such as a projector, TV or monitor. The easiest way to run a slide show is to click Slide Show on the bottom right of the PowerPoint window.
In Presenter View, speaker notes appear in a pane on the right. The text should wrap automatically and a vertical scroll bar appears if necessary. You can change the size of the text in the Notes pane in Presenter View by clicking the Increase or Decrease Font Size buttons on the lower left corner of the Notes pane:
Turn Presenter View on or off
By default, PowerPoint is set to use Presenter View when you run a slide show and you are connected to another output device.
To turn Presenter View on or off:
- In Normal or Slide Sorter View, click the Slide Show tab in the Ribbon.
- Check or uncheck the check box for Use Presenter View.
- Run the show by clicking from Beginning or From Current Slide.
Below is the Slide Show tab in the Ribbon:

Delete speaker notes
You can delete speaker notes in the Notes pane by selecting them and pressing Delete.
Subscribe to get more articles like this one
Did you find this article helpful? If you would like to receive new articles, JOIN our email list.
More resources
How to Print PowerPoint Presentations with Notes
How to Add Slide Numbers in PowerPoint (Step by Step)
How to Export PowerPoint Speaker Notes to Microsoft Word
How to Use the Built-in Laser Pointer in PowerPoint (with Shortcuts)
How to Quickly Remove All Speaker Notes in PowerPoint (PC or Mac)
Related courses
Microsoft PowerPoint: Intermediate / Advanced
Microsoft PowerPoint: Design for Non-Designers
Microsoft PowerPoint: Animations Bootcamp
Our instructor-led courses are delivered in virtual classroom format or at our downtown Toronto location at 18 King Street East, Suite 1400, Toronto, Ontario, Canada (some in-person classroom courses may also be delivered at an alternate downtown Toronto location). Contact us at info@avantixlearning.ca if you'd like to arrange custom instructor-led virtual classroom or onsite training on a date that's convenient for you.
Copyright 2025 Avantix® Learning
You may also like
How to Insert and Format Icons in PowerPoint
You can curve text in PowerPoint using WordArt Transform options on the Shape tab in the Ribbon. The text can be WordArt text or text in a text box or in a placeholder. Using Transform text effects, you can curve or bend selected text. The text can be curved around a circle or other shape if you want. Typically, curved text is inserted in Normal View and can be a word or a line of text.

How to Highlight or Draw on PowerPoint Slides During a Slide Show
You can highlight text in PowerPoint in many different ways. If you have PowerPoint 2019 or a later version, Text Highlight Color is available on the Home tab in the Ribbon. For those with older versions without a Highlight command in the Ribbon, you'll need to use other strategies to highlight text. In this article, we'll review five ways to highlight text in PowerPoint. Most of these strategies will work in all versions.
How to Highlight Text in PowerPoint (5 Ways)
You can highlight text in PowerPoint in many different ways. If you have PowerPoint 2019 or a later version, Text Highlight Color is available on the Home tab in the Ribbon. For those with older versions without a Highlight command in the Ribbon, you'll need to use other strategies to highlight text. In this article, we'll review five ways to highlight text in PowerPoint. Most of these strategies will work in all versions.
Image credit(s) / application screenshot(s): Microsoft
Microsoft, the Microsoft logo, Microsoft Office and related Microsoft applications and logos are registered trademarks of Microsoft Corporation in Canada, US and other countries. All other trademarks are the property of the registered owners.
Avantix Learning |18 King Street East, Suite 1400, Toronto, Ontario, Canada M5C 1C4 | Contact us at info@avantixlearning.ca


