Export Handouts from PowerPoint and Edit in Microsoft Word
by Avantix Learning Team | Updated April 16, 2017
Applies to: Microsoft® PowerPoint® and Word® 2007, 2010, 2013 and 2016 (Windows)
It's easy to export handouts from Microsoft PowerPoint presentations to Word. If you decide to export handouts to Word, you will be able to edit the handouts but you won't have the same choices in terms of format as handouts printed in PowerPoint (such as 6 slides horizontal).
If you're printing handouts in PowerPoint, you'll be offered a number of options (the following are available in 2016 but are similar in other versions):

However, if you export to Microsoft Word, you can edit the handouts. One of the most common choices for handouts that are exported from PowerPoint to Word is with blank lines next to the slides.
After you've exported the handouts to Word, a table will usually be created with columns for slide number, slide images and, most often, lines on the right. You can delete any of the columns in the Word document by selecting the column, right-clicking and then choosing Delete Columns from the context menu.
Recommended article: How to Quickly Remove All Animations in PowerPoint Presentations
Do you want to learn more about PowerPoint? Check out our virtual classroom or live classroom PowerPoint courses >
Export PowerPoint handouts to Word 2013 and 2016
To export handouts from PowerPoint to Word in 2013 and 2016:
- Open the PowerPoint 2013 or 2016 presentation you'd like to export to Word as handouts.
- Click the File tab in the Ribbon and select Export. A new menu appears.
- Click the Create Handouts menu item.
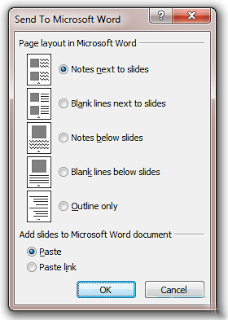
- Click the Create Handouts button. A dialog box appears.
- Select Blank lines next to slides or another option.
- Select Paste or Paste link (if you wish the Word file to update when the PowerPoint presentation is changed).
- Click OK. A Word document will open with the selected options. If you've chosen Blank lines next to slides, a table is created with the slide number, images of the slides and blank lines on the right.
Below are the options that appear when you click on the Create Handouts button in PowerPoint 2013 or 2016:
Export PowerPoint handouts to Word 2010
To export handouts from PowerPoint to Word in 2010:
- Open the PowerPoint 2010 presentation you would like to export to Word as handouts.
- Click the File tab in the Ribbon and select Save and Send. A new menu appears.
- Click the Create Handouts menu item.
- Click the Create Handouts button. A dialog box appears.
- Select Blank lines next to slides or another option.
- Select Paste or Paste link (if you wish the Word file to update when the PowerPoint presentation is changed).
- Click OK. A Word document will open with the selected options. If you've chosen Blank lines next to slides, a table is created with the slide number, images of the slides and blank lines on the right.
Below are the options that appear when you click on the Create Handouts button in PowerPoint 2010:
Export PowerPoint handouts to Word 2007
To export handouts from PowerPoint to Word in 2007:
- Open the PowerPoint 2007 presentation you would like to export to Word as handouts.
- Click the Office button in the Ribbon and select Publish. A new menu appears.
- Click the Create Handouts in Microsoft Office Word menu item.
- Click the Create Handouts button. A dialog box appears.
- Select Blank lines next to slides or another option.
- Select Paste or Paste link (if you wish the Word file to update when the PowerPoint presentation is changed).
- Click OK. A Word document will open with the selected options. If you've chosen Blank lines next to slides, a table is created with the slide number, images of the slides and lines on the right.
Below are the options that appear when you click on the Create Handouts button in PowerPoint 2007:
Editing the handouts in Word
In Word, you may want to add page numbers in the header or footer as they are not automatically created during the export process. You could also delete columns or insert another column in the table if you wish to enter other information for the audience.
Below is a sample of slides and lines next to slides in Microsoft Word where the slide number column has been deleted and headers and footers have been added:

If you'd like to add a heading above the table:
- Select the first cell of the table.
- Click the Table Tools Layout tab and click Split Table. You'll then be able to type a title above the table.

Subscribe to get more articles like this one
Did you find this article helpful? If you would like to receive new articles, join our email list
More resources
How to Rotate Objects in PowerPoint (4 Ways)
How to Animate Text, Images and Other Objects in PowerPoint
How to Remove the Background of a Picture in PowerPoint (2 Ways)
How to Insert the Square Root Symbol in Word (5 Ways to Type or Insert √)
10+ Great Microsoft Word Navigation Shortcuts to Move Around Quickly in Your Documents
Related courses
Microsoft PowerPoint: Intermediate / Advanced
Microsoft PowerPoint: Design for Non-Designers
Microsoft PowerPoint: Animations Bootcamp
Our instructor-led courses are delivered in virtual classroom format or at our downtown Toronto location at 18 King Street East, Suite 1400, Toronto, Ontario, Canada (some in-person classroom courses may also be delivered at an alternate downtown Toronto location). Contact us at info@avantixlearning.ca if you'd like to arrange custom instructor-led virtual classroom or onsite training on a date that's convenient for you.
Copyright 2025 Avantix® Learning
You may also like
How to Insert and Format Icons in PowerPoint
You can curve text in PowerPoint using WordArt Transform options on the Shape tab in the Ribbon. The text can be WordArt text or text in a text box or in a placeholder. Using Transform text effects, you can curve or bend selected text. The text can be curved around a circle or other shape if you want. Typically, curved text is inserted in Normal View and can be a word or a line of text.

How to Highlight or Draw on PowerPoint Slides During a Slide Show
You can highlight text in PowerPoint in many different ways. If you have PowerPoint 2019 or a later version, Text Highlight Color is available on the Home tab in the Ribbon. For those with older versions without a Highlight command in the Ribbon, you'll need to use other strategies to highlight text. In this article, we'll review five ways to highlight text in PowerPoint. Most of these strategies will work in all versions.

How to Highlight Text in PowerPoint (5 Ways)
You can highlight text in PowerPoint in many different ways. If you have PowerPoint 2019 or a later version, Text Highlight Color is available on the Home tab in the Ribbon. For those with older versions without a Highlight command in the Ribbon, you'll need to use other strategies to highlight text. In this article, we'll review five ways to highlight text in PowerPoint. Most of these strategies will work in all versions.
Image credit(s) / application screenshot(s): Microsoft
Microsoft, the Microsoft logo, Microsoft Office and related Microsoft applications and logos are registered trademarks of Microsoft Corporation in Canada, US and other countries. All other trademarks are the property of the registered owners.
Avantix Learning |18 King Street East, Suite 1400, Toronto, Ontario, Canada M5C 1C4 | Contact us at info@avantixlearning.ca


