Create, Modify and Apply Table Styles in Word Documents
by Avantix Learning Team | Updated January 16, 2026
Applies to: Microsoft® Word® 2016, 2019, 2021, 2024 or 365 (Windows)
You can apply table styles to your Word tables to format them quickly and consistently. Word is shipped with several built-in table styles or you can create your own. You can edit table styles by modifying borders, shading, character formatting, paragraph formatting and table properties. If your document includes multiple tables, table styles can save a lot of time.
Contents
- Working with table styles and themes
- Display table gridlines
- Apply a table style
- Apply table style options
- Modify a table style
- Create a new table style
- Clear or remove a table style
- Set a default table style
- Final words
Note: Buttons and Ribbon tabs may display in a different way (with or without text) depending on your version of Word, the size of your screen and your Control Panel settings. For newer versions of Word, Ribbon tabs may appear with different names. For example, the Table Tools Design tab may appear as Table Design.
Recommended article: How to Keep a Microsoft Word Table Together on One Page
Do you want to learn more about Microsoft Word? Check out our virtual classroom or in-person classroom Word courses >
Working with table styles and themes
Every Word document uses a document theme which includes a font theme and color theme. The colors used in table styles are based on the color theme.
You can select document themes, color themes and font themes using the Themes, Colors or Fonts drop-down menus on the Design tab in the Ribbon:

You can also create your own custom color themes so your tables can be formatted using your organization's colors.
Display table gridlines
When you are working with tables, it's a good idea to turn gridlines on. Borders, which are a format, will print. Gridlines do not print.
To display gridlines:
- Click in a table.
- Click the Table Tools Layout or Table Layout tab.
- Click View Gridlines. Gridlines will stay on for all Word documents.
View Gridlines appears on the Table Tools Layout or Table Layout tab when you click in a table:

Apply a table style
If your Word document contains multiple tables that you want to format in a consistent way, it's best to use table styles rather than applying manual or direct formatting to each table.
To apply a table style to a table:
- Click in the table.
- Click the Table Tools Design or Table Design tab in the Ribbon.
- Click the More down arrow on the bottom right in the Table Styles gallery. A drop-down menu appears.
- Hover over the various table styles. The table formatting will change as you move over different table styles in the gallery.
- Click the table style you want to apply.
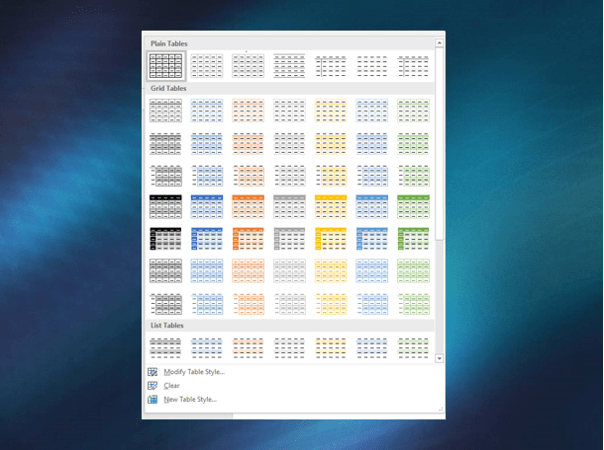
Below is the Table Styles gallery (the current theme is the Office theme):

Note: Table styles do not include row height, column width or custom cell formatting for individual cells. If a user applies manual or direct formatting to a table (such as fills and borders) on the Table Tools Design or Table Design tab, this formatting will override the table style.
Apply table style options
Once you have selected a table style, you can select or check different Table Style Options (which are affected by the formats in the selected table style).
The six Table Style Options that you can apply are: Header Row, Total Row, Banded Rows, First Column, Last Column and Banded Columns. If you have selected a plain table style, you may not notice any changes in the table formatting if you select different Table Style Options.
Table Style Options appear on the Table Tools Design or Table Design tab as follows when you click in a table:

To select Table Style Options:
- Click in the table.
- Click the Table Tools Design or Table Design tab in the Ribbon.
- In Table Style Options, check or uncheck Header Row. If this option is checked, the header row will be formatted differently from the body rows.
- In Table Style Options, check or uncheck Total Row. If this option is checked, the last row will be formatted differently from the body rows.
- In Table Style Options, check or uncheck Banded Rows or Banded Columns for alternate row or column shading.
- In Table Style Options, check First Column or Last Column if you want the first or last column formatted differently from the other columns.
In the following table, Header Row and Banded Rows are checked in Table Style Options:

Modify a table style
You can modify a table style in a Word document and all tables using that table style will change.
To modify a table style:
- Click in the table.
- Click the Table Tools Design or Table Design tab in the Ribbon.
- Click the More down arrow on the bottom right in the Table Styles gallery. A drop-down menu appears.
- Click Modify Table Style. A dialog box appears. You can also right-click a table style and select Modify.
- From the Apply Formatting to drop-down menu, select the element that you want to modify (such as Header row).
- Select the desired formatting such as font, font size, font color, fill and border.
- From the Apply Formatting to drop-down menu, select the next element that you want to modify.
- Select the desired formatting such as font, font size, font color, fill and border.
- Repeat for other elements.
- Select Only in this document or New documents based on this template. If you select Only in this document, the modified style will only be available for the current document. If you select New documents based on this template, then the table style will be modified for future documents based on the current template (usually the Normal template).
- Click OK.
Below is the Modify Style dialog box:

You can also click Format at the bottom of the dialog box and choose other options such as Font or Paragraph.
If you modify a table style and the tables using that style do not change, it's likely that direct or manual formatting has been applied to the table which then overrides the table style. You may need to clear formatting in the table by selecting the table and clicking Clear Formatting on the Home tab in the Font group.
You can also modify Table Properties in a table style. Table properties include table alignment, row settings and cell margins.
To modify Table Properties in a table style:
- Click in the table.
- Click the Table Tools Design or Table Design tab in the Ribbon.
- Click the More down arrow on the bottom right in the Table Styles gallery. A drop-down menu appears.
- Click Modify Table Style. A dialog box appears. You can also right-click a table style and select Modify.
- Click Format on the bottom left of the dialog box. A drop-down menu appears.
- Click Table Properties. A dialog box appears.
- Click the Table tab and select an Alignment.
- Click the Row tab and select the desired options. For example, turn off Allow row to break across pages.
- Select any other formatting options you want to apply to the entire table.
- Click OK.
- Select Only in this document or New documents based on this template.
- Click OK.
Below is the Table Properties dialog box with the Table tab selected:

Create a new table style
You can also create a new or custom table style.
To create a custom table style:
- Click in the table.
- Click the Table Tools Design or Table Design tab in the Ribbon.
- Click the More down arrow on the bottom right in the Table Styles gallery. A drop-down menu appears.
- Click a table style to apply it as a base style.
- Click the More down arrow on the bottom right in the Table Styles gallery. A drop-down menu appears.
- Click New Table Style. A dialog box appears.
- Enter a name for the new table style in the Name box.
- Select the desired formatting.
- Select Only in this document or New documents based on this template.
- Click OK.
New Table Style appears at the bottom of the Table Styles gallery:
The new table style will appear in the Table Styles gallery under Custom (at the top of the gallery). If you want to delete it, right-click it in the gallery and select Delete Table Style.
Clear or remove a table style
To clear a table style and remove formatting:
- Click in the table.
- Click the Table Tools Design or Table Design tab in the Ribbon.
- Click the More down arrow on the bottom right in the Table Styles gallery. A drop-down menu appears.
- Click Clear.
Clear appears at the bottom of the Table Styles gallery:
Set a default table style
You can also set a default table style for new tables in the current document or all new documents.
To set a default table style:
- Click in the table.
- Click the Table Tools Design or Table Design tab in the Ribbon.
- Click the More down arrow on the bottom right in the Table Styles gallery. A drop-down menu appears.
- Right-click the table style you want to use as the default style and select Set as Default from the drop-down menu. A dialog box appears.
- Select This document only or All documents based on the Normal.dotm template (the default template in Word is the Normal template).
- Click OK.
Final words
If you are working with documents with multiple tables, formatting with table styles can ensure that your tables are formatted consistently and save a lot of time.
This article was first published on April 22, 2020 and has been updated for clarity and content.
Subscribe to get more articles like this one
Did you find this article helpful? If you would like to receive new articles, JOIN our email list.
More resources
4 Ways to Create a Table in Word
14 Shortcuts to Quickly Select Text in Microsoft Word
How to Create Headings in Word (Using Heading Styles)
How to Quickly Remove Hard Returns in Word Documents
10 Microsoft Word Tips, Tricks and Shortcuts for Selecting in Tables
Related courses
Microsoft Word: Intermediate / Advanced
Microsoft Excel: Intermediate / Advanced
Microsoft PowerPoint: Intermediate / Advanced
Microsoft Word: Long Documents Master Class
Microsoft Word: Styles, Templates and Tables of Contents
Microsoft Word: Designing Dynamic Word Documents Using Fields
Our instructor-led courses are delivered in virtual classroom format or at our downtown Toronto location at 18 King Street East, Suite 1400, Toronto, Ontario, Canada (some in-person classroom courses may also be delivered at an alternate downtown Toronto location). Contact us at info@avantixlearning.ca if you'd like to arrange custom instructor-led virtual classroom or onsite training on a date that's convenient for you.
Copyright 2025 Avantix® Learning
You may also like

How to Cut, Copy and Paste Text in Word (5 Ways with Shortcuts)
In this guide, we'll cover 5 ways to cut, copy and paste text in Microsoft Word. A common method is to use keyboard shortcuts but you can also use the Ribbon, the context menu and a few hidden tools as well. After you paste your text, you can choose paste options such as Keep Text Only.

How to Insert or Type an Upside Down Exclamation Mark in Word (5 Ways to Insert ¡ with Shortcuts)
This guide covers five easy ways to insert or type the upside down exclamation mark (¡) in Microsoft Word including shortcuts, Alt codes and custom key combinations. The upside down exclamation mark or inverted exclamation mark is used in the Spanish language at the beginning of exclamatory sentences and helps readers understand tone before completing the sentence.

How to Insert or Type I with an Accent Mark in Word (Í, í, Ì, ì, Î, î, Ï, or ï)
You can insert or type i with an accent mark in Word using built-in tools or keyboard shortcuts (including Alt code shortcuts). The letter i can be inserted with an accent in both upper or lower case. The following are common accented characters that you can insert or type in Word in upper or lower case: grave (Ì or ì), acute (Í or í), circumflex (Î or î) and umlaut (Ï or ï).
Image credit(s) / application screenshot(s): Microsoft
Microsoft, the Microsoft logo, Microsoft Office and related Microsoft applications and logos are registered trademarks of Microsoft Corporation in Canada, US and other countries. All other trademarks are the property of the registered owners.
Avantix Learning |18 King Street East, Suite 1400, Toronto, Ontario, Canada M5C 1C4 | Contact us at info@avantixlearning.ca


