Apply and Customize Headings in Word Documents
by Avantix Learning Team | Updated April 19, 2022
Applies to: Microsoft® Word® 2010, 2013, 2016, 2019, 2021 or 365 (Windows)
You can create headings in Microsoft Word documents by applying Word's built-in heading styles (such as Heading 1 or Heading 2). After you have applied styles, you can modify them and change the font, size, color, and other formatting attributes so the entire document will update. Once you have applied heading styles, you'll be able to navigate to the headings using the Navigation Pane and create a table of contents.
Recommended article: How to Hide Comments in Word (or Display Them)
Do you want to learn more about Microsoft Word? Check out our virtual classroom or in-person classroom Word courses >
Heading styles are very important because they create structure in your documents and are readable by screen readers or assistive technology programs used by people with vision impairments. They can also save you a lot of time formatting and reformatting documents.
In addition to creating structure, heading styles are also used to:
- Generate a table of contents
- Reformat a document using Style Sets
- Navigate using the Navigation Pane (select Navigation Pane on the View tab in the Ribbon)
- Rearrange a document using the Outline View
- Create a structured PDF (portable document format) file with heading tags
Note: Screenshots in this article are from Word 365 but are very similar in previous versions of Word.
Creating headings by applying Word heading styles
To create or designate headings, you will need to apply the built-in heading styles in order (Heading 1, Heading 2, Heading 3, and so) to paragraphs. There are 9 levels of headings available in Word.
Heading styles are technically available as paragraph and character styles, but it's important to apply them as paragraph styles to entire paragraphs. A paragraph in Word is anything with a hard return after it (you have pressed Return or Enter).
Heading styles are affected by your theme choices (overall theme, color theme, and font theme). You can change theme options using the Design tab in the Ribbon.
To create headings by applying heading styles:
- Click in the paragraph (title or subheading) you want to designate or format as a heading.
- Click the Home tab in the Ribbon.
- Click the heading style you want in the Styles Gallery (such as Heading 1) in the Style group. You may need to click the More arrow on the bottom right of the Styles Gallery to view more styles and then click the style you want to use.
All available heading styles do not appear initially in the Styles Gallery. When you apply a heading level (such as Heading 3), an additional heading level should appear in the Gallery (such as Heading 4).
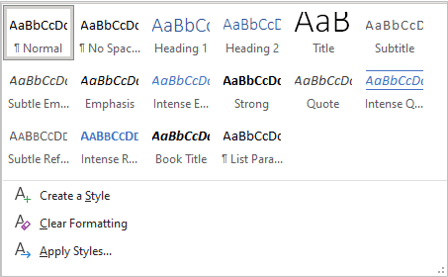
The Styles Gallery appears on the Home tab in the Ribbon and typically displays top level headings:
If you click the More arrow on the bottom right of the Styles Gallery, an expanded gallery appears:
Modifying or customizing heading styles using the Styles task pane
If you modify heading styles, every instance of the modified style will change in your document. Not only will this save time, but it will also ensure consistency. There are many ways to customize heading styles in Word. In this article, we will modify heading styles using the Styles task pane.
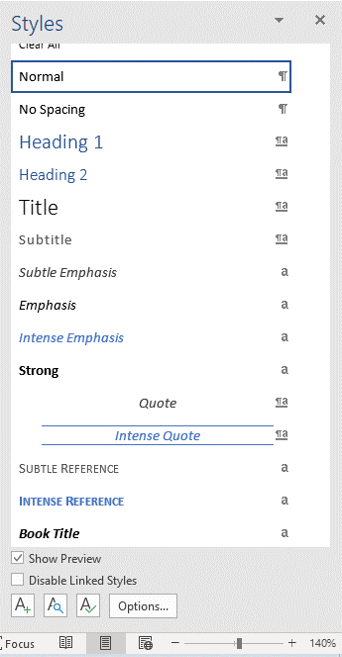
The Styles task pane appears with styles in the document (you can change this display by clicking Options at the bottom of the task pane):
To modify or customize a heading style:
- Click the Home tab in the Ribbon.
- Click the dialog box launcher (diagonal arrow) on the bottom right in the Styles group. You can also press Ctrl + Alt + Shift + S. The Styles task pane will appear. If the task pane is floating, double-click the title bar.
- Click in a paragraph using the style you want to modify.
- Click the arrow to the right of the heading you want to modify in the Styles task pane and then select Modify from the drop-down menu. You can also right-click the heading style in the task pane and select Modify. A dialog box appears.
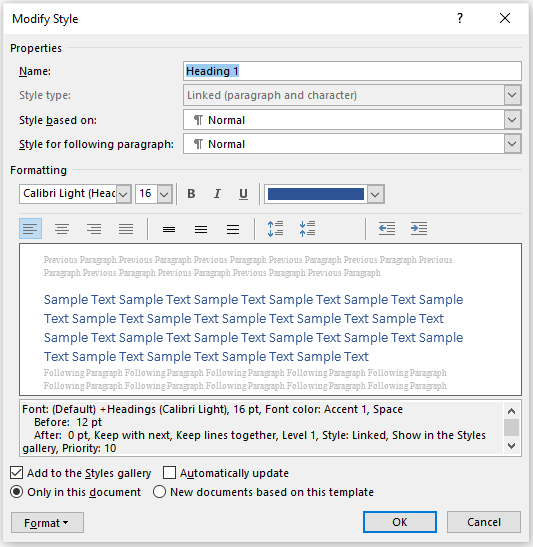
- In the Modify Style dialog box, select the desired options such as font, font size, font color, alignment, and line spacing. Buttons in this dialog box are comparable to those in the Ribbon.
- If you want to change some other formatting options (such as paragraph formats), select Format at the bottom of the dialog box and select other options from the drop-down menu.
- Select Only in this document so that the style is modified in the current document only.
- Do not select Automatically Update unless you want the document styles to update when a user changes heading formatting in the document. It's typically best to leave this option unchecked.
- Click OK or press Enter. The entire document will change unless a heading has been manually formatted (which overrides the style). You can simply reapply the style if this occurs.
The Modify Styles dialog box displays the style name, the type of style and options for modifying the style:
When you save the document, the modified styles are also saved.
Styles are the most important formatting feature in Word to automate formatting in longer documents. Heading styles also have the added benefit of creating structured documents and are integrated with several other Word features such as generated tables of contents.
This article was first published on May 15, 2021 and has been updated for clarity and content.
Subscribe to get more articles like this one
Did you find this article helpful? If you would like to receive new articles, join our email list.
More resources
How to Create a Table of Contents in Word
14+ Word Selection Shortcuts to Quickly Select Text
How to Copy Styles Between Microsoft Word Documents Using the Organizer
How to Insert Reusable Text Snippets in Word with Quick Parts (Great Timesaver)
How to Convert a PDF to Word in Microsoft Word (for Free – No Third Party Programs Needed)
Related courses
Microsoft Word: Intermediate / Advanced
Microsoft Excel: Intermediate / Advanced
Microsoft PowerPoint: Intermediate / Advanced
Microsoft Word: Long Documents Master Class
Microsoft Word: Styles, Templates and Tables of Contents
Microsoft Word: Designing Dynamic Word Documents Using Fields
To request this page in an alternate format, contact us.
Our instructor-led courses are delivered in virtual classroom format or at our downtown Toronto location at 18 King Street East, Suite 1400, Toronto, Ontario, Canada (some in-person classroom courses may also be delivered at an alternate downtown Toronto location). Contact us at info@avantixlearning.ca if you'd like to arrange custom instructor-led virtual classroom or onsite training on a date that's convenient for you.
Copyright 2024 Avantix® Learning
You may also like
How to Insert or Type I with an Accent Mark in Word (Í, í, Ì, ì, Î, î, Ï, or ï)
You can insert or type i with an accent mark in Word using built-in tools or keyboard shortcuts (including Alt code shortcuts). The letter i can be inserted with an accent in both upper or lower case. The following are common accented characters that you can insert or type in Word in upper or lower case: grave (Ì or ì), acute (Í or í), circumflex (Î or î) and umlaut (Ï or ï).
How to Insert or Type A with an Accent Mark in Word (À, Á, Â, Ä, à, á, â, or ä)
You can insert or type a with an accent mark in Word using built-in tools or keyboard shortcuts (including Alt code shortcuts). The letter a can be inserted with an accent in both upper or lower case. The following are common accented characters that you can insert or type in Word in upper or lower case: grave (À or à), acute (Á or á), circumflex (Â or â) and umlaut (Ä or ä).
10 Word Shortcuts to Select Text Using a Keyboard
You can use several shortcuts in Word to select text in your documents using only your keyboard. When you select text, it will typically be highlighted in grey. After you select text, you can cut, copy, or delete the selected text or apply character or paragraph formatting.
Microsoft, the Microsoft logo, Microsoft Office and related Microsoft applications and logos are registered trademarks of Microsoft Corporation in Canada, US and other countries. All other trademarks are the property of the registered owners.
Avantix Learning |18 King Street East, Suite 1400, Toronto, Ontario, Canada M5C 1C4 | Contact us at info@avantixlearning.ca


