3 Ways to Extract Images from a Word File
by Avantix Learning Team | Updated April 7, 2021
Applies to: Microsoft® Word® 2010, 2013, 2016, 2019 or 365 (Windows)
In Microsoft Word, images can be extracted one by one or you can extract all images by converting a Word document to a zip file or saving it as a web page. Extracting all images is helpful if you'd like to find pictures that are inflated in size or reuse pictures in other files. In this article, we'll use 3 methods to extract images (we're referring to images or pictures that have been inserted into your Word document, not shapes or SmartArt you've created).
Recommended article: How to Reduce the Size of a Microsoft Word Document (10 Ways to Compress a Word File)
Do you want to learn more about Word? Check out our virtual classroom or live classroom Word courses >
Extracting one image at a time using Save as Picture
You can extract individual images and save them as new files using Save As Picture.
There are two benefits to this method:
- You can give each image a meaningful name and save it in a specific location.
- You can save the image as a different file type.
To save an image as a new file:
- Right-click the image and then click Save as Picture from the drop-down menu.
- In the Save as type drop-down menu, select the image file format you want to use. You can save a picture in many formats but common choices are JPG or JPEG (Joint Photographics Experts Group) or PNG (Portable Network Graphics).
- In the File name box, type a name for the file.
- Navigate to the desired location.
- Click Save.
Displaying file extensions in Windows
In order to use the zip procedure (below), you may need to display file extensions in Windows if they are not showing automatically.
If you're using Windows 8 or 10:
- In File Explorer, click the View tab in the Ribbon.
- In the Show/Hide group, click the File name extensions check box.
If you're using Windows 7:
- In Windows Explorer, click Folder and Search Options and then click Organize.
- On the View tab, under Files and Folders, clear the check box for Hide extensions for known file types.
- Click OK.
Extracting all images by changing the file to a zip format
If you want to extract all images, the following trick works with any Microsoft Word file using XML (Extensible Markup Language) format. XML files are stored as a package and can therefore be unzipped. They also end with an "x" such as .docx.
In order to use the zip method, you will need a document created in Word 2007 or a later version and File Explorer or Windows Explorer must be set so that it shows file names with extensions (see the following section if extensions are not displayed).
To extract all image files from a Microsoft Word file:
- In File Explorer or Windows Explorer, select the document (it should have a .dotx extension) with the images you wish to extract.
- Right-click and choose Copy or press Ctrl + C.
- Right-click and choose Paste or press Ctrl + V.
- Right-click the copy of the document and choose Rename.
- Change the file extension from .dotx to .zip (Windows must be set to display file extensions).
- Press Enter. A dialog box appears warning you that the file may become unusable if you change the extension.
- Click Yes to continue. The file icon changes to a folder icon.
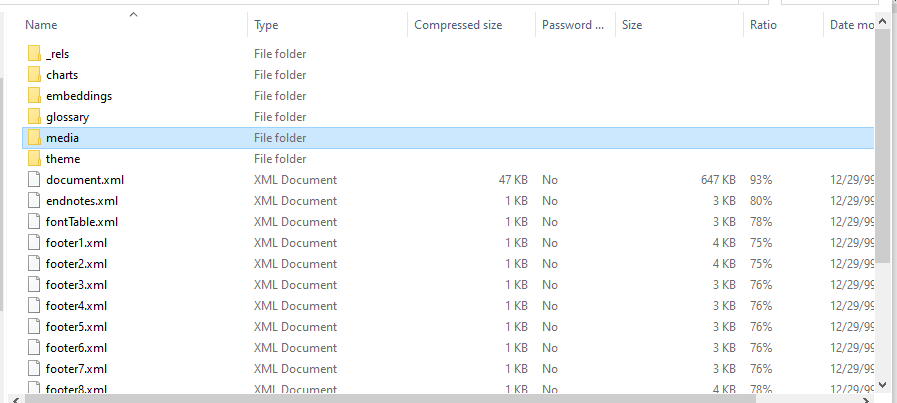
- Double-click the zipped folder. The zipped folder contains multiple folders (some contain information such as XML code or properties).
- Double-click the Word folder.
- Double-click the media folder to view image, video and audio files. Each file is given a generic name.
- Copy these files (or the entire folder) to another location to use in other documents and to rename the files. Copying to another location will unzip the files. You can also click the Extract button in Windows Explorer to extract the files to another location.
Below is a sample Word folder (with a media folder) created during this process:
Extracting all images by saving the Word file as a web page
Unlike PowerPoint, Microsoft Word files can be saved as web pages (HTML format). If you save a Word file as a web page, then separate files are created for pictures and media files.
To extract all image files from a Microsoft Word file by saving the file as a web page:
- Click the File tab in the Ribbon and select Save As.
- From the Save As Type drop-down menu, select Web Page.
- Enter a new name for the file. A .htm extension will be added.
- Click OK.
- A dialog box may appear indicating that you may lose some formatting. Click Continue. Word will change the view to Web Layout View.
- Close the file.
- In File Explorer or Windows Explorer, navigate to the location in which you had saved the file. A folder should have been created with the same name and "files" at the end.
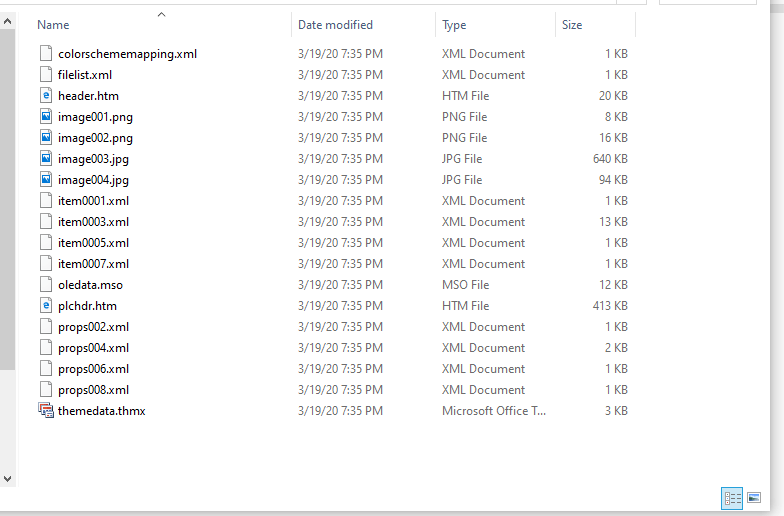
- Double-click the folder. Image, video and audio files should appear in this folder. Each file is given a generic name.
- Right-click any of the files to rename them.
Below are the contents of a folder that was created when a Word file was saved as a web page:
When you open Word again, click the View tab and select Print Layout (the default view).
It's up to you which method you'd prefer but the last two are the easiest if you are extracting multiple images.
Subscribe to get more articles like this one
Did you find this article helpful? If you would like to receive new articles, join our email list.
More resources
How to Double Space in Word (4 Ways)
14 Shortcuts to Quickly Select Text in Microsoft Word
How to Check Word Count in Microsoft Word (4 Ways)
How to Show or Hide White Space in Word Documents
How to Create a Hanging Indent or First Line Indent in Microsoft Word
Related courses
Microsoft Word: Intermediate / Advanced
Microsoft Excel: Intermediate / Advanced
Microsoft PowerPoint: Intermediate / Advanced
Microsoft Word: Long Documents Master Class
Microsoft Word: Styles, Templates and Tables of Contents
Microsoft Word: Designing Dynamic Word Documents Using Fields
Our instructor-led courses are delivered in virtual classroom format or at our downtown Toronto location at 18 King Street East, Suite 1400, Toronto, Ontario, Canada (some in-person classroom courses may also be delivered at an alternate downtown Toronto location). Contact us at info@avantixlearning.ca if you'd like to arrange custom instructor-led virtual classroom or onsite training on a date that's convenient for you.
Copyright 2024 Avantix® Learning
You may also like
How to Insert or Type I with an Accent Mark in Word (Í, í, Ì, ì, Î, î, Ï, or ï)
You can insert or type i with an accent mark in Word using built-in tools or keyboard shortcuts (including Alt code shortcuts). The letter i can be inserted with an accent in both upper or lower case. The following are common accented characters that you can insert or type in Word in upper or lower case: grave (Ì or ì), acute (Í or í), circumflex (Î or î) and umlaut (Ï or ï).
How to Insert or Type A with an Accent Mark in Word (À, Á, Â, Ä, à, á, â, or ä)
You can insert or type a with an accent mark in Word using built-in tools or keyboard shortcuts (including Alt code shortcuts). The letter a can be inserted with an accent in both upper or lower case. The following are common accented characters that you can insert or type in Word in upper or lower case: grave (À or à), acute (Á or á), circumflex (Â or â) and umlaut (Ä or ä).
10 Word Shortcuts to Select Text Using a Keyboard
You can use several shortcuts in Word to select text in your documents using only your keyboard. When you select text, it will typically be highlighted in grey. After you select text, you can cut, copy, or delete the selected text or apply character or paragraph formatting.
Microsoft, the Microsoft logo, Microsoft Office and related Microsoft applications and logos are registered trademarks of Microsoft Corporation in Canada, US and other countries. All other trademarks are the property of the registered owners.
Avantix Learning |18 King Street East, Suite 1400, Toronto, Ontario, Canada M5C 1C4 | Contact us at info@avantixlearning.ca


