Insert the Division Symbol or Sign in Microsoft Word Documents
by Avantix Learning Team | Updated December 20, 2021
Applies to: Microsoft® Word® 2013, 2016, 2019 or 365 (Windows)
You can insert the division symbol in a Word document using Insert Symbol, a keyboard shortcut, an AutoCorrect entry, an Alt shortcut or Equation tools. The division sign or symbol is different from the division operator used in calculations in a Word table or in Excel (/).
Recommended article: How to Check Word Count in Microsoft Word (4 Ways)
In this article, we'll look at 5 ways to insert the division symbol in a Word document:
- Use the Insert Symbol command
- Press Alt and then enter a number sequence
- Add and use a custom keyboard shortcut
- Add and use an AutoCorrect entry (or use an existing entry)
- Insert the symbol in an equation using Equation tools
Do you want to learn more about Microsoft Word? Check out our virtual classroom or in-person classroom Word courses >
1. Inserting the division symbol using Insert Symbol
To insert the division symbol using Insert Symbol in the Ribbon in Word:
- Position the cursor in the Word document where you want to insert the symbol.
- Click the Insert tab in the Ribbon.
- In the Symbols group, click Symbol. A drop-down menu appears.
- Click More Symbols. A dialog box appears.
- If necessary, click the Symbols tab.
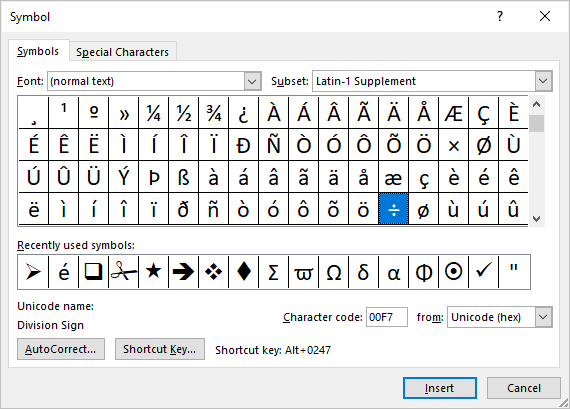
- Select (normal text) from the Font drop-down menu.
- Select Latin-1 Supplement from the Subset drop-down menu.
- Scroll through the list of symbols until you find the division symbol (÷) and then click it.
- Click Insert.
- Click Close.
The Insert Symbol dialog box appears as follows (with ÷ selected):
2. Inserting the division symbol using an Alt keyboard shortcut
To insert the division symbol in a Word document using Alt:
- Position the cursor where you want to insert the symbol.
- Press and hold Alt + 0247 on the numeric keypad.
If the sequence doesn't work, press NumLock on the numeric keypad. If you don't have a numeric keypad on your laptop, you may be able to access number keys at the top of your keyboard in combination with another key (like Fn).
3. Inserting the division symbol using a custom keyboard shortcut
If you insert the division sign frequently, you can create your own keyboard shortcut for the symbol in Word.
To create a keyboard shortcut for the division symbol:
- Position the cursor in a Word document.
- Click the Insert tab in the Ribbon.
- In the Symbols group, click Symbol. A drop-down menu appears.
- Click More Symbols. A dialog box appears.
- If necessary, click the Symbols tab.
- Select (normal text) from the Font drop-down menu.
- Select Latin-1 Supplement from the Subset drop-down menu.
- Scroll through the list of symbols until you find the division symbol (÷) and then click it.
- Click Shortcut. A dialog box appears.
- Click in the box below Assign New Shortcut key.
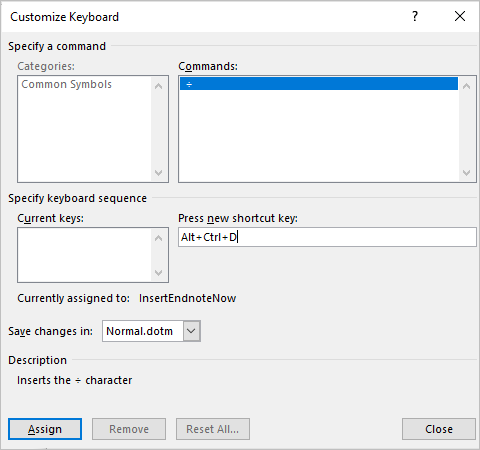
- Press the keys you want to assign (such as Ctrl + Alt + D). Don't type any text, just press the keys. Be careful not to override a useful built-in shortcut such as Ctrl + D.
- Click Assign. Typically the location for these shortcuts is the Normal (or default) template.
- Click Close twice.
Test the shortcut in your document by pressing the assigned keys.
The Customize Keyboard dialog box appears as follows:
Since these shortcuts are typically saved in the Normal template, when you exit Word, if you are prompted to save the Normal template, click Yes.
4. Inserting the division symbol using AutoCorrect
You can also insert the division sign automatically using AutoCorrect.
To set up an AutoCorrect entry for the division sign:
- Position the cursor in a Word document.
- Click the Insert tab in the Ribbon.
- In the Symbols group, click Symbol. A drop-down menu appears.
- Click More Symbols. A dialog box appears.
- If necessary, click the Symbols tab.
- Select (normal text) from the Font drop-down menu.
- Select Latin-1 Supplement from the Subset drop-down menu.
- Scroll through the list of symbols until you find the division symbol (÷) and then click it.
- Click AutoCorrect. A dialog box appears.
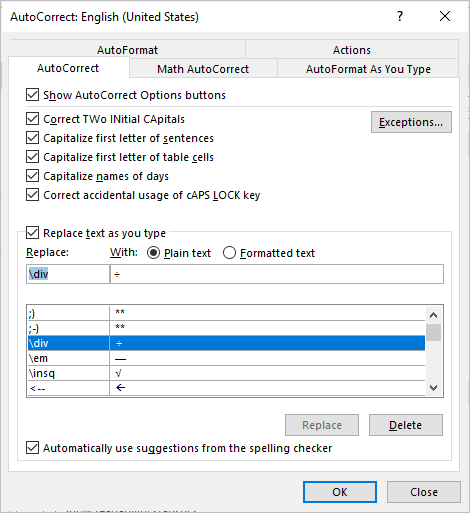
- In the Replace with box, enter the name of the entry (such as \div).
- Click Add.
- Click OK.
- Click Close.
- In the document, type the entry (such as \div) and then press the Spacebar.
The AutoCorrect dialog box appears as follows:
Since these shortcuts are typically saved in the Normal template, when you exit Word, if you are prompted to save the Normal template, click Yes.
If you insert an equation block in Word, you can insert symbols using Math AutoCorrect entries (note the Math AutoCorrect tab in the AutoCorrect Options dialog box). Simply type \div and then press the Spacebar (this is the default Math Autocorrect entry for this symbol). This can be used outside of an equation block as well as long as Math AutoCorrect is set to Use Math AutoCorrect options outside of math regions.
5. Inserting the division symbol in an equation block or placeholder
If you insert an equation in Word, an Equation tab will appear in the Ribbon when the equation block or placeholder is selected and you can simply click the division symbol in the Ribbon to insert it into the equation.
To insert the division symbol in an equation block or placeholder:
- Click in the document where you want to enter an equation.
- Click the Insert tab in the Ribbon.
- In the Symbols group, click Equation to insert a new equation block or placeholder. Alternatively, type Alt + equal sign (=). You can also use an existing equation block or placeholder.
- Click in the equation block or placeholder.
- Click the Equation tab in the Ribbon.
- Click the More arrow on the bottom right of the Symbols gallery.
- At the top of the Symbols gallery, select Basic Math from drop-down menu (typically, this is the default).
- Click the division sign.
You can also type \div in an equation block and then press the Spacebar to use the default Math Autocorrect entry for this symbol.
Subscribe to get more articles like this one
Did you find this article helpful? If you would like to receive new articles, join our email list.
More resources
How to Generate Random Text in Word
14+ Shortcuts to Quickly Select Text in Microsoft Word
How to Show or Hide White Space in Word Documents
10+ Great Microsoft Word Navigation Shortcuts to Move Around Quickly in Your Documents
How to Insert a Check Mark in Word (5 Ways to Insert a Check Mark or Tick Mark with Shortcuts)
Related courses
Microsoft Word: Intermediate / Advanced
Microsoft Excel: Intermediate / Advanced
Microsoft PowerPoint: Intermediate / Advanced
Microsoft Word: Long Documents Master Class
Microsoft Word: Styles, Templates and Tables of Contents
Microsoft Word: Designing Dynamic Word Documents Using Fields
Our instructor-led courses are delivered in virtual classroom format or at our downtown Toronto location at 18 King Street East, Suite 1400, Toronto, Ontario, Canada (some in-person classroom courses may also be delivered at an alternate downtown Toronto location). Contact us at info@avantixlearning.ca if you'd like to arrange custom instructor-led virtual classroom or onsite training on a date that's convenient for you.
Copyright 2024 Avantix® Learning
You may also like
How to Insert or Type I with an Accent Mark in Word (Í, í, Ì, ì, Î, î, Ï, or ï)
4 Ways to Insert I with an Accent in Word by Avantix Learning Team | Updated July 14, 2024 Applies to: Microsoft® Word® 2016, 2019, 2021 or 365 (Windows) You can insert or type i with an accent mark in Word using built-in tools or keyboard shortcuts (including Alt...
How to Insert or Type A with an Accent Mark in Word (À, Á, Â, Ä, à, á, â, or ä)
4 Ways to Insert A with an Accent in Word by Avantix Learning Team | Updated July 16, 2024 Applies to: Microsoft® Word® 2016, 2019, 2021 or 365 (Windows) You can insert or type a with an accent mark in Word using built-in tools or keyboard shortcuts (including Alt...
10 Word Shortcuts to Select Text Using a Keyboard
10 Timesaving Shortcuts to Select Text in Word Using Only a Keyboard by Avantix Learning Team | Updated March 21, 2024 Applies to: Microsoft® Word® 2013, 2016, 2019, 2021 or 365 (Windows) You can use several shortcuts in Word to select text in your documents using...
Microsoft, the Microsoft logo, Microsoft Office and related Microsoft applications and logos are registered trademarks of Microsoft Corporation in Canada, US and other countries. All other trademarks are the property of the registered owners.
Avantix Learning |18 King Street East, Suite 1400, Toronto, Ontario, Canada M5C 1C4 | Contact us at info@avantixlearning.ca


