Try Out These Shortcuts to Save Time using Word Styles
by Avantix Learning Team | Updated April 9, 2021
Applies to: Microsoft® Word® 2010, 2013, 2016, 2019 and 365 (Windows)
Styles are one of the biggest timesavers in Microsoft Word and a must in longer documents. A style contains a set of formatting instructions which are applied when you apply a style. Styles can then be updated in a couple of steps. Microsoft Word ships with many built-in styles and the default style is the Normal style.
Recommended article: No Mouse? Using Keyboard Only Navigation in Microsoft Office
The following are some great shortcuts you can use with styles in Word.
1. Apply the Normal style
Select the text or paragraph and then press Ctrl + Shift + N.
2. Apply the Heading 1 style
Select the text or paragraph and then press Ctrl + Alt + 1.
3. Apply the Heading 2 style
Select the text or paragraph and then press Ctrl + Alt + 2.
4. Apply the Heading 3 style
Select the text or paragraph and then press Ctrl + Alt + 3.
5. Apply the list bullet style
Select the paragraph and then press Ctrl + Shift + L.
6. Promote or demote a heading
Select the paragraph and then press Alt + Shift + left arrow (promotes to the next highest level such as Heading 3 to Heading 2) or Alt + Shift + right arrow (demotes to the next lowest level such as Heading 2 to Heading 3).
7. Remove all manual character formatting
Select the text or paragraph and then press Ctrl + Spacebar (removes all manual character formatting but leaves the style formatting).
8. Remove all manual paragraph formatting
Select the paragraph and then press Ctrl + Q (removes all manual paragraph formatting but leaves the style formatting).
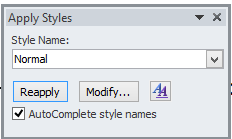
9. Apply a Style using the Apply Styles dialog box
Select the text or paragraph and then press Ctrl + Shift + S. You can then type a name of a style and press Enter to apply.
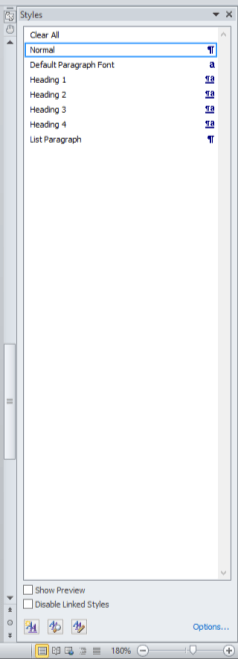
10. Apply a style using the Styles task pane
Select the text or paragraph and then press Ctrl + Alt + Shift + S. Select the style you wish to apply in the task pane. To navigate the task pane using only a keyboard, check out No Mouse? Using Keyboard Only Navigation in Microsoft Office (Part 3: Task Panes).
Subscribe to get more articles like this one
Did you find this article helpful? If you would like to receive new articles, join our email list.
More resources
How to Update All Figure Numbers in a Microsoft Word
5 Ways to Insert or Type the Square Root Symbol in Word (√)
How to Insert, Format and Update Cross-References in Word
How to Insert Reusable Text Snippets in Word with Quick Parts (Great Timesaver)
How to Convert a PDF to Word in Microsoft Word (for Free – No Third Party Programs Needed)
Related courses
Microsoft Word: Intermediate / Advanced
Microsoft Word: Styles, Templates and Tables of Contents
Microsoft Word: Designing Dynamic Word Documents Using Fields
Microsoft Word: Long Documents Master Class
Microsoft Word: Accessible Word Documents
Our instructor-led courses are delivered in virtual classroom format or at our downtown Toronto location at 18 King Street East, Suite 1400, Toronto, Ontario, Canada (some in-person classroom courses may also be delivered at an alternate downtown Toronto location). Contact us at info@avantixlearning.ca if you'd like to arrange custom instructor-led virtual classroom or onsite training on a date that's convenient for you.
Copyright 2024 Avantix® Learning
You may also like
How to Insert or Type I with an Accent Mark in Word (Í, í, Ì, ì, Î, î, Ï, or ï)
You can insert or type i with an accent mark in Word using built-in tools or keyboard shortcuts (including Alt code shortcuts). The letter i can be inserted with an accent in both upper or lower case. The following are common accented characters that you can insert or type in Word in upper or lower case: grave (Ì or ì), acute (Í or í), circumflex (Î or î) and umlaut (Ï or ï).
How to Insert or Type A with an Accent Mark in Word (À, Á, Â, Ä, à, á, â, or ä)
You can insert or type a with an accent mark in Word using built-in tools or keyboard shortcuts (including Alt code shortcuts). The letter a can be inserted with an accent in both upper or lower case. The following are common accented characters that you can insert or type in Word in upper or lower case: grave (À or à), acute (Á or á), circumflex (Â or â) and umlaut (Ä or ä).
10 Word Shortcuts to Select Text Using a Keyboard
You can use several shortcuts in Word to select text in your documents using only your keyboard. When you select text, it will typically be highlighted in grey. After you select text, you can cut, copy, or delete the selected text or apply character or paragraph formatting.
Microsoft, the Microsoft logo, Microsoft Office and related Microsoft applications and logos are registered trademarks of Microsoft Corporation in Canada, US and other countries. All other trademarks are the property of the registered owners.
Avantix Learning |18 King Street East, Suite 1400, Toronto, Ontario, Canada M5C 1C4 | Contact us at info@avantixlearning.ca


