Applying Kerning Automatically or Manually in Word to Control Character Spacing
by Avantix Learning Team | Updated December 28, 2021
Applies to: Microsoft® Word® 2013, 2016, 2019, 2021 or 365 (Windows)
Kerning can be used in Microsoft Word to increase or decrease the spacing between characters. You have the option of turning on automatic kerning or you can manually control kerning by expanding or condensing spacing.
When a font designer creates a font or typeface, spacing between characters is integrated into the font by default. Specific characters or letter pairs are spaced closer together and some are spaced farther apart. Depending on the font, certain characters may seem to be spaced too far apart.
Recommended article: How to Check Word Count in Microsoft Word (4 Ways)
The goal when you apply kerning is to make text more readable and legible. Some fonts or typefaces may require kerning with some letter pairs while others may not. Kerning tends to be used most often with larger text such as a heading. However, if you apply kerning to larger text (let's say 48 point) and then change it to a smaller size (like 24 point), you should check the kerning or character spacing you have applied as it may need to be changed. Therefore, it's often a good idea to leave kerning until the end of the editing process.
Turning on automatic kerning to change character spacing
To turn on automatic kerning in a Word document:
- Select the text with the spacing between characters you want to adjust.
- Press Ctrl + D. You can also select the Home tab in the Ribbon and select the dialog box launcher on the bottom right corner of the Font group or right-click in the text and select Font from the drop-down menu. The Font dialog box appears.
- Click the Advanced tab.
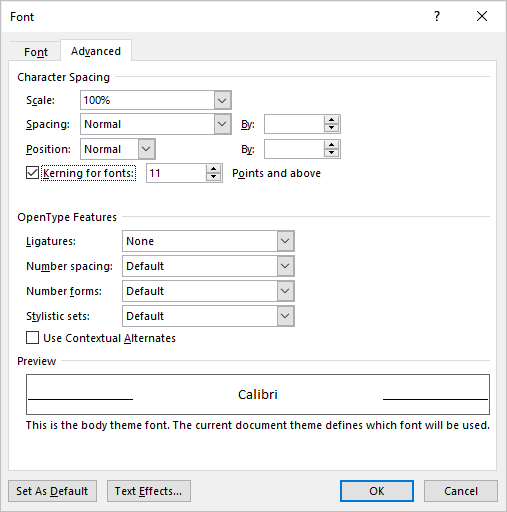
- Select or check the Kerning for fonts check box.
- Enter a font size (such as 12) in points to the right of Kerning for fonts. You can also click the up or down arrows to choose a font size. Kerning will be applied to fonts of the selected size and above.
- Click OK.
The Font dialog box appears as follows with Kerning for fonts (automatic kerning) turned on:
Applying manual kerning using expanded or condensed spacing
To adjust spacing between characters manually, you will need to change Spacing settings:
- Select the text with the spacing between characters you want to adjust.
- Press Ctrl + D. You can also select the Home tab in the Ribbon and select the dialog box launcher on the bottom right corner of the Font group or right-click in the text and select Font from the drop-down menu. The Font dialog box appears.
- Click the Advanced tab.
- Deselect or uncheck the Kerning for fonts check box.
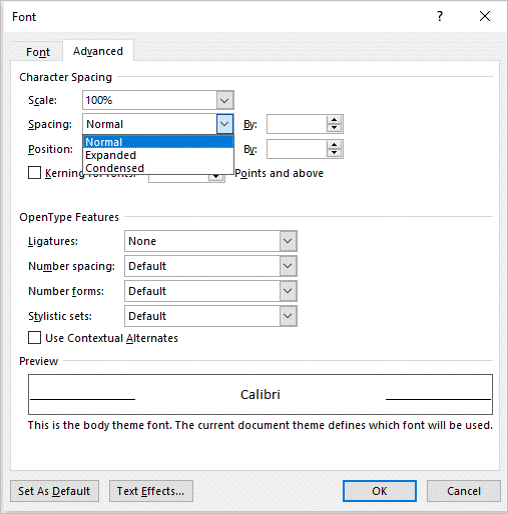
- Beside Spacing, select Expanded (to increase the space between characters) or Condensed (to decrease the space between characters) from the drop-down menu.
- In the By box to the right of spacing, click the up or down arrows to increase or decrease the amount, in points, by which the text is expanded or condensed.
- Click OK.
The Font dialog box appears as follows with options for Normal, Expanded or Condensed spacing:
In some other programs, this type of spacing is called tracking. It's typically a better idea to expand text rather than condense it. You also should avoid text being too loose or too tight as the text can be difficult to read for those with vision impairments or cognitive disabilities.
Subscribe to get more articles like this one
Did you find this article helpful? If you would like to receive new articles, join our email list.
More resources
How to Generate Random Text in Word
14+ Shortcuts to Quickly Select Text in Microsoft Word
How to Show or Hide White Space in Word Documents
10+ Great Microsoft Word Navigation Shortcuts to Move Around Quickly in Your Documents
How to Insert a Check Mark in Word (5 Ways to Insert a Check Mark or Tick Mark with Shortcuts)
Related courses
Microsoft Word: Intermediate / Advanced
Microsoft Word: Long Documents Master Class
Microsoft Word: Styles, Templates and Tables of Contents
Microsoft Word: Designing Dynamic Word Documents Using Fields
Our instructor-led courses are delivered in virtual classroom format or at our downtown Toronto location at 18 King Street East, Suite 1400, Toronto, Ontario, Canada (some in-person classroom courses may also be delivered at an alternate downtown Toronto location). Contact us at info@avantixlearning.ca if you'd like to arrange custom instructor-led virtual classroom or onsite training on a date that's convenient for you.
Copyright 2024 Avantix® Learning
You may also like
How to Insert or Type A with an Accent Mark in Word (À, Á, Â, Ä, à, á, â, or ä)
3 Ways to Insert A with an Accent in Word Documents by Avantix Learning Team | Updated April 20, 2024 Applies to: Microsoft® Word® 2016, 2019, 2021 or 365 (Windows) You can insert or type a with an accent mark in Word using built-in tools or keyboard shortcuts...
10 Word Shortcuts to Select Text Using a Keyboard
10 Timesaving Shortcuts to Select Text in Word Using Only a Keyboard by Avantix Learning Team | Updated March 21, 2024 Applies to: Microsoft® Word® 2013, 2016, 2019, 2021 or 365 (Windows) You can use several shortcuts in Word to select text in your documents using...
How to Generate Random Text in Word
Generate Random Text in Microsoft Word Documents (Like Lorem Ipsum or Latin Text) by Avantix Learning Team | Updated May 4, 2023 Applies to: Microsoft® Word® 2010, 2013, 2016, 2019, 2021 and 365 (Windows) If you are creating a Microsoft Word document, template or...
Microsoft, the Microsoft logo, Microsoft Office and related Microsoft applications and logos are registered trademarks of Microsoft Corporation in Canada, US and other countries. All other trademarks are the property of the registered owners.
Avantix Learning |18 King Street East, Suite 1400, Toronto, Ontario, Canada M5C 1C4 | Contact us at info@avantixlearning.ca


