Insert Fields in a Microsoft Word Document to Display Variable Content
by Avantix Learning Team | Updated January 10, 2021
Applies to: Microsoft® Word® 2010, 2013, 2016, 2019 or 365 (Windows)
You can insert built-in or custom fields in Word documents to display variable content that will change when you update the fields. Some fields (like page numbers, merge fields or cross-references) are inserted automatically when you use Microsoft Word features. If you want to insert custom fields, you will need to create custom document properties.
By default, Word displays the result of a field rather than its field codes. You can right-click a field and select Toggle Field Codes to display field codes or field results.
Recommended article: How to Hide Comments in Word (or Display Them)
Do you want to learn more about Microsoft Word? Check out our virtual classroom or live classroom Word courses >
If you are working with fields in Microsoft Word, you will be using quite a few function keys (such as F9). On some laptops, you will need to press the Fn key on your keyboard to enable your function keys. For example, instead of pressing F9 to update a field or fields, you would press Fn + F9.
Inserting built-in fields
To insert a field, click Quick Parts in the Text group on the Insert tab in the Ribbon. The Field command appears in the Quick Parts drop-down menu as follows:

Below is the Field dialog box in Microsoft Word with Page selected:

To insert a built-in field using the Field dialog box:
- Navigate to the location in the Word document where you want to insert a field.
- Click the Insert tab in the Ribbon and then click Quick Parts in the Text group. A drop-down menu appears.
- Select Field. A dialog box appears.
- In the list of Field names, select a field. You can filter the list by clicking the down arrow in the Categories list and selecting a category first. Select All to display all fields.
- Under Field properties, select any properties or options you want.
- To view the codes for a field in the Field box, click Field Codes. For some fields, this button is clicked by default.
- Ensure that Preserve Formatting During Updates is checked so that formatting you apply is not removed when the fields are updated.
- Click OK. The field is inserted into the document.
Format the field results by applying text formatting to the field using the Home tab in the Ribbon.
You can view or hide all field codes in your document by pressing Alt + F9. Field codes appear between braces or curly brackets { } and you cannot type these braces. Be sure to hide the field codes again by pressing Alt + F9.
To edit a built-in field in the Field dialog box:
- Right-click the field and then click Edit Field. A dialog box appears.
- Change the field properties and options.
- Click OK.
Understanding Word document properties
There are 3 different types of document properties in Word:
- Standard document properties (also called built-in document properties)
- Custom document properties
- Document library properties
Word documents contain a set of standard document properties such as Title, Author, Keywords and Comments. These properties are used to store metadata about your document. You cannot change the name of standard properties but you can edit the value of some of them (such as Title). Other standard properties that cannot be edited store data that is updated automatically (such as Size or Last Modified).
Document library properties are related to documents that are stored in a document library on a website or in a public folder (such as files in SharePoint).
In addition to the standard properties, you can create your own custom document properties. These properties can be created to store additional information in a document other than the standard document properties. For example, custom document properties could be created for Product1, Product2, Product3, Sponsor, Project Manager, Cell Phone or Disclaimer. Each custom document property must be assigned a name, a data type and a value. The four data types are Text, Date, Number and Yes or No.
After you create custom document properties for your Word document, you can then insert them as custom fields.
Adding a custom document property
To add a custom document property:
- Open the Word document in which you want to add a custom document property.
- Click the File tab in the Ribbon and then click Info on the left. Info is usually selected by default.
- On the right side of screen, click Properties. A drop-down menu appears.
- Select Advanced Properties. A dialog box appears.
- Click the Custom tab in the dialog box.
- Type a name for the custom document property in the Name box. You can also choose one of the other properties that appear in the drop-down list.
- Select Text, Date, Number or Yes or No as the data type for the custom property.
- Enter a value for the property in the Value box.
- Click Add. The custom property appears in the list at the bottom of the dialog box.
- Click OK.
After you have added a custom document property, you will be able to insert it into your document as a field.
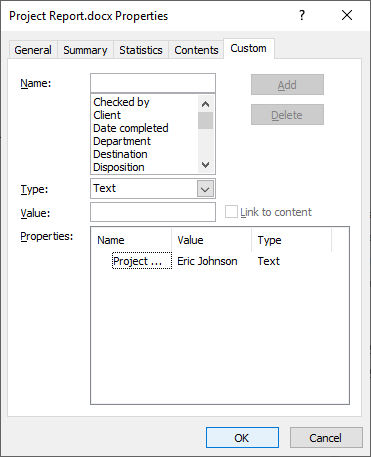
In the example below, we're adding a field for Project Manager:

After you click Add, the custom field appears in the Properties list:
Inserting custom document property fields
The value of a custom document property can be inserted in a Word document using DocProperty fields. Custom document properties that have been added to a document are saved with the document whether they are inserted as a DocProperty field or not. You can insert DocProperty fields multiple times in a document.
To insert a custom document property field using the Field dialog box:
Navigate to the location in the Word document where you want to insert a field.
- Click the Insert tab in the Ribbon and then click Quick Parts in the Text group. A drop-down menu appears.
- Select Field. A dialog box appears.
- In the list of Field names on the left, select DocProperty.
- Under Field properties, select a property name.
- To view the codes for a field in the Field box, click Field Codes. For some fields, this button is clicked by default.
- Ensure that Preserve Formatting During Updates is checked so that formatting you apply is not removed when the fields are updated.
- Click OK. The field is inserted into the document.
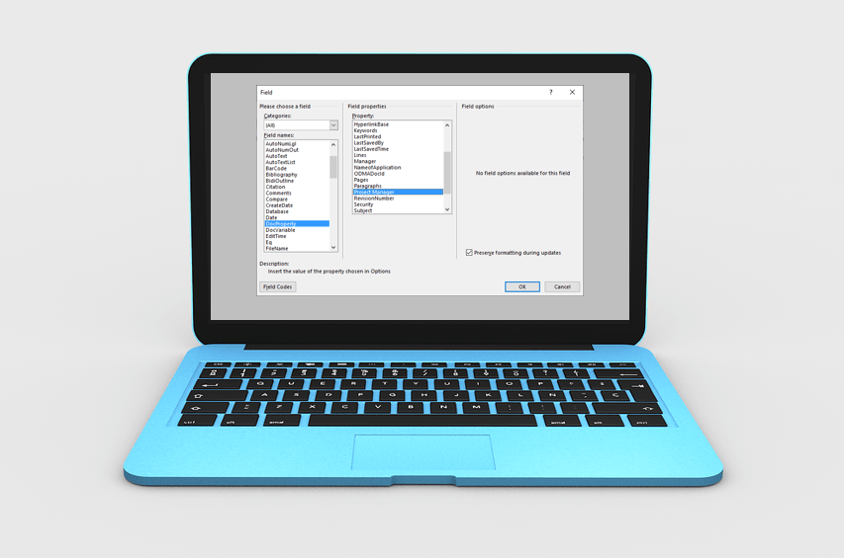
In the example below, we're inserting the custom Project Manager field we created in Advanced Properties:

Updating built-in and custom fields
Word should automatically update fields when a document is opened. Many fields are also updated automatically when you go to Print Preview (click the File tab and then click Print). If you prefer, you can update fields manually.
To update a field manually, right-click the field and then click Update Field or press F9.
To update all fields manually in the main body of a document, press Ctrl + A to select all and then press F9.
Some fields in headers, footers or text boxes must be updated separately. Click in the header, footer or text box, press Ctrl + A to select all and then press F9. Page fields do not need to be updated manually because they update when you go the Print Preview.
If you want to edit a custom DocProperty field, you will need to edit it in the Advanced Properties dialog box.
Subscribe to get more articles like this one
Did you find this article helpful? If you would like to receive new articles, join our email list.
More resources
How to Create, Save, Edit and Use Templates in Word
How to Insert, Format and Update Cross-References in Word
5 Ways to Insert the Division Symbol in Word (Type or Insert ÷)
10 Microsoft Word Tips, Tricks and Shortcuts for Selecting in Tables
How to Create a Table of Contents in Word (Insert, Format and Update a TOC)
Related courses
Microsoft Word: Intermediate / Advanced
Microsoft Excel: Intermediate / Advanced
Microsoft PowerPoint: Intermediate / Advanced
Microsoft Word: Long Documents Master Class
Microsoft Word: Styles, Templates and Tables of Contents
Microsoft Word: Designing Dynamic Word Documents Using Fields
Our instructor-led courses are delivered in virtual classroom format or at our downtown Toronto location at 18 King Street East, Suite 1400, Toronto, Ontario, Canada (some in-person classroom courses may also be delivered at an alternate downtown Toronto location). Contact us at info@avantixlearning.ca if you'd like to arrange custom instructor-led virtual classroom or onsite training on a date that's convenient for you.
Copyright 2025 Avantix® Learning
You may also like

How to Cut, Copy and Paste Text in Word (5 Ways with Shortcuts)
In this guide, we'll cover 5 ways to cut, copy and paste text in Microsoft Word. A common method is to use keyboard shortcuts but you can also use the Ribbon, the context menu and a few hidden tools as well. After you paste your text, you can choose paste options such as Keep Text Only.

How to Insert or Type an Upside Down Exclamation Mark in Word (5 Ways to Insert ¡ with Shortcuts)
This guide covers five easy ways to insert or type the upside down exclamation mark (¡) in Microsoft Word including shortcuts, Alt codes and custom key combinations. The upside down exclamation mark or inverted exclamation mark is used in the Spanish language at the beginning of exclamatory sentences and helps readers understand tone before completing the sentence.

How to Insert or Type I with an Accent Mark in Word (Í, í, Ì, ì, Î, î, Ï, or ï)
You can insert or type i with an accent mark in Word using built-in tools or keyboard shortcuts (including Alt code shortcuts). The letter i can be inserted with an accent in both upper or lower case. The following are common accented characters that you can insert or type in Word in upper or lower case: grave (Ì or ì), acute (Í or í), circumflex (Î or î) and umlaut (Ï or ï).
Image credit(s) / application screenshot(s): Microsoft
Microsoft, the Microsoft logo, Microsoft Office and related Microsoft applications and logos are registered trademarks of Microsoft Corporation in Canada, US and other countries. All other trademarks are the property of the registered owners.
Avantix Learning |18 King Street East, Suite 1400, Toronto, Ontario, Canada M5C 1C4 | Contact us at info@avantixlearning.ca


