Use Keyboard Shortcuts to Apply Bullet Points to Paragraphs in Word
by Avantix Learning Team | Updated February 10, 2023
Applies to: Microsoft® Word® 2010, 2013, 2016, 2019, 2021 or 365 (Windows)
You can add bullet points in Microsoft Word documents using several keyboard shortcuts. Since bullets are best applied as a paragraph format, the following shortcuts apply to paragraphs. A paragraph is anything with a hard return after it.
Recommended article: How to Turn Off Automatic Bullets and Numbering in Word
Insert default bullet points using Word's built-in keyboard shortcut
To insert default bullet points using Word's built-in keyboard shortcut:
- Select the paragraphs to which you want to apply bullets (insert at the beginning).
- Press Ctrl + Shift + L. Word will apply the default bullets and apply indents to the paragraphs.
Insert bullet points using the Bullets drop-down menu
To insert bullet points using the Bullets drop-down menu:
- Select the paragraphs to which you want to apply bullets (insert at the beginning).
- Press Alt > H > U (Alt and then H and then U). A drop-down menu appears.
- Press the right arrow to move through the different types of bullets.
- Press Enter to select the highlighted bullet. Word will apply the bullets and apply indents to the paragraphs.
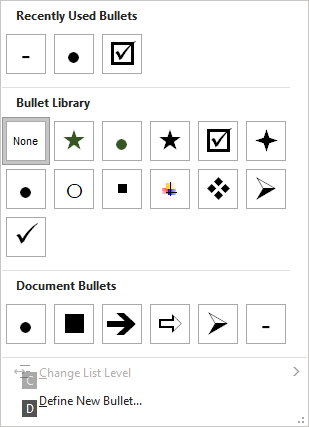
You can also select Define New Bullet to choose other characters as bullets.
The Bullets drop-down menu includes other types of bullets:
Insert bullet points using AutoCorrect
Using Word's AutoCorrect, you can also apply bullets as you type. This method can be used before you type the first paragraph.
To insert bullet points using AutoCorrect (this option should be turned on by default):
- Position the cursor at the beginning of a new line where you want to insert a bullet.
- Press Shift + 8 to enter an asterisk (*).
- Press Tab or Spacebar. Word inserts the default bullet and indents the paragraph.
- Type the text for the bulleted paragraph.
- Press Enter at the end of the paragraph. Word should continue the bulleted list.
- To turn off the bullets and return to the Normal style, press Ctrl + Shift + N.
You can also use several other characters for other types of bullets using the AutoCorrect method:
- Type — (two hyphens or dashes at the top of the keyboard) and then press Tab or Spacebar to enter a square bullet.
- Type – (one hyphen or dash) and then press Tab or Spacebar to enter a dash style bullet.
- Type -> (one hyphen and the greater than symbol) and then press Tab or Spacebar to enter a thin arrow.
- Type => (equal sign and the greater than symbol) and then press Tab or Spacebar to enter a thick arrow.
- Type > (greater than symbol) and then press Tab or Spacebar to enter a tail-less arrow.
If you are comfortable using styles in Word, you can also apply styles that include bullets.
Subscribe to get more articles like this one
Did you find this article helpful? If you would like to receive new articles, JOIN our email list.
More resources
How to Remove Hard Returns in Word Documents
14+ Word Selection Shortcuts to Quickly Select Text
How to Superscipt or Subscript in Word (with Shortcuts)
3 Strikethrough Shortcuts in Microsoft Word to Cross Out Text
How to Keep Text Together in Microsoft Word (Paragraphs, Lines or Words)
Related courses
Microsoft Word: Intermediate / Advanced
Microsoft Word: Designing Dynamic Word Documents Using Fields
Microsoft Word: Long Documents Master Class
Microsoft Word: Accessible Word Documents
Microsoft Excel: Intermediate / Advanced
Our instructor-led courses are delivered in virtual classroom format or at our downtown Toronto location at 18 King Street East, Suite 1400, Toronto, Ontario, Canada (some in-person classroom courses may also be delivered at an alternate downtown Toronto location). Contact us at info@avantixlearning.ca if you'd like to arrange custom instructor-led virtual classroom or onsite training on a date that's convenient for you.
Copyright 2024 Avantix® Learning
You may also like
How to Insert or Type I with an Accent Mark in Word (Í, í, Ì, ì, Î, î, Ï, or ï)
You can insert or type i with an accent mark in Word using built-in tools or keyboard shortcuts (including Alt code shortcuts). The letter i can be inserted with an accent in both upper or lower case. The following are common accented characters that you can insert or type in Word in upper or lower case: grave (Ì or ì), acute (Í or í), circumflex (Î or î) and umlaut (Ï or ï).
How to Insert or Type A with an Accent Mark in Word (À, Á, Â, Ä, à, á, â, or ä)
You can insert or type a with an accent mark in Word using built-in tools or keyboard shortcuts (including Alt code shortcuts). The letter a can be inserted with an accent in both upper or lower case. The following are common accented characters that you can insert or type in Word in upper or lower case: grave (À or à), acute (Á or á), circumflex (Â or â) and umlaut (Ä or ä).
10 Word Shortcuts to Select Text Using a Keyboard
You can use several shortcuts in Word to select text in your documents using only your keyboard. When you select text, it will typically be highlighted in grey. After you select text, you can cut, copy, or delete the selected text or apply character or paragraph formatting.
Microsoft, the Microsoft logo, Microsoft Office and related Microsoft applications and logos are registered trademarks of Microsoft Corporation in Canada, US and other countries. All other trademarks are the property of the registered owners.
Avantix Learning |18 King Street East, Suite 1400, Toronto, Ontario, Canada M5C 1C4 | Contact us at info@avantixlearning.ca


