Great Tips and Tricks in Microsoft Word to Increase Your Productivity
by Avantix Learning Team | Updated April 8, 2021
Applies to: Microsoft® Word® 2013, 2016, 2019 or 365 (Windows)
Check out this great list of tips and tricks (some using hidden features) in Microsoft Word. There are a lot of features in Word that are buried a little deeper in the program and many users have no idea where to find them or that they are available in Word.
These features are available in Microsoft Word 2013, 2016, 2019 and 365 (in the Windows environment).
Recommended articles: 21 Shortcuts for Faster Formatting in Your Microsoft Word Documents
1. Changing Word's measurement system
Are your dialog boxes and the Ruler appearing in centimetres or inches? To change the measurement system in Word 2010 and later versions:
- Click the File tab in the Ribbon.
- Click Options.
- Click Advanced in the left panel.
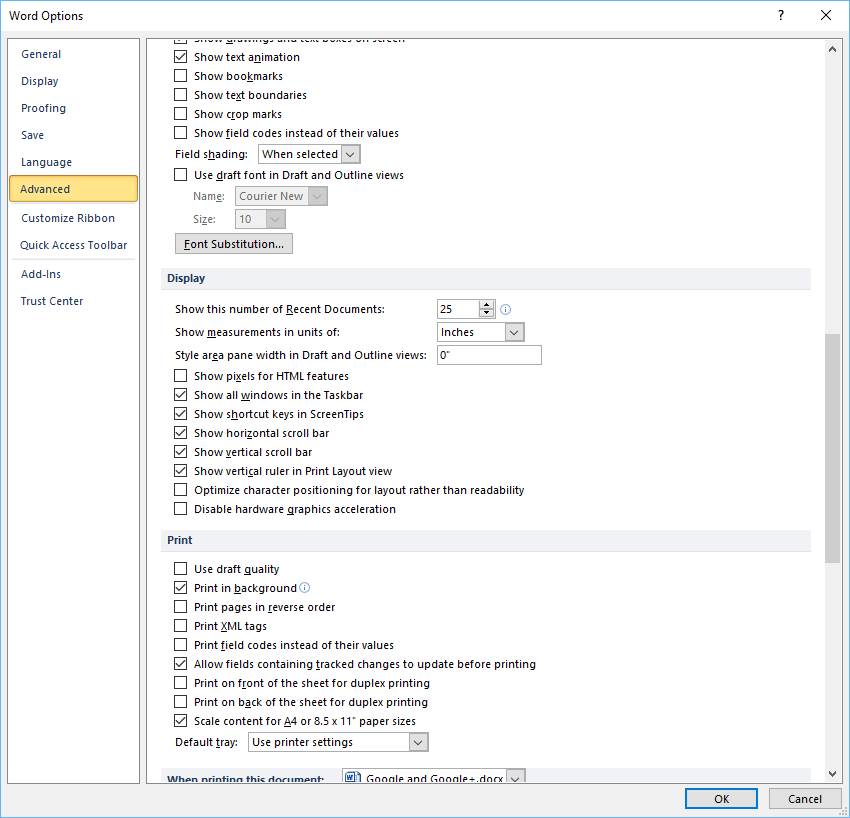
- Scroll down to the Display group.
- Beside Show measurements in units of, choose Inches or your preferred measurement system from the drop-down menu.
- Click OK.
Below is the Options dialog box in Microsoft Word:
2. Changing Word's default file saving location
To specify the default location for saving files (so you don't waste a lot of time navigating to the correct folder), you can also use Word's Options:
- Click the File tab in the Ribbon.
- Click Options.
- Click Save in the left panel.
- To the right of the Default file location box, click Browse.
- Navigate to the folder you wish to use as a default location.
- Click the folder and click OK.
- Click OK again.
3. Finding and replacing fonts
One of the most useful, yet underused, tools in Microsoft Word is Find and Replace. You can find and replace formatting such as font, bold or italic or find and replace special characters.
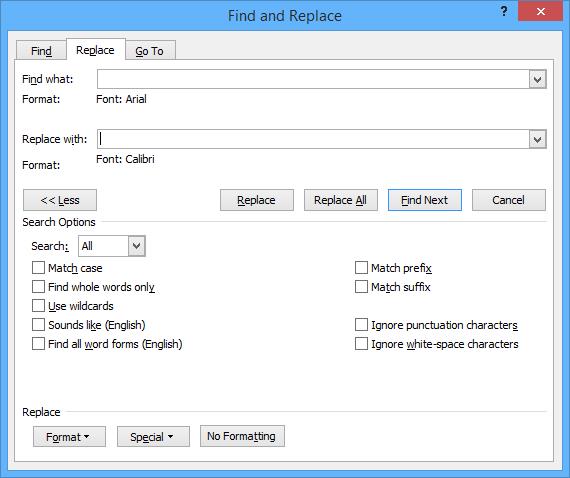
Let's say you want to replace the font for specific text in your document (in this example, some text has been formatted as Arial and the user wants to change it to Calibri):
- Position the cursor at the beginning of the document.
- Click the Home tab in the Ribbon and then click Replace or press Ctrl + H.
- Click More (if necessary) to display the expanded dialog box.
- Click in the Find what box.
- Click No Formatting at the bottom if formatting has previously been used. Be sure that there are no characters such as spaces entered in the Find what box.
- Click Format and from the drop-down menu, choose Font. Click Arial (or the desired font) in the list of fonts and click OK.
- Click in the Replace with box. Click No Formatting to ensure that no formatting is applied (this may be disabled). Be sure that there are no characters entered in the Replace with box such as spaces.
- Click Format and from the drop-down menu, choose Font. Click Calibri (or the desired font) in the list of fonts and click OK.
- Click Find Next to ensure that Word is finding the text with the desired font.
- Click Replace All.
- If you make a mistake, press Ctrl + Z to undo.
Below is the Find and Replace dialog box in Microsoft Word:
4. Selecting text with similar formatting
An interesting feature available through the Home tab is Select Text with Similar Formatting.
Let's say that throughout your document, you have formatted headings as 14 point, bold. You have now decided that you'd like to format these headings as 16 point, bold and blue. Ideally, it's best to format these with styles such as Heading 1 or Heading 2 so you can use the Select Text with Similar Formatting to accomplish this:
- Position the cursor in one of the headings that is formatted as 14 point, bold.
- Click the Home tab in the Ribbon and then click Select. From the drop-down menu, choose Select Text with Similar Formatting. Alternatively, press Alt + H to access the Home tab, press SL (at the same time) and then press S. All instances with the same formatting should be selected.
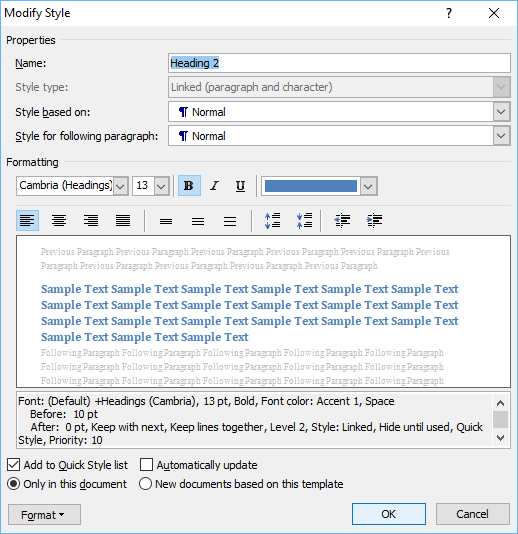
- Click the desired heading style in the Styles group on the Ribbon. In this case, select Heading 2. You may also press
Ctrl+ Alt + 2 to apply the Heading 2 style. All instances should now be formatted with the formatting settings for Heading 2. - To change the formatting for the Heading 2 style, right-click Heading 2 in the Styles group in the Ribbon and choose Modify from the drop-down menu.
- Choose the desired Font, size, colour and any other formatting options.
- Click OK.
Below is the Modify Styles dialog box:
5. Removing character formatting using the keyboard
One of the biggest timewasters is cleaning up formatting in a document that you have received from other users who have applied excessive amounts of bold, italic and other character formatting.
To remove manual character formatting such as font, size, bold, italic and colour from selected text and retain the underlying style such as Normal or Heading 1, select the text and press Ctrl + spacebar.
6. Changing your keyboard back to normal
Have you ever had your keyboard start entering odd characters such as É or è when you meant to enter a question mark or apostrophe? To change the keyboard back to entering normal characters, press Ctrl + Shift (at the same time). Wait and then release. Enter the character again.
7. Repeating your last action
Most people seem to know that Ctrl + Z will undo your last action. However, you can also redo or repeat your last action by pressing Ctrl + Y.
8. Customizing the Quick Access Toolbar
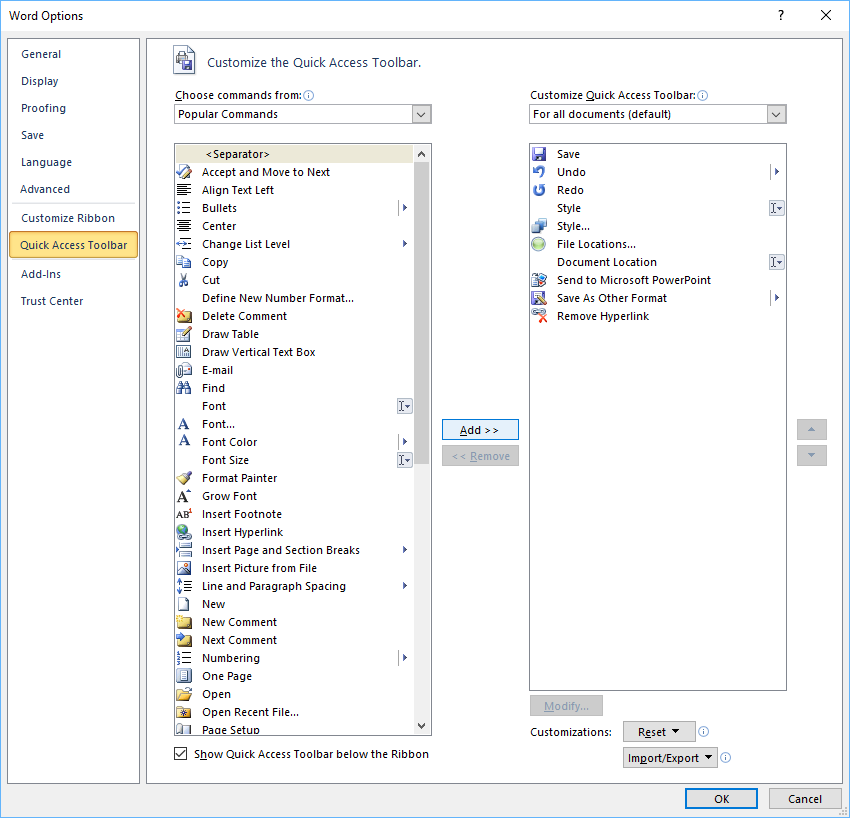
You can add buttons for many features (including hidden features) to your Quick Access Toolbar. To customize the Quick Access toolbar:
- Click the down arrow to the right of the Quick Access Toolbar (which appears above or below the Ribbon).
- Choose More Commands from the drop-down menu.
- At the top, choose All Commands from the Choose Commands from drop-down menu.
- Click the desired button on the left and click Add to add a button. Repeat for each button.
- Click OK.
You can customize the Quick Access Toolbar in Word Options:
9. Hiding and unhiding text
You can hide text using the Font dialog (formerly the Character format dialog). The easiest way to display the Font dialog to apply or remove character formatting is to press Ctrl + D.
To hide or unhide text:
- Select the text you want to hide.
- Press Ctrl + D.
- Check or uncheck the Hidden checkbox.
- Click OK.
- To display hidden text, you can click on the Show/Hide ¶ button on the Home tab. By default, hidden text does not print.
10. Deleting all hidden text
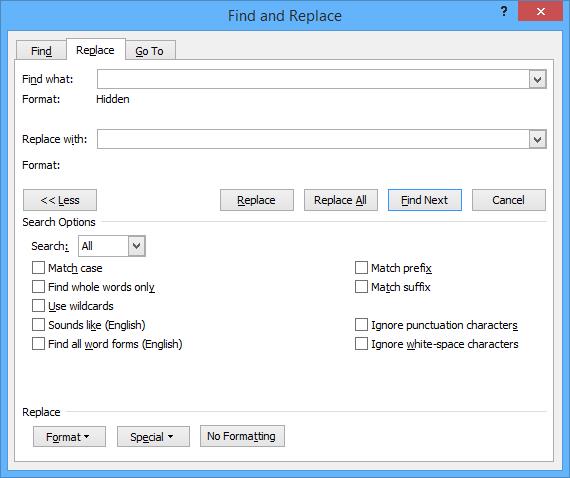
To quickly delete all hidden text, you can again use the Replace command:
- Display hidden text by clicking Show/Hide ¶ on the Home tab (if it is not already turned on).
- Move the cursor to the beginning of the document.
- Click the Home tab in the Ribbon.
- Click Replace or press Ctrl + H.
- Click More (if necessary) to display the expanded dialog box.
- Click in the Find what box.
- Click No Formatting (if formatting has previously been used. Be sure that there are no characters such as spaces entered in the Find what box.
- Click Format and from the drop-down menu, choose Font. A dialog box appears.
- Check Hidden.
- Click OK.
- Click in the Replace with box.
- Click No Formatting to ensure that no formatting is applied (this may be disabled). Be sure that there are no characters such as spaces entered in the Replace with box.
- Click Find Next to ensure that Word is finding the hidden text.
- Click Replace All. This should delete all the hidden text.
- If you make a mistake, press Ctrl + Z to undo.
Below is the Find and Replace dialog box:
This article was first published on September 3, 2014 but has been updated for clarity and content.
Subscribe to get more articles like this one
Did you find this article helpful? If you would like to receive new articles, join our email list.
More resources
How to Check Word Count in Microsoft Word
How to Superscipt or Subscript in Word (with Shortcuts)
How to Keep Text Together in Microsoft Word
10+ Great Microsoft Word Navigation Shortcuts to Move Around Quickly in Documents
Related courses
Microsoft Word: Intermediate / Advanced
Microsoft Word: Designing Dynamic Word Documents Using Fields
Microsoft Word: Long Documents Master Class
Microsoft Word: Accessible Word Documents
Microsoft Excel: Intermediate / Advanced
Our instructor-led courses are delivered in virtual classroom format or at our downtown Toronto location at 18 King Street East, Suite 1400, Toronto, Ontario, Canada (some in-person classroom courses may also be delivered at an alternate downtown Toronto location). Contact us at info@avantixlearning.ca if you'd like to arrange custom instructor-led virtual classroom or onsite training on a date that's convenient for you.
Copyright 2024 Avantix® Learning
You may also like
How to Insert or Type I with an Accent Mark in Word (Í, í, Ì, ì, Î, î, Ï, or ï)
You can insert or type i with an accent mark in Word using built-in tools or keyboard shortcuts (including Alt code shortcuts). The letter i can be inserted with an accent in both upper or lower case. The following are common accented characters that you can insert or type in Word in upper or lower case: grave (Ì or ì), acute (Í or í), circumflex (Î or î) and umlaut (Ï or ï).
How to Insert or Type A with an Accent Mark in Word (À, Á, Â, Ä, à, á, â, or ä)
You can insert or type a with an accent mark in Word using built-in tools or keyboard shortcuts (including Alt code shortcuts). The letter a can be inserted with an accent in both upper or lower case. The following are common accented characters that you can insert or type in Word in upper or lower case: grave (À or à), acute (Á or á), circumflex (Â or â) and umlaut (Ä or ä).
10 Word Shortcuts to Select Text Using a Keyboard
You can use several shortcuts in Word to select text in your documents using only your keyboard. When you select text, it will typically be highlighted in grey. After you select text, you can cut, copy, or delete the selected text or apply character or paragraph formatting.
Microsoft, the Microsoft logo, Microsoft Office and related Microsoft applications and logos are registered trademarks of Microsoft Corporation in Canada, US and other countries. All other trademarks are the property of the registered owners.
Avantix Learning |18 King Street East, Suite 1400, Toronto, Ontario, Canada M5C 1C4 | Contact us at info@avantixlearning.ca


