Insert the Degree Symbol or Sign in Microsoft Word Documents (with Shortcuts)
by Avantix Learning Team | Updated April 30, 2023
Applies to: Microsoft® Word® 2013, 2016, 2019, 2021 or 365 (Windows)
You can insert or type the degree symbol in Microsoft Word documents using the Ribbon or by using keyboard shortcuts. The degree (or degrees) symbol or sign is automatically entered in superscript. The term degree is used in several temperature scales including Celsius and Fahrenheit.
In this article, we'll look at 5 ways to insert the degree symbol in Word documents:
- Use the Insert Symbol command
- Use an Alt code shortcut by pressing Alt and then enter a number sequence
- Use a built-in Word shortcut
- Create and use a custom keyboard shortcut
- Create and use a custom AutoCorrect shortcut
Recommended article: How to Keep Text Together in Microsoft Word
Do you want to learn more about Microsoft Word? Check out our virtual classroom or live classroom Word courses >
1. Insert the degree symbol using Insert Symbol
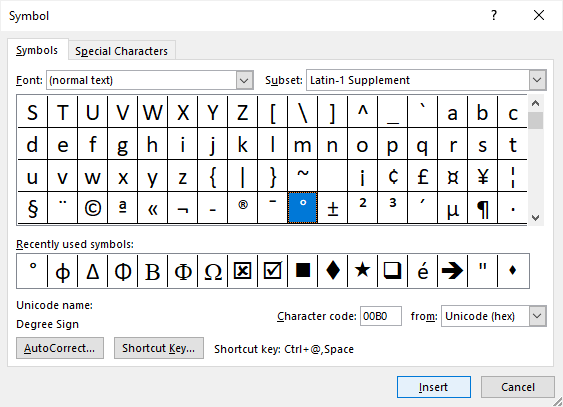
To insert the degree symbol in Word using Insert Symbol:
- Position the cursor where you want to insert the degree symbol.
- Click the Insert tab in the Ribbon.
- In the Symbols group, click Symbol. A drop-down menu appears.
- Click More Symbols. A dialog box appears.
- If necessary, click the Symbols tab.
- Select (normal text) from the Font drop-down menu.
- Select Latin-1 Supplement from the Subset menu.
- Click the degree symbol.
- Click Insert.
- Click Close.
Below is the Insert Symbol dialog box:
2. Insert the degree symbol using an Alt code keyboard shortcut
You can press the Alt key in combination with numbers on the numeric keypad to insert the degree symbol.
To insert the degree symbol in a Word document using an Alt code keyboard shortcut:
- Position the cursor where you want to insert the degree symbol.
- Press Alt + 0176 or Alt + 248 on the numeric keypad.
If the sequence doesn't work, press NumLock on the numeric keypad.
3. Insert the degree symbol using a built-in shortcut
To insert the degree symbol using a built-in shortcut:
- Position the cursor where you want to insert the degree symbol.
- Press Ctrl + Shift + 2 (at the top of the keyboard).
- Press the Spacebar.
The benefit of this method is that it works if you don't have a numeric keypad.
4. Create a custom keyboard shortcut to insert the degree symbol
If you insert the degree symbol frequently, you can create your own keyboard shortcut as well.
To create a custom Word keyboard shortcut for the degree symbol:
- Position the cursor in a Word document.
- Click the Insert tab in the Ribbon.
- In the Symbols group, click Symbol. A drop-down menu appears.
- Click More Symbols. A dialog box appears.
- If necessary, click the Symbols tab.
- Select (normal text) from the Font drop-down menu.
- Select Latin-1 Supplement from the Subset menu.
- Click the degree symbol.
- Click Shortcut. A dialog box appears.
- Click in the box below Assign New Shortcut key.
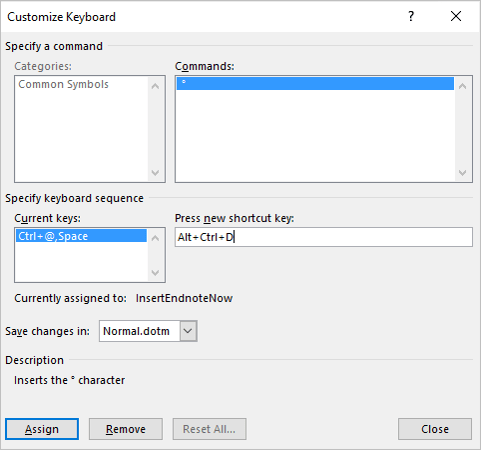
- Press the keys you want to assign (such as Ctrl + Alt + D). Don't type any text, just press the keys. Be careful not to override a useful built-in shortcut such as Ctrl + D.
- Click Assign. Typically the location for these shortcuts is the Normal (or default) template.
- Click Close twice.
Test the shortcut in your document by pressing the assigned keys.
Below is the Customize Keyboard dialog box in Word:
This shortcut is typically added to the Normal template so when you exit the program, Word will prompt you to save the Normal template. If your IT department has disabled modification of the Normal template, you won't be able to use this method.
5. Create an AutoCorrect shortcut
To create an AutoCorrect shortcut for the degree symbol:
- Position the cursor in a Word document.
- Click the Insert tab in the Ribbon.
- In the Symbols group, click Symbol. A drop-down menu appears.
- Click More Symbols. A dialog box appears.
- If necessary, click the Symbols tab.
- Select (normal text) from the Font drop-down menu.
- Select Latin-1 Supplement from the Subset menu.
- Click the degree symbol.
- Click AutoCorrect. A dialog box appears.
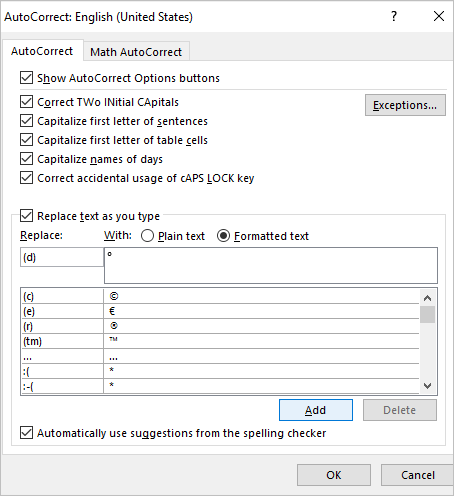
- Enter the characters you want to use in the Replace dialog box such as (d). The degree symbol should appear on the right.
- Click Add.
- Click OK.
- Click Close.
To use the AutoCorrect entry, type the characters you entered in Replace, such as (d), and then press the Spacebar.
The AutoCorrect dialog box appears as follows:
The AutoCorrect shortcut is typically added to the Normal template so when you exit the program, Word will prompt you to save the Normal template. If your IT department has disabled modification of the Normal template, you won't be able to use this method.
This article was first published on August 14, 2020 and has been updated for clarity and content.
Subscribe to get more articles like this one
Did you find this article helpful? If you would like to receive new articles, join our email list.
More resources
How to Insert a Check Mark in Word (5 Ways)
14+ Word Selection Shortcuts to Quickly Select Text
21 Microsoft Word Shortcuts for Faster Formatting
How to Keep Text Together in Microsoft Word (Words, Lines or Paragraphs)
How to Create a Table of Contents in Microsoft Word (Insert, Format and Update a TOC)
Related courses
Microsoft Word: Intermediate / Advanced
Microsoft Excel: Intermediate / Advanced
Microsoft PowerPoint: Intermediate / Advanced
Microsoft Word: Long Documents Master Class
Microsoft Word: Styles, Templates and Tables of Contents
Microsoft Word: Designing Dynamic Word Documents Using Fields
Our instructor-led courses are delivered in virtual classroom format or at our downtown Toronto location at 18 King Street East, Suite 1400, Toronto, Ontario, Canada (some in-person classroom courses may also be delivered at an alternate downtown Toronto location). Contact us at info@avantixlearning.ca if you'd like to arrange custom instructor-led virtual classroom or onsite training on a date that's convenient for you.
Copyright 2024 Avantix® Learning
You may also like
How to Insert or Type I with an Accent Mark in Word (Í, í, Ì, ì, Î, î, Ï, or ï)
You can insert or type i with an accent mark in Word using built-in tools or keyboard shortcuts (including Alt code shortcuts). The letter i can be inserted with an accent in both upper or lower case. The following are common accented characters that you can insert or type in Word in upper or lower case: grave (Ì or ì), acute (Í or í), circumflex (Î or î) and umlaut (Ï or ï).
How to Insert or Type A with an Accent Mark in Word (À, Á, Â, Ä, à, á, â, or ä)
You can insert or type a with an accent mark in Word using built-in tools or keyboard shortcuts (including Alt code shortcuts). The letter a can be inserted with an accent in both upper or lower case. The following are common accented characters that you can insert or type in Word in upper or lower case: grave (À or à), acute (Á or á), circumflex (Â or â) and umlaut (Ä or ä).
10 Word Shortcuts to Select Text Using a Keyboard
You can use several shortcuts in Word to select text in your documents using only your keyboard. When you select text, it will typically be highlighted in grey. After you select text, you can cut, copy, or delete the selected text or apply character or paragraph formatting.
Microsoft, the Microsoft logo, Microsoft Office and related Microsoft applications and logos are registered trademarks of Microsoft Corporation in Canada, US and other countries. All other trademarks are the property of the registered owners.
Avantix Learning |18 King Street East, Suite 1400, Toronto, Ontario, Canada M5C 1C4 | Contact us at info@avantixlearning.ca


