Insert Lines in Microsoft Word Documents Using Borders
by Avantix Learning Team | Updated March 21, 2026
Applies to: Microsoft® Word® 2016, 2019, 2021, 2024 and 365 (Windows)
You can insert a line in Word using the Ribbon or by using keyboard shortcuts. It's best to avoid drawing lines and instead insert border lines in Microsoft Word (normally paragraph borders) so the line or lines will move as you edit the document.
Contents
- About border lines in Word
- Insert a line using the Borders command in the Ribbon
- Remove a line using the Borders command in the Ribbon
- Insert a line using the Borders and Shading dialog box
- Remove a line using the Borders and Shading dialog box
- Insert a line using keyboard shortcuts
- Final thoughts
Recommended article: How to Keep Text Together in Microsoft Word
Do you want to learn more about Microsoft Word? Check out our virtual classroom or live classroom Word courses >
About border lines in Word
If you use borders to add lines in Word, they can be attached to paragraphs. In Microsoft Word, anything with a hard return after it is a paragraph. If you use border lines, you can customize the type of border, line thickness and color. You can also include paragraph border lines in styles so they will appear throughout your document.
If you draw lines using Insert Shapes in Word, you'll have to deal with the line being inline or floating.
Insert a line using the Borders command in the Ribbon
To insert a line in Word above and / or below a paragraph using the Borders command in the Ribbon:
- Select the paragraph(s) to which you want to add a line.
- Click the Home tab in the Ribbon.
- Click Borders in the Paragraph group. A drop-down menu appears.
- Select the line you want to use.
Below is the Borders command in the Ribbon in Word:
![]()
Remove a line using the Borders command in the Ribbon
To remove a border line or lines from one or more paragraphs using the Borders command in the Ribbon:
- Select the paragraph(s) with the border lines you want to remove.
- Click the Home tab in the Ribbon and then click Borders. A drop-down menu appears.
- Choose No Border from the drop-down menu.
Insert a line using the Borders and Shading dialog box
You can apply a line or custom border lines to one or more paragraphs using the Borders and Shading dialog box.
To insert a line in Word above and / or below a paragraph using the Borders and Shading dialog box:
- Select the paragraph(s) to which you want to add a line.
- Click the Home tab in the Ribbon.
- Click Borders in the Paragraph group. A drop-down menu appears.
- Select Borders and Shading. A dialog box appears.
- Select a border style, color and width.
- Click between the guides in the sample area on the right (above or below the sample).
- Click Options (if required), enter any offset amounts to control the distance between the line and the paragraph and click OK.
- In Apply to, ensure Paragraph is selected.
- Click OK.
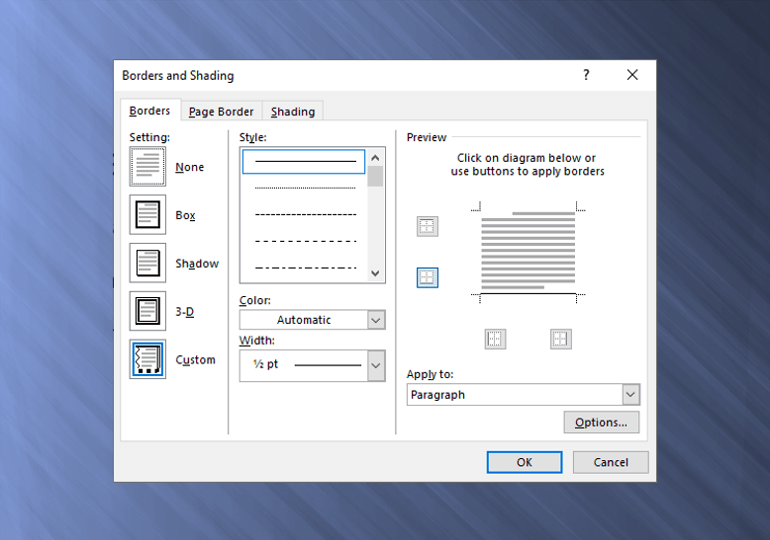
Below is the Borders and Shading dialog box where you can add a line or lines to paragraphs:

Remove a line using the Borders and Shading dialog box
To remove a line or lines from one or more paragraphs using the Borders and Shading dialog box:
- Select the paragraph(s) with the lines you want to remove.
- Click the Home tab in the Ribbon and click Borders. A drop-down menu appears.
- Select Borders and Shading. A dialog box appears.
- Click None in the Setting area.
- In Apply to, ensure Paragraph is selected.
- Click OK.
Insert a line using keyboard shortcuts
You can also insert a horizontal line using keyboard shortcuts (which insert border lines as AutoCorrect entries).
Type the following characters and then press Enter or Return to insert lines:
- To insert a plain single line, type three hyphens (—).
- To insert a plain double line, type three equal signs (===).
- To insert a dotted line, type three asterisks (***).
- To insert a bold single line, type three underlines (___).
- To insert a wavy line, type three tildes (~~~).
- To insert a triple line, type three number signs or hash tags (###).
To remove these lines, select the paragraph with the line, click the Borders button on the Home tab and select No Border.
Final thoughts
The Borders and Shading dialog box allows users to customize the type of border line, the weight and color. It is typically the best tool to use if you want to add border lines in Word.
Subscribe to get more articles like this one
Did you find this article helpful? If you would like to receive new articles, JOIN our email list.
More resources
How to Double Space in Word (4 Ways)
14 Shortcuts to Quickly Select Text in Microsoft Word
4 Ways to Insert or Type the Pound Symbol in Word (£)
How to Create a Hanging Indent or First Line Indent in Microsoft Word
How to Insert an Em or En Dash in Microsoft Word (4 Ways with Shortcuts)
Related courses
Microsoft Word: Intermediate / Advanced
Microsoft Excel: Intermediate / Advanced
Microsoft PowerPoint: Intermediate / Advanced
Microsoft Word: Long Documents Master Class
Microsoft Word: Styles, Templates and Tables of Contents
Microsoft Word: Designing Dynamic Word Documents Using Fields
Our instructor-led courses are delivered in virtual classroom format or at our downtown Toronto location at 18 King Street East, Suite 1400, Toronto, Ontario, Canada (some in-person classroom courses may also be delivered at an alternate downtown Toronto location). Contact us at info@avantixlearning.ca if you'd like to arrange custom instructor-led virtual classroom or onsite training on a date that's convenient for you.
Copyright 2025 Avantix® Learning
You may also like

How to Cut, Copy and Paste Text in Word (5 Ways with Shortcuts)
In this guide, we'll cover 5 ways to cut, copy and paste text in Microsoft Word. A common method is to use keyboard shortcuts but you can also use the Ribbon, the context menu and a few hidden tools as well. After you paste your text, you can choose paste options such as Keep Text Only.

How to Insert or Type an Upside Down Exclamation Mark in Word (5 Ways to Insert ¡ with Shortcuts)
This guide covers five easy ways to insert or type the upside down exclamation mark (¡) in Microsoft Word including shortcuts, Alt codes and custom key combinations. The upside down exclamation mark or inverted exclamation mark is used in the Spanish language at the beginning of exclamatory sentences and helps readers understand tone before completing the sentence.

How to Insert or Type I with an Accent Mark in Word (Í, í, Ì, ì, Î, î, Ï, or ï)
You can insert or type i with an accent mark in Word using built-in tools or keyboard shortcuts (including Alt code shortcuts). The letter i can be inserted with an accent in both upper or lower case. The following are common accented characters that you can insert or type in Word in upper or lower case: grave (Ì or ì), acute (Í or í), circumflex (Î or î) and umlaut (Ï or ï).
Image credit(s) / application screenshot(s): Microsoft
Microsoft, the Microsoft logo, Microsoft Office and related Microsoft applications and logos are registered trademarks of Microsoft Corporation in Canada, US and other countries. All other trademarks are the property of the registered owners.
Avantix Learning |18 King Street East, Suite 1400, Toronto, Ontario, Canada M5C 1C4 | Contact us at info@avantixlearning.ca


