Blur an Image on a PowerPoint Slide
by Avantix Learning Team | Updated September 7, 2023
Applies to: Microsoft® PowerPoint® 2013, 2016, 2019, 2021 and 365 (Windows)
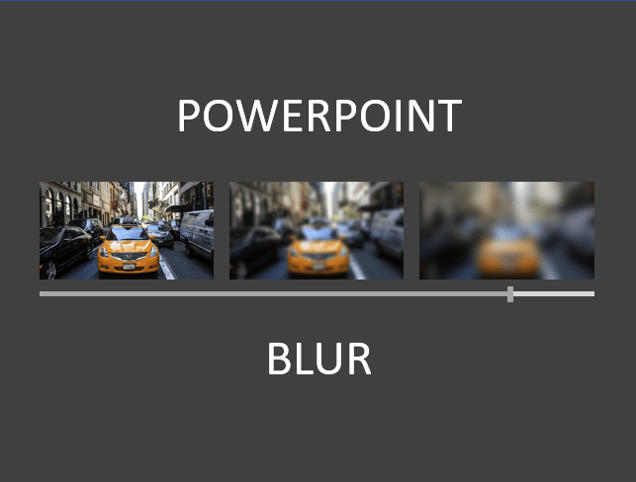
You can blur an image in PowerPoint and achieve some interesting effects. Blur is an artistic effect and you can increase the blur using the Format Picture task pane. After you blur an image, you can then place shapes, text or even another picture on top of the image.
You may want to blur images to:
- Add visual interest
- Remove focus from an element on a slide
- Create interesting backgrounds
Note: Buttons and Ribbon tabs may display in a different way (with or without text) depending on your version of PowerPoint, the size of your screen and your Control Panel settings. For PowerPoint 365 users, Ribbon tabs may appear with different names. For example, the Picture Tools Format tab may appear as Picture Format and the Drawing Tools Format tab may appear as Drawing Format or Shape Format.
Recommended article: How to Crop an Image to a Circle in PowerPoint (Crop to Shape Method)
Do you want to learn more about PowerPoint? Check out our virtual classroom or in-person classroom PowerPoint courses >
In this article we'll review:
- How to apply a blur effect to an image
- How to adjust a blur effect
- Examples of images with a blur effect
Apply a blur effect to an image
To blur an image:
- In Normal View, click the picture you want to blur. You could also select a picture in Slide Master View.
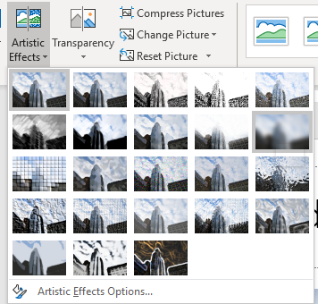
- Click the Picture Format or Picture Tools Format tab in the Ribbon and click Artistic Effects in the Adjust group. A drop-down menu appears.
- Select Blur (the last option in the second row).
The Artistic Effects gallery appears as follows in PowerPoint with blur:
Adjust blur settings
You can adjust the blur applied to an image using the Format Picture task pane.
To adjust blur settings:
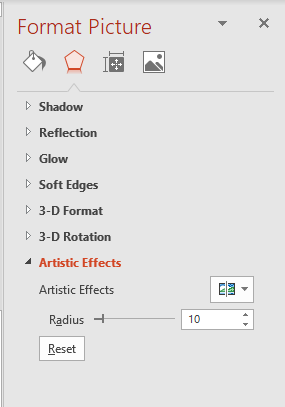
- Right-click the blurred image and select Format Picture. A task pane appears.
- Click the Effects button at the top of the task pane.
- Click the arrow beside Artistic Effects to expand it.
- Drag the slider line beside Radius to increase the blur.
Below is the Format Picture task pane with blur options:
Examples of images with a blur effect
Check out the following examples of pictures before and after a blur effect has been applied.
Example 1 shows a blur with an image of buildings and text:
Example 2 shows a blur with an abstract image used as a background and text:
Example 3 shows a blur with a cloud image used as a background and text above:
 You can also combine other effects with blur such as brightness, contrast or color.
Blurred images can be used effectively as slide backgrounds. Simply blur the image, right-click it and select Save As Picture from the drop-down menu. Enter a new name for the image, save it in the desired folder and then insert it as a slide background.
Although you can blur pictures, you cannot blur text in the same way. You would need to copy the text and paste it as an image using Paste Special. Once the text has been pasted as an image, you would then be able to apply a blur effect to it.
Subscribe to get more articles like this one
Did you find this article helpful? If you would like to receive new articles, JOIN our email list.
More resources
How to Blur Text on a PowerPoint Slide
How to Align Objects in PowerPoint (4 Ways)
3 Ways Change the Font on All Slides in PowerPoint
How to Crop an Image into a Circle in PowerPoint (Crop to Shape Method)
How to Add Animation in PowerPoint (Animate Images, Text and Other Objects)
Related courses
Microsoft PowerPoint: Intermediate / Advanced
Microsoft PowerPoint: Design for Non-Designers
Microsoft PowerPoint: Animations Bootcamp
Our instructor-led courses are delivered in virtual classroom format or at our downtown Toronto location at 18 King Street East, Suite 1400, Toronto, Ontario, Canada (some in-person classroom courses may also be delivered at an alternate downtown Toronto location). Contact us at info@avantixlearning.ca if you'd like to arrange custom instructor-led virtual classroom or onsite training on a date that's convenient for you.
Copyright 2024 Avantix® Learning
You may also like
How to Insert or Type I with an Accent Mark in Word (Í, í, Ì, ì, Î, î, Ï, or ï)
You can insert or type i with an accent mark in Word using built-in tools or keyboard shortcuts (including Alt code shortcuts). The letter i can be inserted with an accent in both upper or lower case. The following are common accented characters that you can insert or type in Word in upper or lower case: grave (Ì or ì), acute (Í or í), circumflex (Î or î) and umlaut (Ï or ï).
How to Insert or Type A with an Accent Mark in Word (À, Á, Â, Ä, à, á, â, or ä)
You can insert or type a with an accent mark in Word using built-in tools or keyboard shortcuts (including Alt code shortcuts). The letter a can be inserted with an accent in both upper or lower case. The following are common accented characters that you can insert or type in Word in upper or lower case: grave (À or à), acute (Á or á), circumflex (Â or â) and umlaut (Ä or ä).
10 Word Shortcuts to Select Text Using a Keyboard
You can use several shortcuts in Word to select text in your documents using only your keyboard. When you select text, it will typically be highlighted in grey. After you select text, you can cut, copy, or delete the selected text or apply character or paragraph formatting.
Microsoft, the Microsoft logo, Microsoft Office and related Microsoft applications and logos are registered trademarks of Microsoft Corporation in Canada, US and other countries. All other trademarks are the property of the registered owners.
Avantix Learning |18 King Street East, Suite 1400, Toronto, Ontario, Canada M5C 1C4 | Contact us at info@avantixlearning.ca


