Protect Worksheets and Workbooks in Excel
by Avantix Learning Team | Updated June 10, 2022
Applies to: Microsoft® Excel® 2013, 2016, 2019, 2021 or 365 (Windows)
You can password protect worksheets and workbooks in Excel. If you want to prevent other users from opening or modifying an Excel workbook, you can encrypt the file with a password. You can also protect workbook structure where you can prevent users from deleting, renaming, moving or unhiding worksheets. Password protection can be added to your Excel file in several ways.
If you want to lock and unlock specific cells in a worksheet, check out the article How to Lock Cells in Excel (Protect Formulas and Data).
Do you want to learn more about Excel? Check out our virtual classroom or in-person Excel courses >
Protect a workbook with a password on open
To protect a workbook with a password so other users can't open the workbook:
- Open the Excel workbook you want to protect with a password.
- Click the File tab in the Ribbon. The Backstage View appears.
- Select Info.
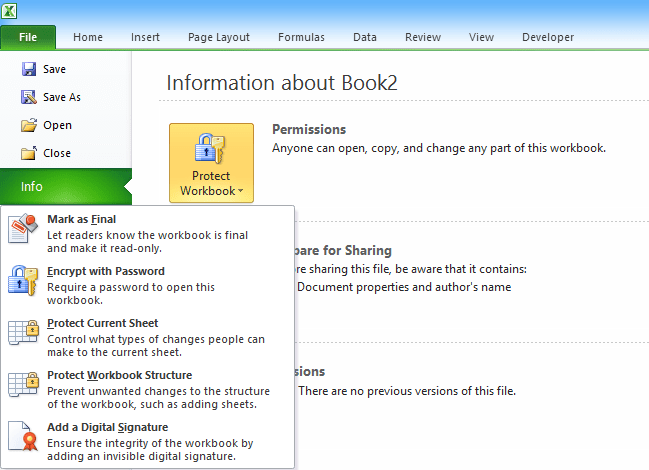
- Click Protect Workbook or Encrypt with Password and then Protect Workbook. A menu appears. Choose the desired option from the menu.
- Enter a password.
- Re-enter the password.
- Click OK.
Below are the options to protect a workbook using the File tab in the Ribbon:
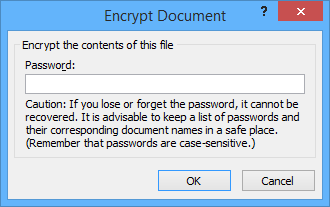
The following Excel dialog box prompts for a password:
Close and save the workbook. When a user tries to open the workbook, they will be prompted to enter the password.
To remove a password to open a workbook:
- Open the Excel workbook with password protection. A dialog box appears.
- Enter the password and click OK.
- Click the File tab in the Ribbon. The Backstage View appears.
- Select Info.
- Click Protect Workbook. A drop-down menu appears.
- Choose Encrypt with Password. A dialog box appears.
- Delete the password in the edit box or enter a new password.
- Click OK.
- If you have entered a new password, enter the password again.
- Save the file.
Protect workbook structure with a password
If you protect workbook structure, you can prevent users from changing, moving, deleting or unhiding worksheet tabs.
To prevent users from changing the structure of a workbook:
- Open the Excel workbook you want to protect.
- Click the File tab in the Ribbon. The Backstage View appears.
- Select Info.
- Click Protect Workbook or Encrypt with Password and then Protect Workbook. A menu appears. Choose the desired option from the menu.
- Choose Protect Workbook Structure. A dialog box appears.
- Ensure Structure is checked. Enter a password in the edit box. Passwords are case sensitive. Be sure to keep your password in a safe place.
- Click OK. A dialog box appears prompting you to re-enter the password.
- Re-enter the password.
- Click OK.
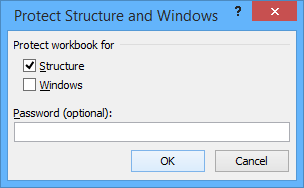
Below is the Protect Structure and Windows dialog box:
Save the workbook. Users will not be able to change, delete, move or unhide worksheet tabs.
There are many more strategies for securing workbooks including creating digital signatures or using third party programs.
This article was first published on September 4, 2015 and has been updated for clarity and content.
Subscribe to get more articles like this one
Did you find this article helpful? If you would like to receive new articles, join our email list.
More resources
How to Delete a Pivot Table in Excel
How to Convert Text to Numbers in Excel (5 Ways)
How Lock Cells in Excel (Protect Formulas and Data)
How to Insert Multiple Rows in Excel (4 Fast Ways with Shortcuts)
Excel Shortcuts to Zoom In and Out in Your Worksheets (4 Shortcuts)
Related courses
Microsoft Excel: Intermediate / Advanced
Microsoft Excel: Data Analysis with Functions, Dashboards and What-If Analysis Tools
Microsoft Excel: Introduction to VBA (Visual Basic for Applications)
Our instructor-led courses are delivered in virtual classroom format or at our downtown Toronto location at 18 King Street East, Suite 1400, Toronto, Ontario, Canada (some in-person classroom courses may also be delivered at an alternate downtown Toronto location). Contact us at info@avantixlearning.ca if you'd like to arrange custom instructor-led virtual classroom or onsite training on a date that's convenient for you.
Copyright 2024 Avantix® Learning
You may also like
How to Freeze Rows in Excel (One or Multiple Rows)
Freeze One or More Rows in an Excel Worksheet by Avantix Learning Team | Updated October 25, 2023 Applies to: Microsoft® Excel® 2010, 2013, 2016, 2019, 2021 and 365 (Windows) You can freeze one or more rows in an Excel worksheet using the Freeze Panes command. If you...
How to Show or Hide Gridlines in Excel
Show or Hide Gridlines in Excel Worksheets (+ Shortcuts) by Avantix Learning Team | Updated October 15, 2023 Applies to: Microsoft® Excel® 2013, 2016, 2019, 2021 and 365 (Windows) You can remove or hide gridlines in Excel worksheets to simplify worksheet design. By...
How to Insert Multiple Columns in Excel (4 Fast Ways with Shortcuts)
Insert Multiple Columns Quickly in an Excel Worksheet by Avantix Learning Team | Updated September 15, 2023 Applies to: Microsoft® Excel® 2013, 2016, 2019, 2021 and 365 (Windows) You can quickly insert multiple columns in Excel using a drop-down menu, keyboard...
Microsoft, the Microsoft logo, Microsoft Office and related Microsoft applications and logos are registered trademarks of Microsoft Corporation in Canada, US and other countries. All other trademarks are the property of the registered owners.
Avantix Learning |18 King Street East, Suite 1400, Toronto, Ontario, Canada M5C 1C4 | Contact us at info@avantixlearning.ca


