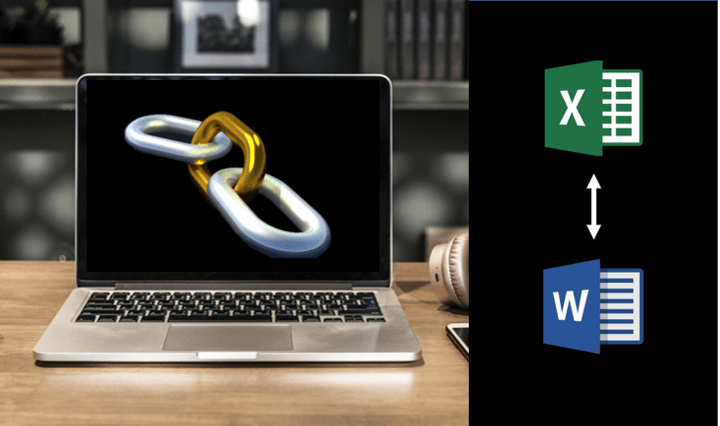
Use Word's Edit Links to Files to Break, Update or Change Excel Links
by Avantix Learning Team | Updated May 1, 2020
Applies to: Microsoft® Excel® 2010, 2013, 2016, 2019 and 365 (Windows)
If you want to break, update or change links to Excel charts or worksheets in Microsoft Word, you'll need to use the Edit Links to Files command. Unfortunately, this command is difficult to find. To make it easier to access, you can add Edit Links to Files to the Quick Access Toolbar. If you decide that you want to break links to external Excel files, be sure to make a copy of the file first because you can't undo the break links command.
In this article, we'll access Edit Links to Files in Microsoft Word in 3 ways – through the Ribbon, by right-clicking (displaying the context menu) or by adding a button to the Quick Access Toolbar.
Note: The links discussed here are not hyperlinks. For more information on hyperlinks, check out the article How to Insert, Edit and Remove Hyperlinks in Microsoft Word.
Recommended article: How to Compress Microsoft Word File Size (10 Ways to Reduce the Size of Large Word Documents)
Finding Word's Edit Links to Files command in the Ribbon
To access Edit Links to Files in the Ribbon:
- Save the Word document.
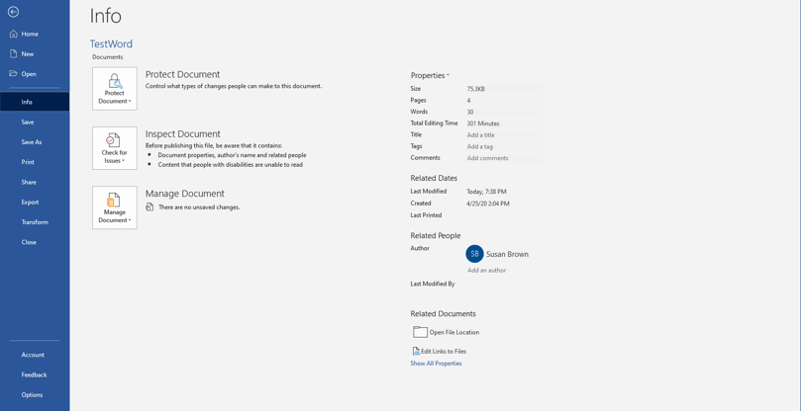
- Click the File tab in the Ribbon and then click Info.
- In the bottom right corner or the window, under Related Documents, click Edit Links to Files. This command will appear only if external links exist and you have saved the file.
Below is the Edit Links to Files command in Word:
Adding Edit Links to Files to the Quick Access Toolbar
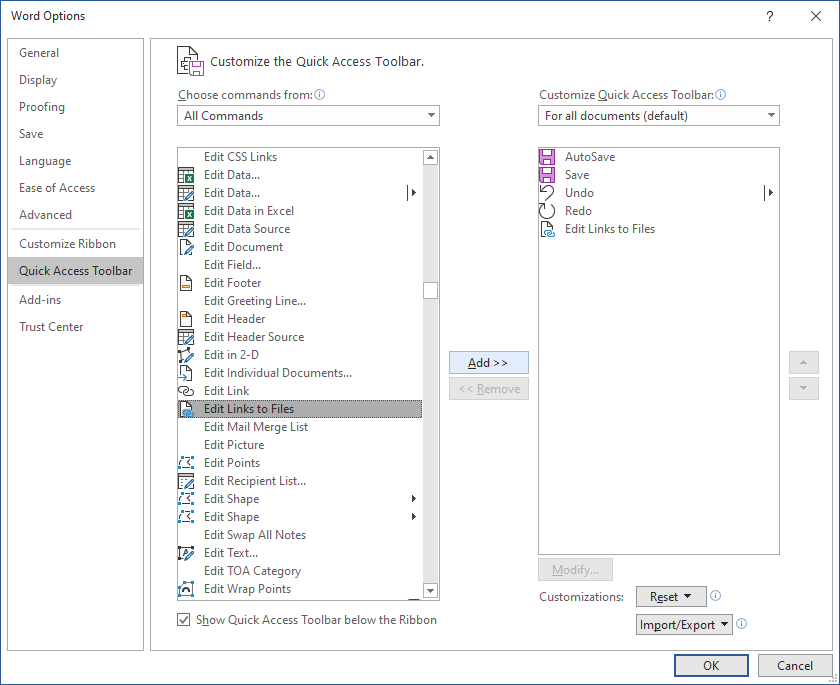
If you're going to work with external links regularly, you may want to add Edit Links to Files to the Quick Access Toolbar:
- Click the arrow on the right side of the Quick Access Toolbar (this toolbar appears above or below the Ribbon).
- Select More Commands. The Options dialog box appears.
- From the drop-down menu below Choose commands from, select All Commands.
- In the list of commands on the left, click Edit Links to Files.
- Click Add.
- Click OK.
Edit Links to Files will appear on the Quick Access Toolbar. It will become active when you have inserted a linked chart, worksheet data or other object and saved the file.
Below is the Options dialog box in Word (which is similar in all versions):
Accessing Edit Links to Files in the context menu
You can also access Edit Links to Files in the context menu in Word for linked objects or HTML linked tables.
To access the Edit Links to Files command in the context menu:
- Save the Word document.
- Click on a linked object or in an HTML linked table.
- Right-click the linked worksheet object or table. A drop-down menu (context menu) appears. You can also press Shift + F10 or press the Context button on your keyboard if you have one.
- In the drop-down menu, select Linked Worksheet Object or Linked Binary Worksheet Object and then select Links from the sub-menu. The Links dialog box appears. Note: You can't use this method with charts.
Automatic linking or manual linking
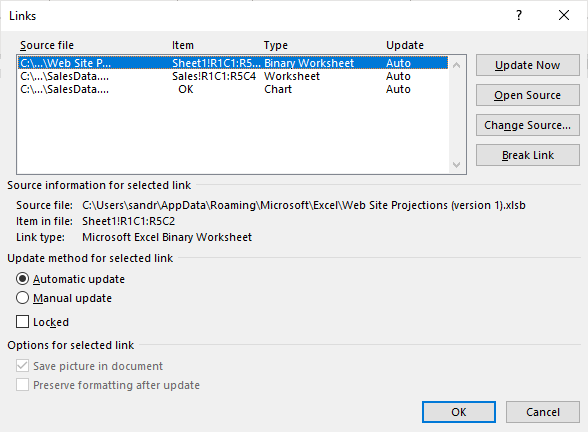
In the Links dialog box, you can click Automatic or Manual for each link as the update method. The default is Automatic so that when you open a document, links can be automatically updated (a prompt appears asking you to update the links).
Some users may select Manual as the type of update if the Word document is large and there are alot of links to Excel charts or worksheet data that are slowing down the Word file. Manual links are usually updated using the Links dialog box.
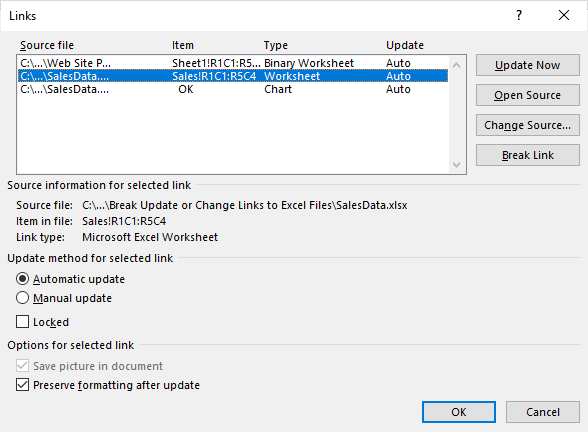
The Links dialog box appears as follows:
Locking and unlocking
In the Links dialog box, you can also check the Locked option for a link. If a link is locked, it cannot be updated. You will need to select the link and uncheck Locked if you want to unlock it.
Preserving formatting for HTML tables
If you have copied worksheet data into Word as HTML format, you should select the linked table and then select Preserve formatting after update in the Links dialog box so you don't lose formatting when the link(s) are updated.
In the example below, the Preserve Formatting option is available for an HTML linked table:
Breaking links
To break a link:
- Save a copy of the Word document (always save a copy before breaking links).
- In the copy, click the File tab in the Ribbon and select Edit Links to Files, click Edit Links to Files in the Quick Access Toolbar, or right-click a linked worksheet object or HTML table and select Linked Worksheet Object or Linked Binary Worksheet Object from the drop-down menu and then select Links from the sub-menu. The Links dialog box appears.
- Click the link you want to break. You can also click the first link and then Shift-click a link to select contiguous links or Ctrl-click links to select non-contiguous links.
- Click Break Link. A dialog box appears asking if you want to break the link.
- Click OK.
- Click Close.
Updating links
You will normally be prompted to update links when you open a file with Links. Click Update Links in the dialog box that appears when you open a file to update the links. Automatic links will be updated.
You can also update links when a file is open.
To update a link:
- Save the Word document.
- Right-click the linked worksheet object or HTML table. A drop-down menu appears.
- Select Update Now.
To update one or multiple links:
- Save the Word document.
- Click the File tab in the Ribbon and select Edit Links to Files, click Edit Links to Files in the Quick Access Toolbar, or right-click a linked worksheet object or HTML table and select Linked Worksheet Object or Linked Binary Worksheet Object from the drop-down menu and then select Links from the sub-menu. The Links dialog box appears.
- Click the link you want to update. You can also click the first link and then Shift-click a link to select contiguous links or Ctrl-click links to select non-contiguous links.
- Click Update Now. Select the Automatic Update checkbox to automatically update for future changes when you close or open the file. If you select Manual Update, you will need to update links using Update Now.
- Click Close.
Changing the source of a link
If the source file has been moved or renamed, you will need to change the source.
To change the source of a link:
- Save the Word document.
- Click the File tab in the Ribbon and select Edit Links to Files, click Edit Links to Files in the Quick Access Toolbar, or right-click and select Linked Worksheet Object or Linked Binary Worksheet Object (for worksheet data only) from the drop-down menu and then select Links from the sub-menu. The Links dialog box appears.
- Click the link you want to change.
- Click Change Source.
- Navigate to the new location of the file and click it.
- Click Open. You can also double-click it.
- Click Close.
If you choose to link to Excel files in Word, you'll often need to manage the links. Before you send files to clients or coworkers, you may also want to break the links. Always break links in a copy so you can retain the original file with the links.
Subscribe to get more articles like this one
Did you find this article helpful? If you would like to receive new articles, join our email list
Related
14+ Word Selection Shortcuts to Quickly Select Text
How to Remove Hard Returns in Word Documents
How to Superscipt or Subscript in Word (with Shortcuts)
Recommended courses
Microsoft Word: Intermediate / Advanced
Microsoft Excel: Intermediate / Advanced
Copyright 2024 Avantix® Learning
Our instructor-led courses are delivered in virtual classroom format or at our downtown Toronto location at 18 King Street East, Suite 1400, Toronto, Ontario, Canada (some in-person classroom courses may also be delivered at an alternate downtown Toronto location). Contact us at info@avantixlearning.ca if you'd like to arrange custom instructor-led virtual classroom or onsite training on a date that's convenient for you.
You may also like

How to Insert or Type E with an Accent Mark in PowerPoint (È, É, Ê, Ë, è, é, ê, or ë)
You can insert or type e with an accent mark in PowerPoint using built-in tools or keyboard shortcuts (including Alt code shortcuts). The letter e can be inserted with an accent in both upper or lower case in text boxes or placeholders on slides, the slide master or layouts. The following are common accents in upper or lower case – È, É, Ê, Ë, è, é, ê, or ë.

How to Fade a Picture or Part of a Picture in PowerPoint (Using a Gradient)
You can fade a picture in PowerPoint by drawing a rectangle shape on top of the picture and then filling the rectangle with a gradient from opaque to transparent. This technique is often used to fade an image into the background of a slide. Since the rectangle is placed on top of the image and then text may be placed on top of the rectangle, you may need to reorder the objects.

How to Lock an Image, Shape or Other Object in PowerPoint
You can now lock an image, shape or other object in PowerPoint. Objects can be locked in Normal View or Slide Master View. Only PowerPoint 365 users can lock objects to prevent moving and resizing. This is helpful if you want to select and move other objects on the slide or prevent others from moving or resizing an object. You can lock items using the context menu or the Selection Pane.
Microsoft, the Microsoft logo, Microsoft Office and related Microsoft applications and logos are registered trademarks of Microsoft Corporation in Canada, US and other countries. All other trademarks are the property of the registered owners.
Avantix Learning |18 King Street East, Suite 1400, Toronto, Ontario, Canada M5C 1C4 | Contact us at info@avantixlearning.ca