Microsoft Visio: Introduction
Microsoft Visio Training Series | Level 1
Course Details
Duration: 1 day (9 am – 4 pm)
Microsoft® Visio® Professional (Desktop) Versions: 2016 | 2019 | 2021 | 365 (Windows)
Delivery Methods (Instructor-led): In-person (Live classroom) | Virtual classroom
Course Dates: Contact us to arrange a date (Online in virtual classroom) | View schedule ![]()
Course Fee: $295 CAD per person + HST (Virtual classroom), $325 CAD per person + HST (Bring your own device for live classroom courses) or $395 CAD per person + HST (Avantix Learning provides device for live classroom courses)*
Timing: Public scheduled courses run from 9:00 am to 4:00 pm (Eastern Time).
Virtual classroom courses: Our instructor-led virtual classroom courses are delivered in a virtual classroom environment. Students will be sent a virtual classroom invitation prior to the course.
In-person classroom courses: Our instructor-led, live classroom (in-person) courses are held in downtown Toronto at 18 King Street East, Suite 1400, Toronto, Ontario, Canada. Some courses are also held at an alternate downtown Toronto location.
Custom training: This course may be delivered at your site or ours as an instructor-led or virtual classroom solution. Contact us at info@avantixlearning.ca for more information including savings for custom group training.
Some public courses and / or formats and may be subject to a minimum enrollment requirement.
![]()
Course Overview
This introductory Visio course is designed for those new to Visio who want to create professional-looking business and technical drawings. Students will build diagrams using templates, stencils and master shapes and will use various tools to enhance these diagrams using shapes, tools and formatting strategies. Different types of drawings will be created including flow charts, organization charts, floor plans and brainstorming diagrams.
*Note: Students will need the full desktop version of Visio for this course.
Prerequisite: Comfortable using Microsoft Excel or Microsoft Word.
INCLUDED IN THIS COURSE
- Comprehensive course manual
- Keyboard shortcuts quick reference
- Sample and exercise files
- Refreshments (for classes conducted in Avantix Learning classrooms)
- Certificate of completion
- Follow-up email support
Course Topics
Working in Microsoft Visio Environment
- Creating a drawing from a template
- Overview of master shapes, stencils and templates
- Working with the Ribbon and the Quick Access Toolbar
- Parts of the Visio window
- Displaying and hiding the Shapes window
- Scrolling in a document
- Zooming in and out quickly and easily
- Changing the measurement system
- Setting the scale
- Applying themes
Inserting and Manipulating Basic Shapes
- Creating basic shapes using the Shapes window
- Using the dynamic grid
- Resizing and repositioning shapes
- Duplicating shapes
- Key settings for shapes
- Using different stencils
- Finding shapes
- Grouping objects
- Aligning and distributing objects
Formatting Shapes
- Using themes
- Applying text and fill colours
- Adding line/border formatting
- Enhancing shapes with special effects
Inserting and Manipulating Text
- Adding text to shapes
- Rotating text in shapes
- Editing text
- Formatting shape text
Connecting Shapes
- Connecting shapes in different ways
- Dynamic vs static connectors
- Selecting connectors
- Deleting connectors
- Changing connectors
- Different types of glue
- Automatically connecting shapes
Inserting Images
- Inserting images
- Resizing an image using different strategies
- Applying formatting to images
Working with Pages
- Inserting pages
- Naming pages
- Duplicating pages
- Changing page order
- Deleting pages
Applying Background Pages
- Applying background pages with headers and footers
- Creating a background page
- Naming a background page
- Applying a background page to a drawing page
Working with Layers
- Creating layers
- Assigning shapes to layers
- Displaying specific layers
- Deleting a layer
Using Containers
- Inserting containers
- Adding shapes to containers
- Locking containers
Creating Basic Flowcharts and Cross-Functional Flowcharts
- Creating basic flowcharts
- Connecting shapes automatically
- Making point-to-point connections
- Routing connectors
- Using line-curve connectors
- Creating cross-functional flow charts
- Adding swim lanes
Creating Organization Charts
- Designing an organization chart from scratch
- Inserting subordinates
- Adding multiple shapes quickly
- Creating an organization chart from Excel data
- Changing styles
- Changing spacing
Creating Brainstorming Diagrams
- Adding shapes to a brainstorming diagram
- Connecting brainstorming shapes
- Formatting the shapes
Creating Network Diagrams
- Creating a network diagram
- Adding network shapes
- Add shape data as required
- Connecting network shapes
Creating Floor Plans
- Creating a floor plan
- Adding space
- Adding walls
- Drawing to scale
- Adding doors, windows and furniture
Previewing and Printing
- Previewing a drawing
- Specifying print options
*Prices subject to change.
Our instructor-led courses are delivered in virtual classroom format or at our downtown Toronto location at 18 King Street East, Suite 1400, Toronto, Ontario, Canada (some in-person classroom courses may also be delivered at an alternate downtown Toronto location). Contact us at info@avantixlearning.ca if you'd like to arrange custom instructor-led virtual classroom or onsite training on a date that's convenient for you.
Copyright 2025 Avantix® Learning

Custom Training
Register now for a public scheduled course or contact us to arrange custom training at your site or ours.
Related courses
Microsoft Visio: Intermediate (Professional)
Microsoft Excel: Intermediate / Advanced
Microsoft PowerPoint: Intermediate / Advanced
Microsoft Project: Introduction
You may like
How to Insert and Format Icons in PowerPoint
You can curve text in PowerPoint using WordArt Transform options on the Shape tab in the Ribbon. The text can be WordArt text or text in a text box or in a placeholder. Using Transform text effects, you can curve or bend selected text. The text can be curved around a circle or other shape if you want. Typically, curved text is inserted in Normal View and can be a word or a line of text.

How to Highlight or Draw on PowerPoint Slides During a Slide Show
You can highlight text in PowerPoint in many different ways. If you have PowerPoint 2019 or a later version, Text Highlight Color is available on the Home tab in the Ribbon. For those with older versions without a Highlight command in the Ribbon, you'll need to use other strategies to highlight text. In this article, we'll review five ways to highlight text in PowerPoint. Most of these strategies will work in all versions.
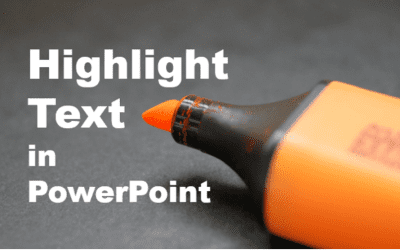
How to Highlight Text in PowerPoint (5 Ways)
You can highlight text in PowerPoint in many different ways. If you have PowerPoint 2019 or a later version, Text Highlight Color is available on the Home tab in the Ribbon. For those with older versions without a Highlight command in the Ribbon, you'll need to use other strategies to highlight text. In this article, we'll review five ways to highlight text in PowerPoint. Most of these strategies will work in all versions.

How to Curve Text in PowerPoint
You can curve text in PowerPoint using WordArt Transform options on the Shape tab in the Ribbon. The text can be WordArt text or text in a text box or in a placeholder. Using Transform text effects, you can curve or bend selected text. The text can be curved around a circle or other shape if you want. Typically, curved text is inserted in Normal View and can be a word or a line of text.

How to Link to Another Slide in PowerPoint (4 Ways)
You can easily add a link or hyperlink to another slide in the same PowerPoint presentation. In this article, we'll review 3 ways to link to another slide – using a link or hyperlink, adding an action setting or using the Zoom feature (Zoom & Link) to add a Slide Zoom. In order to make it easier to link to another slide, it's best to add a title in the title placeholder on each slide in the presentation. In PowerPoint, links become active when you run a slide show (click the Slide Show button on the bottom right of the screen). When you run a slide show and click a link, PowerPoint will jump to the link.

How to Make Text Appear on Click in PowerPoint
You can make text appear on click in PowerPoint using entrance animations. The most common entrance animations are appear, fade, wipe and fly in. During a slide show, presenters can make text appear by line, bullet point, paragraph, word or character. In this article, we will focus on using animations to make text appear on click so you will need to run a slide show and then click anywhere on the slide to make the text appear. You can also press the right arrow or spacebar to make text appear during a slide show. Animations are typically added to placeholders or text boxes in Normal View but can be applied in Slide Master View.

How to Flip an Image in PowerPoint (2 Easy Ways)
You can easily flip an image in PowerPoint using the Ribbon or by dragging a sizing handle. Images can be flipped horizontally or vertically on a slide.

How to Recolor a Picture in PowerPoint
You can recolor a picture in PowerPoint in several ways. The recolor options in the Ribbon and in the Format Picture task pane allow you to recolor a picture but, depending on your version of PowerPoint, the colors available may only work with the current color theme and may also blend colors from the original picture which is problematic. An alternative is to create a shape, fill it with a color, change its transparency and overlay the shape on top of the picture. You would typically make the image grayscale first if you use this strategy.
You may also like
How to Print a Word Document Without Comments
If you or another user have added comments in a Word document, you may want to print the document without comments. By default, when you print a Word document, comments are printed as well. There are a few ways you can print a Word document without printing the comments – hide the comments or change print settings. If you use either of these strategies, the comments are not deleted.

How to Cut, Copy and Paste Text in Word (5 Ways with Shortcuts)
In this guide, we'll cover 5 ways to cut, copy and paste text in Microsoft Word. A common method is to use keyboard shortcuts but you can also use the Ribbon, the context menu and a few hidden tools as well. After you paste your text, you can choose paste options such as Keep Text Only.

How to Insert or Type an Upside Down Exclamation Mark in Word (5 Ways to Insert ¡ with Shortcuts)
This guide covers five easy ways to insert or type the upside down exclamation mark (¡) in Microsoft Word including shortcuts, Alt codes and custom key combinations. The upside down exclamation mark or inverted exclamation mark is used in the Spanish language at the beginning of exclamatory sentences and helps readers understand tone before completing the sentence.
Image credit(s) / application screenshot(s): Microsoft
Microsoft, the Microsoft logo, Microsoft Office and related Microsoft applications and logos are registered trademarks of Microsoft Corporation in Canada, US and other countries. All other trademarks are the property of the registered owners.
Avantix Learning |18 King Street East, Suite 1400, Toronto, Ontario, Canada M5C 1C4 | Contact us at info@avantixlearning.ca