5 Different Strategies to Highlight Text in PowerPoint
by Avantix Learning Team | Updated August 24, 2021
Applies to: Microsoft® PowerPoint® 2013, 2016, 2019 and 365 (Windows)
You can highlight text in PowerPoint in many different ways. If you have PowerPoint 2019 or 365, Text Highlight Color is available on the Home tab in the Ribbon. For those with older versions (without a Highlight command in the Ribbon), you'll need to use other strategies to highlight text. In this article, we'll review 5 ways to highlight text in PowerPoint. Most of these strategies will work in all versions.
A word of caution – highlighting uses color as a way to focus attention. However, some members of your audience may not be able to see color so you may want to combine highlighting with another effect such as bold.
Also, keep in mind that highlighting is only one way to focus attention. You can use many strategies in PowerPoint to focus attention including creating hierarchy, drawing lines, creating spotlight effects, inserting images and adding animations.
Note: Buttons and Ribbon tabs may display in a different way (with or without text) depending on the size of your screen and your Control Panel settings. For PowerPoint 365 users, Ribbon tabs may appear with different names. For example, the Picture Tools Format tab may appear as Picture Format and the Drawing Tools Format tab may appear as Drawing Format or Shape Format.
Recommended article: 15 Shortcuts to Select Text in PowerPoint
Do you want to learn more about PowerPoint? Check out our virtual classroom or live classroom PowerPoint courses >
Option 1: Apply and remove highlighting (for PowerPoint 2019 or 365 users)
If you have PowerPoint 2019 or 365, the Text Highlight Color command is available in the Ribbon in PowerPoint. You would typically apply highlighting in Normal view.
Below is the Home tab in the Ribbon (for 365 and 2019) with the Text Highlight Color command in the Font group:
To highlight text in PowerPoint 2019 or 365:
- Select the text that you want to highlight.
- Click the Home tab in the Ribbon.
- Click the arrow next to Text Highlight Color in the Font group. A color gallery appears.
- Select the desired highlight color from the gallery.
Below is the Text Highlight Color command in PowerPoint for Office 365 subscribers:
To highlight multiple non-contiguous text selections:
- Ensure that no text is selected on the slide.
- Click the Home tab in the Ribbon.
- Click the arrow next to Text Highlight Color in the Font group. A color gallery appears.
- Select the desired highlight color from the gallery. The mouse pointer changes to a highlighter.
- Drag over the text you wish to highlight. You can continue dragging over multiple instances of text.
- When you have finished highlighting, press Esc on the keyboard to turn off the highlighter.
To remove highlighting from text:
- Select the highlighted text.
- Click the Home tab in the Ribbon.
- Click the arrow next to Text Highlight Color in the Font group. A color gallery appears.
- Select No Color from the gallery.
Option 2: Copy Microsoft Word highlighting to PowerPoint (for PowerPoint 2010, 2013 or 2016 users)
If you have PowerPoint 2010, 2013 or 2016 and are not an Office 365 subscriber, the Text Highlight Color command is not available in the Ribbon. However, you can copy highlighting from Microsoft Word and paste it into your PowerPoint slides. You would typically apply highlighting in Normal view.
To copy highlighting from Word to PowerPoint:
- In Microsoft Word, select the text that you want to highlight and copy to PowerPoint. Ensure it is the same font and size as the destination text box or placeholder in PowerPoint.
- Click the Home tab in the Ribbon.
- Click the arrow next to Text Highlight Color. A color gallery appears.
- Select the desired highlight color from the gallery.
- Copy the text by pressing Ctrl + C or right-click and select Copy.
- Switch to PowerPoint.
- Click in a text box or placeholder on a PowerPoint slide where you wish to place the highlighted text.
- Right-click and select Keep Source Formatting in the Paste Options in the drop-down menu. This will copy the highlighted text into PowerPoint.
- If you wish to copy the highlighting to other text, select the highlighted text.
- Click the Home tab in the Ribbon.
- Click the Format Painter.
- Drag over the other text you wish to highlight.
Below is the Paste Source Formatting option in PowerPoint (available in all versions):
Below is a sample of highlighted text copied from Microsoft Word:
To remove highlighting you have copied from Microsoft Word from text in PowerPoint:
- Select any text on the PowerPoint slide that is not highlighted.
- Click the Home tab in the Ribbon.
- Click the Format Painter.
- Drag over the text with the highlighting you want to remove.
Option 3: Draw a shape around the text you want to highlight (all versions)
Another way to highlight text is to draw a shape (such as a rectangle) around the text you want to highlight and then send it behind the text (you can also fill a text box or placeholder with a color).
To highlight text by drawing a basic shape around it:
- Display the slide with the text you want to highlight.
- Click the Insert tab in the Ribbon.
- Click Shapes and then select a shape such as a rectangle from the gallery.
- Drag to draw the shape around the text.
- Drag the shape sizing handles to fit the text.
- Drag the edge of the shape to move it. You can also use your arrow keys on your keyboard to move it.
- With the shape selected, click the Drawing Tools Format tab in the Ribbon.
- Click the arrow beside Shape Fill and select a color from the gallery as the highlight color.
- Click the arrow beside Shape Outline and select No Outline.
- With the shape selected, click the Drawing Tools Format tab again and select Send to Back or Send Backward from the Send Backward drop-down menu to send the shape behind the text.
Below is a sample of a rectangle shape used to highlight text:
To highlight text by drawing a custom shape around it:
- Display the slide with the text you want to highlight.
- Click the Insert tab in the Ribbon.
- Click Shapes and select the Scribble tool from the gallery (the last option in the Lines group).
- Keep the left mouse button pressed and drag around the text to draw a custom shape. Ensure that you release the mouse button on the starting point of the path to create a closed path (which you can fill with a color).
- Drag the edge of the shape to move it. You can also use your arrow keys on your keyboard to move it.
- Right-click the shape and select Edit Points to edit the points. Drag a point to move it. Ctrl-click a point to remove it. Ctrl-click the path to add a point. Click outside the shape to exit Edit Points mode.
- With the shape selected, click the Drawing Tools Format tab in the Ribbon.
- Click the arrow beside Shape Fill and select a color from the gallery as the highlight color.
- Click the arrow beside Shape Outline and select No Outline.
- With the shape selected, click the Drawing Tools Format tab again and select Send to Back or Send Backward from the Send Backward drop-down menu to send the shape behind the text.
Below is a sample of a custom shape used to highlight text:
Option 4: Apply a glow effect to text (all versions)
You can also apply the Glow text effect as an alternative to highlighting.
To highlight text by applying the Glow text effect:
- Select the text you want to highlight.
- Click the Drawing Tools Format tab in the Ribbon.
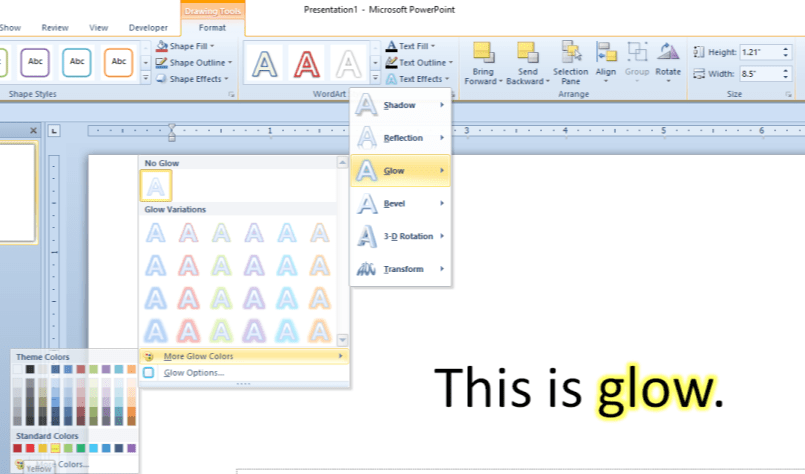
- Click the arrow next to Text Effects and select Glow from the drop-down menu.
- Select a Glow variation from the drop-down menu.
Below is the drop-down menu with Glow variations:
Option 5: Draw on slides during a slide show using the Highlighter tool (all versions)
Another way that you can apply highlighting is to use the Highlighter tool when you are running a slide show. This is called ink annotation.
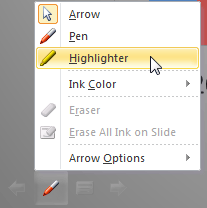
The Highlighter tool creates lines that start out in yellow, are semi-transparent and are thicker than lines created with the Pen tool. You can access the Highlighter tool using the context menu (below) during a slide show.
To use the Highlighter tool and draw on a slide during a slide show:
- Open an existing presentation.
- Click the Slide Show button on the bottom right.
- In Slide Show mode, point to the bottom left area of screen. A series of icons will appear.
- Click the Pen icon. A menu will appear. Choose the Highlighter tool from the menu. Alternatively, you can also right-click or press Shift + F10 to display a menu, choose Pointer Options and then Highlighter. The cursor changes to a yellow line (the default color of the Highlighter tool is yellow).
- Drag to draw or write on the slide. Hold down Shift as you draw to draw straight lines.
- Press Escape when you're finished using the Highlighter. When you exit the show, you will be asked if you want to keep the ink annotations. You can opt to keep or discard the annotations.
Below is a sample of highlighting applied during a slide show:
To change the color of the Highlighter:
- In Slide Show mode, point to the bottom left area of the screen.
- Click the Pen icon or right-click or press Shift + F10 to display the menu. Select Ink Color from the menu and then select a color from the sub-menu. There are two types of colors – Theme Colors and Standard Colors. Theme colors may differ as they are affected by the Theme for the presentation but Standard Colors will always contain the same 10 colors for all presentations.
- Display the highlighter and draw as usual.
If you'd like to learn more about this and other ink annotation tools, check out How to Draw on PowerPoint Slides on the Fly during a Presentation (Using Ink).
This article was first published on March 31, 2018 and has been updated for clarity and content.
Subscribe to get more articles like this one
Did you find this article helpful? If you would like to receive new articles, join our email list.
More resources
How to Group and Ungroup in PowerPoint (with Shortcuts)
How to Highlight Text with Emphasis Animation
How to Break, Update or Change Links to Excel Charts or Worksheets in PowerPoint
How to Remove the Background from a Picture in PowerPoint (2 Ways)
How to Make a Picture Transparent in PowerPoint (3 Ways)
Related courses
Microsoft PowerPoint: Intermediate / Advanced
Microsoft PowerPoint: Design for Non-Designers
Microsoft PowerPoint: Animations Bootcamp
Our instructor-led courses are delivered in virtual classroom format or at our downtown Toronto location at 18 King Street East, Suite 1400, Toronto, Ontario, Canada (some in-person classroom courses may also be delivered at an alternate downtown Toronto location). Contact us at info@avantixlearning.ca if you'd like to arrange custom instructor-led virtual classroom or onsite training on a date that's convenient for you.
Copyright 2024 Avantix® Learning
You may also like
How to Insert or Type A with an Accent Mark in Google Docs (À, Á, Â, Ä, à, á, â, or ä) – 6 Ways
You can insert or type a with an accent mark in Google Docs in several ways. You can use built-in tools, online tools, add-ons or keyboard shortcuts (including Alt code shortcuts). The letter a can be inserted with an accent in both upper or lower case. The following are common accents in upper or lower case – À, Á, Â, Ä, à, á, â, or ä.
How to Insert or Type A with an Accent Mark in Word (À, Á, Â, Ä, à, á, â, or ä)
You can insert or type a with an accent mark in Word using built-in tools or keyboard shortcuts (including Alt code shortcuts). The letter a can be inserted with an accent in both upper or lower case. The following are common accents in upper or lower case – À, Á, Â, Ä, à, á, â, or ä.
How to Insert or Type U with an Accent Mark in Google Docs (Ù, Ú, Û, Ü, ù, ú, û, or ü) – 6 Ways
You can insert or type u with an accent mark in Google Docs in several ways. You can use built-in tools, online tools, add-ons or keyboard shortcuts (including Alt code shortcuts). The letter u can be inserted with an accent in both upper or lower case. The following are common accents in upper or lower case – Ù, Ú, Û, Ü, ù, ú, û, or ü
Microsoft, the Microsoft logo, Microsoft Office and related Microsoft applications and logos are registered trademarks of Microsoft Corporation in Canada, US and other countries. All other trademarks are the property of the registered owners.
Avantix Learning |18 King Street East, Suite 1400, Toronto, Ontario, Canada M5C 1C4 | Contact us at info@avantixlearning.ca


