Use Word's Hidden Clipboard for Cutting, Copying and Pasting
by Avantix Learning Team | Updated March 24, 2022
Applies to: Microsoft® Word® 2010, 2013, 2016, 2019, 2021 and 365 (Windows)
If you do a lot of cutting, copying and pasting in Microsoft Word, there's a hidden tool that can save you a lot of time. The technical name for this tool is the Spike which is likely why very few Word users know about it. The Spike is different from the regular Clipboard which holds only one cut or copied item at a time. The Spike can collect multiple items (text or images) as you cut or copy them.
You can collect (cut or copy) a number of items and then paste them in the same document or a different document in a couple of steps. The trick is to display the Clipboard task pane when you're cutting or copying.
If you are a keyboard only user, check out our article No Mouse? Using Keyboard Only Navigation in Microsoft Office.
Recommended article: How to Export PowerPoint Handouts to Microsoft Word
Displaying the Clipboard task pane (the Spike)
To display the Clipboard task pane or the Spike in Word:
- Click the Home tab in the Ribbon.
- In the Clipboard group, click the dialog box launcher (the button on the bottom right of the Clipboard group). The Clipboard task pane appears.
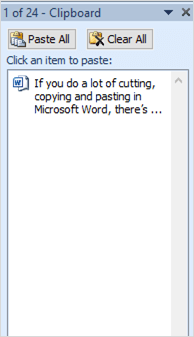
Below is the Clipboard task pane:
Adding items to the Clipboard task pane
Now, when you cut or copy text or an image, it will be added to the Clipboard task pane automatically (which can hold up to 24 items).
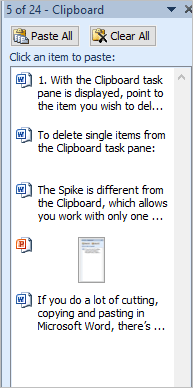
Below is the Clipboard task pane with multiple items:
You can also cut items and add them to the Spike by pressing Ctrl + F3 if the task pane is not displayed.
Pasting items from the Clipboard task pane
To paste items from the Clipboard task pane (in the current document or another document):
- With the Clipboard task pane displayed, place the cursor in the document where you want to paste the item.
- Click the item in the Clipboard task pane and it will be pasted into the document at the cursor.
- Repeat for other items.
Deleting items from the Clipboard task pane
To delete single items from the Clipboard task pane:
- With the Clipboard task pane displayed, point to the item you wish to delete until an arrow appears.
- Click the arrow and select Delete.
- Repeat for other items.
To delete all items from the Clipboard task pane, with the Clipboard task pane displayed, click Clear All at the top of the task pane.
The Clipboard task pane or the Spike can be a real timesaver if you're working with large Word documents. You can change the behaviour of the Spike by clicking on Options at the bottom of the task pane and selecting other options (such as showing the Clipboard automatically).
Subscribe to get more articles like this one
Did you find this article helpful? If you would like to receive new articles, join our email list.
More resources
How to Select All in Word (6 Ways with Shortcuts)
How to Find and Replace in Word (and Use Wildcards)
3 Ways to Insert the Copyright or Trademark Symbol in Word (with Shortcuts)
5 Ways to Insert the Approximately Equal To or Almost Equal To Symbol in Word
10+ Great Microsoft Word Navigation Shortcuts to Move Around Quickly in Your Documents
Related courses
Microsoft Word: Intermediate / Advanced
Microsoft Excel: Intermediate / Advanced
Microsoft PowerPoint: Intermediate / Advanced
Our instructor-led courses are delivered in virtual classroom format or at our downtown Toronto location at 18 King Street East, Suite 1400, Toronto, Ontario, Canada (some in-person classroom courses may also be delivered at an alternate downtown Toronto location). Contact us at info@avantixlearning.ca if you'd like to arrange custom instructor-led virtual classroom or onsite training on a date that's convenient for you.
Copyright 2024 Avantix® Learning
You may also like
How to Insert or Type I with an Accent Mark in Word (Í, í, Ì, ì, Î, î, Ï, or ï)
You can insert or type i with an accent mark in Word using built-in tools or keyboard shortcuts (including Alt code shortcuts). The letter i can be inserted with an accent in both upper or lower case. The following are common accented characters that you can insert or type in Word in upper or lower case: grave (Ì or ì), acute (Í or í), circumflex (Î or î) and umlaut (Ï or ï).
How to Insert or Type A with an Accent Mark in Word (À, Á, Â, Ä, à, á, â, or ä)
You can insert or type a with an accent mark in Word using built-in tools or keyboard shortcuts (including Alt code shortcuts). The letter a can be inserted with an accent in both upper or lower case. The following are common accented characters that you can insert or type in Word in upper or lower case: grave (À or à), acute (Á or á), circumflex (Â or â) and umlaut (Ä or ä).
10 Word Shortcuts to Select Text Using a Keyboard
You can use several shortcuts in Word to select text in your documents using only your keyboard. When you select text, it will typically be highlighted in grey. After you select text, you can cut, copy, or delete the selected text or apply character or paragraph formatting.
Microsoft, the Microsoft logo, Microsoft Office and related Microsoft applications and logos are registered trademarks of Microsoft Corporation in Canada, US and other countries. All other trademarks are the property of the registered owners.
Avantix Learning |18 King Street East, Suite 1400, Toronto, Ontario, Canada M5C 1C4 | Contact us at info@avantixlearning.ca


