Check Out These Helpful Tips for Creating a Select Query in Microsoft Access
by Avantix Learning Team | Updated October 14, 2022
Applies to: Microsoft® Access® 2010, 2013, 2016, 2019, 2021 and 365 (Windows)
You can create a select query in Microsoft Access to retrieve data based on criteria. A select query in Microsoft Access is the most common type of query. There are a number of ways of working efficiently in select queries to get the results you want and save some time. You can also use many of these tips in other types of queries.
Recommended article: 10 Timesaving Shortcuts in Microsoft Access
Do you want to learn more about Microsoft Access? Check out our virtual classroom or in-person classroom Access courses >
Create a select query in Design View
To create a select query and go to Design View (and avoid the wizard):
- Click the Create tab in the Ribbon.
- In the Queries group, click Query Design. A dialog box appears.
- Double-click the desired tables or queries (click on the Queries tab in the dialog box to select queries).
- Click Close. A field list for each table or query will appear in the top pane in Design View.
- If you need to add another table or query to the top pane, click the Show Table button on the Query Tools Design tab in the Ribbon, double-click the desired table or query (click on the Queries tab first) and click Close.
Move between Design View and Datasheet View
You can run a select query by clicking on the Run button on the Query Tools Design tab in the Ribbon or by simply going to Datasheet View.
To quickly move between Design View and Datasheet View:
- Right-click the query tab (or title bar) of the current query and select the desired view, or
- Click the View button on the Home tab or the Query Tools Design tab in the Ribbon and select the desired view.
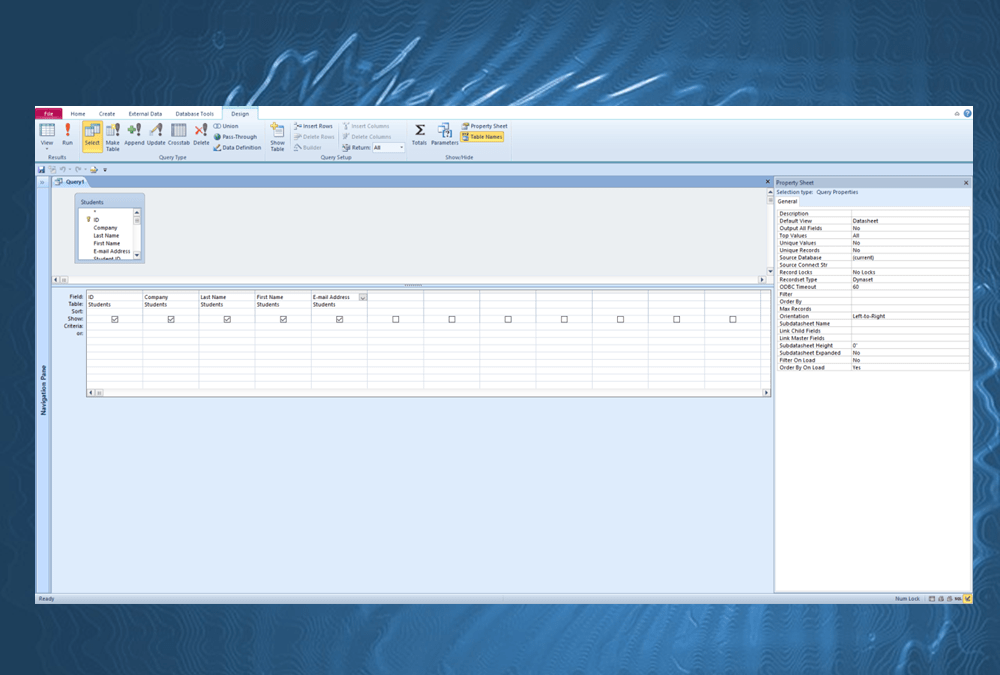
Add fields to the grid in Design View
In Design View, the lower pane is called the QBE (Query by Design) grid. Display the fields you wish to query in this grid. The upper pane in Design View displays the data sources – field lists of tables or queries.
To add a field to the QBE grid:
- Double-click a field in a field list in the top pane in Design View to add it to the next available column in the grid.
- Drag a field from a field list by holding down the left mouse button and then dragging down to a column to add it to the grid.
- Click the field row in a column in the QBE grid and from the drop-down menu, select the desired field. If there's more than one table and the same field name occurs in both, you must also specify the source table in the Table row or Access will default to the first table (left to right in the upper pane) that contains the field.
Add multiple fields to the grid in Design View
You can add multiple fields to the QBE grid.
To select multiple fields that are contiguous (adjacent):
- In the top pane, click a field in a field list and then hold down Shift and click the last field you want to include below.
- Point to one of the selected fields, hold down the left mouse button and drag down into a column in the QBE grid.
To select multiple fields that are non-contiguous (not adjacent):
- In the top pane, click a field in a field list and then Control-click on subsequent fields below.
- Point to one of the selected fields, hold down the left mouse button and drag down into a column in the QBE grid.
Add all fields to the grid in Design View
You can add all fields to the grid. However, keep in mind that this can slow down your query depending on the number of fields and the amount of data.
To select all fields in a source table or query field list:
- In the top pane, double-click the title bar of a field list to select all of the fields.
- Point to one of the selected fields, hold down the left mouse button and drag down into a column in the QBE grid.

You could use the asterisk (*) which appears at the top of the field list in the top pane and drag it to the QBE grid to represent all of the fields. However, this method has limitations. For example, you can't include an aggregate function or run a Totals query using the asterisk character.
Use AND and OR logic
In the QBE grid, in the criteria row(s):
- Enter criteria in the same criteria row as an AND scenario.
- Enter criteria in different criteria rows as an OR scenario.
Rearrange columns
You can rearrange columns in Design View in a query. This is helpful in many ways including grouping and sorting. If you specify a sort order for more than one field, Access sorts from left to right.
To rearrange columns in Design View:
- Click the thin bar at the top of the column you want to move to select the entire column.
- Point to the same area on the selected column, hold down the left mouse button and drag the column to its new position.
Set properties
You can display properties in Design View in a number of ways:
- Double-click the top pane in a blank area.
- Press F4.
- Right-click in either pane in Design View and select Properties from the drop-down menu.
- Click the Properties button on the Query Design Tools tab in the Ribbon.
To set query properties:
- Click the top pane in a blank area.
- Select the desired properties in the Properties pane.
Below are query properties:

To set field properties:
- Click a column in the QBE grid.
- Select the desired properties in the Properties pane.
Below are field properties:

Add a button to easily clear the grid
You can add a Clear Grid button to the Quick Access Toolbar to make it easy to clear the entire grid in Query Design View.
First, you may want to display the Quick Access Toolbar below the Ribbon (this makes it easy to see and allows more buttons to be added). Click the arrow to the right of the Quick Access Toolbar (which is above the Ribbon by default) and select Show Below Ribbon.
To add a Clear Grid button to the Quick Access Toolbar:
- Click the arrow to the right of the Quick Access Toolbar and choose More Commands.
- In the menu at the top, choose All Commands.
- In the list of commands, select Clear Grid.
- Click Add.
- Click OK.

From this point on, you'll be able to select the Clear Grid button (X) on the Quick Access Toolbar in Design View in a query.
Below is the Quick Access Toolbar with the Clear Grid button (X):

Display totals in Datasheet View
You can now display totals automatically in Datasheet View:
- Go to Datasheet View.
- Click the Totals button on the Home tab in the Ribbon. A Total row is added to the datasheet.
- Click the column you wish to total in the Total row and select a function from the drop-down list. Access calculates the total automatically.

There are many more tips and tricks for working with select queries but these are a great set to start.
Subscribe to get more articles like this one
Did you find this article helpful? If you would like to receive new articles, JOIN our email list.
More resources
Key Features and Benefits of Microsoft Access
10 Techniques for Designing Forms in Microsoft Access
How to Convert a Microsoft Access Report to PDF (3 Ways)
How to Create a Calculated Field in a Microsoft Access Query
How to Highlight Records or Values in a Microsoft Access Report Using Conditional Formatting
Related courses
Microsoft Access: Introduction
Microsoft Access: Intermediate / Advanced
Microsoft Access: Introduction to Macros and the Macro Designer
Our instructor-led courses are delivered in virtual classroom format or at our downtown Toronto location at 18 King Street East, Suite 1400, Toronto, Ontario, Canada (some in-person classroom courses may also be delivered at an alternate downtown Toronto location). Contact us at info@avantixlearning.ca if you'd like to arrange custom instructor-led virtual classroom or onsite training on a date that's convenient for you.
Copyright 2025 Avantix® Learning
You may also like

How to Replace Zeros (0) with Blanks in Excel
There are several strategies to replace zero values (0) with blanks in Excel. If you want to replace zero values in cells with blanks, you can use the Replace command or write a formula to return blanks. However, if you simply want to display blanks instead of zeros, you have two formatting options – create a custom number format or a conditional format.

What is Power Query in Excel?
Power Query in Excel is a powerful data transformation tool that allows you to import data from many different sources and then extract, clean, and transform the data. You will then be able to load the data into Excel or Power BI and perform further data analysis. With Power Query (also known as Get & Transform), you can set up a query once and then refresh it when new data is added. Power Query can import and clean millions of rows of data.

How to Freeze Rows in Excel (One or Multiple Rows)
You can freeze one or more rows in an Excel worksheet using the Freeze Panes command. If you freeze rows containing headings, the headings will appear when you scroll down. You can freeze columns as well so when you scroll to the right columns will be frozen.
Image credit(s) / application screenshot(s): Microsoft
Microsoft, the Microsoft logo, Microsoft Office and related Microsoft applications and logos are registered trademarks of Microsoft Corporation in Canada, US and other countries. All other trademarks are the property of the registered owners.
Avantix Learning |18 King Street East, Suite 1400, Toronto, Ontario, Canada M5C 1C4 | Contact us at info@avantixlearning.ca


