Crop a Picture into a Circle in Google Slides Using Crop to Shape
by Avantix Learning Team | Updated August 1, 2021
Applies to: Google Slides® (Windows or Mac)
You can achieve some interesting effects by cropping an image into a shape in Google Slides. However, if you want to crop an image into a circle, you'll need to use a few tricks.
To crop an image into a circle, you'll need to:
- Crop the image to a square
- Change the square to a circle
- Adjust if necessary
You can also adjust an oval into a circle as an alternative method.
Recommended article: How to Crop a Picture in PowerPoint (4 Ways)
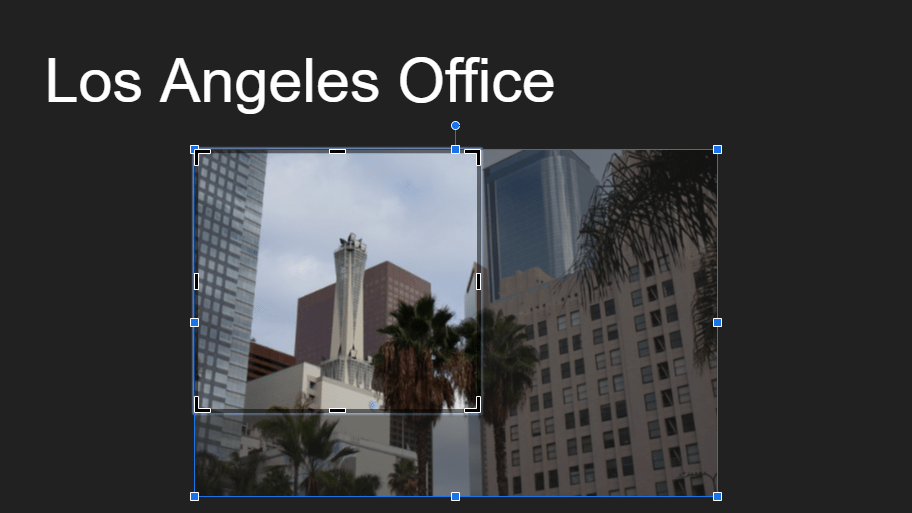
When you crop an image, the image will appear in crop mode with two sets of handles (black crop handles and square blue sizing handles):
Step 1: Crop an image to a square
There are 4 ways to crop an image in Google Slides:
- Using the menu
- Using the Crop command on the Toolbar
- By right-clicking
- By double-clicking
To crop an image into a square in Google Slides using the menu:
- Select the image on the slide.
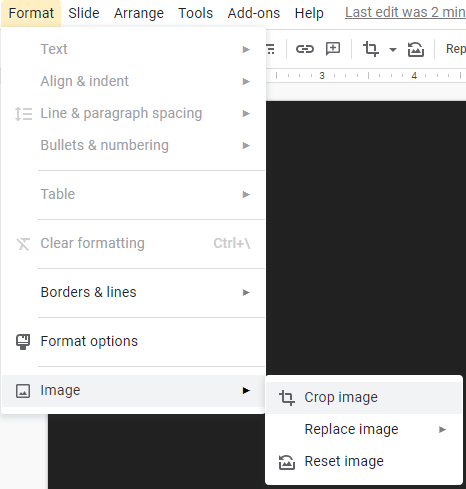
- Click Format in the menu, select Image and then Crop Image. The image appears in crop mode.
- Drag the black cropping handles to create a perfect square (it's usually best to use a corner cropping handle).
- Drag the square blue sizing handles to resize the image within the cropped area (it's usually best to use a corner sizing handle).
- Drag the image within the cropped area to the desired location.
- Click outside the image to exit crop mode.
The following menu appears with you select Format > Image > Crop Image:
To crop an image into a square in Google Slides using the Crop command on the Toolbar:
- Select the image on the slide.
- Click Crop on the Toolbar. The image appears in crop mode.
- Drag the black cropping handles to create a perfect square (it's usually best to use a corner cropping handle).
- Drag the square blue sizing handles to resize the image within the cropped area (it's usually best to use a corner sizing handle).
- Drag the image within the cropped area to the desired location.
- Click outside the image to exit crop mode.
The Crop command appears in the Toolbar when an image is selected:
To crop an image into a square in Google Slides by right-clicking:
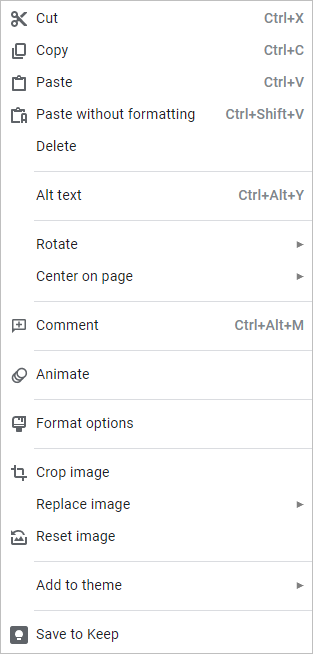
- Right-click the image on the slide. A drop-down menu appears.
- Click Crop Image. The image appears in crop mode.
- Drag the black cropping handles to create a perfect square (it's usually best to use a corner cropping handle).
- Drag the square blue sizing handles to resize the image within the cropped area (it's usually best to use a corner sizing handle).
- Drag the image within the cropped area to the desired location.
- Click outside the image to exit crop mode.
The following menu appears when you right-click an image:
To crop an image into a square in Google Slides by double-clicking:
- Double-click the image on the slide. The image appears in crop mode.
- Drag the black cropping handles to create a perfect square (it's usually best to use a corner cropping handle).
- Drag the square blue sizing handles to resize the image within the cropped area (it's usually best to use a corner sizing handle).
- Drag the image within the cropped area to the desired location.
- Click outside the image to exit crop mode.
Step 2: Crop the image into a circle
The next step is to crop the image into a circle.
To crop an image into a circle in Google Slides using the Crop command on the Toolbar:
- Select the image on the slide.
- Click the arrow beside Crop in the Toolbar. A drop-down menu appears.
- Select Shapes and then click the oval shape in the Shapes Gallery.
- If the cropped area does not appear to be a perfect circle, double-click the image and drag the crop handles until it appears as a circle.
- Click outside the image to exit crop mode.
You can create some really interesting effects in your presentation when you try cropping to a shape.
Subscribe to get more articles like this one
Did you find this article helpful? If you would like to receive new articles, join our email list.
More resources
How to Add Audio in Google Slides
How to Change Margins in Google Docs (2 Ways)
How to Do a Hanging Indent in Google Docs (3 Ways)
How to Superscript in Google Docs (Mac or Windows)
How to Strikethrough or Cross Out Text in Google Docs (with Shortcuts)
Related courses
Microsoft PowerPoint: Intermediate / Advanced
Microsoft PowerPoint: Design for Non-Designers
Microsoft PowerPoint: Accessible PowerPoint Presentations
Our instructor-led courses are delivered in virtual classroom format or at our downtown Toronto location at 18 King Street East, Suite 1400, Toronto, Ontario, Canada (some in-person classroom courses may also be delivered at an alternate downtown Toronto location). Contact us at info@avantixlearning.ca if you'd like to arrange custom instructor-led virtual classroom or onsite training on a date that's convenient for you.
Copyright 2024 Avantix® Learning
You may also like
How to Insert or Type U with an Accent Mark in Google Docs (Ù, Ú, Û, Ü, ù, ú, û, or ü) – 6 Ways
You can insert or type u with an accent mark in Google Docs in several ways. You can use built-in tools, online tools, add-ons or keyboard shortcuts (including Alt code shortcuts). The letter u can be inserted with an accent in both upper or lower case. The following are common accents in upper or lower case – Ù, Ú, Û, Ü, ù, ú, û, or ü
How to Insert or Type O with an Accent Mark in Google Docs (Ò, Ó, Ô, Õ, Ö, ò, ó, ô, õ or ö) – 6 Ways
You can insert or type o with an accent mark in Google Docs in several ways. You can use built-in tools, online tools, add-ons or keyboard shortcuts (including Alt code shortcuts). The letter o can be inserted with an accent in both upper or lower case. The following are common accents in upper or lower case – Ò, Ó, Ô, Õ, Ö, ò, ó, ô, õ or ö.
How to Insert or Type E with an Accent Mark in Google Docs (È, É, Ê, Ë, è, é, ê, or ë) – 6 Ways
You can insert or type e with an accent mark in Google Docs in several ways. You can use built-in tools, online tools, add-ons or keyboard shortcuts (including Alt code shortcuts). The letter e can be inserted with an accent in both upper or lower case. The following are common accents in upper or lower case – È, É, Ê, Ë, è, é, ê, or ë.
Google, the Google logo and related Google Drive applications and logos are registered trademarks of Google LLC in Canada, US and other countries.
Microsoft, the Microsoft logo, Microsoft Office and related Microsoft applications and logos are registered trademarks of Microsoft Corporation in Canada, US and other countries. All other trademarks are the property of the registered owners.
Avantix Learning |18 King Street East, Suite 1400, Toronto, Ontario, Canada M5C 1C4 | Contact us at info@avantixlearning.ca


