Microsoft PowerPoint 2010 Version Overview
If you're considering upgrading to Microsoft PowerPoint 2010 before attending a training course or arranging custom training, check out this list of some of the new features in PowerPoint 2010.
Are you working on PowerPoint 2013? Check out new features in the Microsoft PowerPoint 2013 Overview.
If you are using PowerPoint 2016 or considering upgrading to PowerPoint 2016, see the Microsoft PowerPoint 2016 Overview.
Looking for PowerPoint training courses?
Microsoft PowerPoint 2010 New Features
Applies to: Microsoft PowerPoint 2010 for Windows
The following are some of the key new features available in Microsoft PowerPoint 2010.
File Tab (Backstage View)
In 2010, the Office button has been replaced with a File tab on the Ribbon (also called Backstage View). Here you will find common commands such as Save, Open, New and so on.
Customize the Ribbon
In PowerPoint 2010, you can now customize the Ribbon and add your own tabs. Click on the File tab and then choose Options. In the dialog box, click on Customize Ribbon on the left. You can add new tabs and add buttons to new tabs or existing tabs. You also have the ability to Import and Export any Quick Access Toolbar or Ribbon customizations so that you can transfer your custom tabs and commands to other computers.
Copy Animations with the Animation Painter
In PowerPoint 2010, you can now copy and paste an object's animations with the Animation Painter. To use it, click on the object with the animations you want to copy and then click on the Animation Painter on the Animations tab on the Ribbon.. Click on the object to which you want to copy the animations.
Improved Picture Cropping
Basic cropping has been improved. When the crop tool is activated, PowerPoint will display the removed portions as grayed out which is helpful for seeing both the before and after versions of the picture.
With PowerPoint 2010, you can also fill a shape with a picture and control the cropping within the picture as well as customizing how the image will fill the shape. When you select Crop > Fill, the picture will cover the edges of the shape. If you select Crop > Fit, the picture's edges will fit inside of the shape.
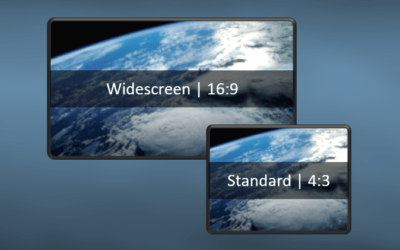
You can also now easily crop pictures by aspect ratio. This is useful if you move back and forth between widescreen (16:9 or 16:10) presentations and the standard 4:3 slide ratio.
New Video Formatting
You now can format video with picture style formatting including styles, colours and borders. You can even crop video to a shape in PowerPoint 2010.
Insert Videos from YouTube
With PowerPoint 2010, you can easily insert and play videos from YouTube during a slide show. You will need to be connected to the internet to play a video. Click on the Insert tab in the Ribbon, click on Video and then select Video from Web Site. Copy and paste the embed code from YouTube into the Insert Video dialog box and click on Insert.
Save a Presentation as a Video
In previous versions of PowerPoint, you could use third-party applications to convert a PowerPoint presentation into a video (often with poor quality results). In PowerPoint 2010, you can create a video by selecting File > Save & Send > Create Video. PowerPoint will create videos with audio and animations will maintain their timings and synchronization.
You have the ability to save in three possible sizes:
- Computer & HD (960 x 720),
- Internet & DVD (640 x 480),
- Portable Devices (320 x 240).
Resolutions will vary depending on the size of your PowerPoint slides. To specify size, click on the Design tab, click on Page Setup and then select On Screen Show 4:3 or On Screen Show 16:9, etc.
Bookmark and Trigger Audio and Video
A great new feature in PowerPoint 2010 is the ability to create bookmarks in audio or video on slides. Presenters can then jump to a specific point within the audio or video during a presentation.
If you combine this with triggers, you can trigger an animation to start at a bookmarked location (such as text appearing over a video at a specific point in time).
Combine Shapes
PowerPoint 2010 now includes a new Combine Shapes tool. With Combine Shapes, you can join two or more shapes with either the Shape Union or Shape Combine tools and cut shapes using the Shape Intersect or Shape Subtract tools.
In order to use this tool, you will have to add it to either the Quick Access Toolbar or to a tab on the Ribbon. To add Combine Shapes to the Quick Access Toolbar, click on File > Options. Click on Quick Access Toolbar on the left and select Commands Not in the Ribbon under Choose command from. Click on Combine Shapes and click on Add. Click on OK.
Remove the Background from a Picture
In PowerPoint 2010, one of the best new features is the background removal tool for pictures. Simply click on a picture and then click on the background removal tool on the Picture Tools Format tab. A new tab appears. Click on the Mark Areas to Remove button and then click on the areas of the photo you want to remove. You can also click on the Mark Areas to Keep button and click on the areas of the photo you wish to keep. When you are finished, click on the Keep Changes button.
Create Sections
In PowerPoint 2010, you can now create sections and organize slides in groups. This is very useful in longer presentations. With sections, you can collapse and expand sections and navigate quickly to a specific section. You can also rearrange, print and apply themes or transitions by section. Sections can be added, removed, collapsed and expanded in the Slide Sorter View or the Normal View in the Navigation Pane.
Broadcast a Slideshow via the SkyDrive (One Drive)
PowerPoint 2010 gives you the ability to broadcast your slideshow using the free PowerPoint Broadcast Service. You will need a Windows Live ID to sign in to send a private URL to remote users via email. Remove viewers click on the link to watch your presentation from their Web browser.
Contact us to discuss any of our custom options.
Check out our articles for more PowerPoint tips, tricks and shortcuts.
Public courses are delivered at our downtown Toronto location at 1 Yonge Street, Suite 1801 (Toronto Star Building), Toronto, Ontario, Canada.
Do you need more information? Contact us!
Copyright 2017 Avantix Learning Inc.
To request this page in an alternate format, contact our staff.

Custom training
Register for a public course or contact us to arrange custom training at your site or ours.
Related courses
Microsoft PowerPoint: Introduction
Microsoft PowerPoint: Intermediate / Advanced
Microsoft PowerPoint: Design for Non-Designers
You may like

How to Insert Linked or Unlinked Excel Worksheet Data into PowerPoint
You can insert Excel worksheet data into PowerPoint as an object or a table. Objects can be linked or unlinked. If you insert worksheet data as a table, it cannot be linked but can be formatted in PowerPoint.
20 PowerPoint Tips and Shortcuts to Work Faster with SmartArt
If you're inserting and formatting SmartArt in PowerPoint, there are several tips and shortcuts you can use to work faster with SmartArt objects.

How to Use the Selection Pane in PowerPoint to Select, Reorder, Rename and Hide Objects
One of PowerPoint's most useful tools is the Selection Pane. You can use it when you're working with multiple images and objects that are stacked on top of each other on a slide. With the Selection Pane, you can select, reorder, rename, show and hide objects on a PowerPoint slide.
How to Change Slide Size or Dimensions in PowerPoint
You can change the slide size or aspect ratio of a PowerPoint presentation in all versions. The default slide size or dimensions is widescreen (16:9 aspect ratio). You can also enter a custom slide size if you prefer (including entering slide size in pixels). The best time to set slide size is when you first set up your PowerPoint presentation before you add any content. If you change the size later in the process, you may have to deal with distorted pictures and you may also need to adjust the position and size of various objects on slides in Normal View and in the slide master(s) and layouts in Slide Master View.
You may also like

Using Keyboard Only Navigation in Word, Excel and PowerPoint (Part 3: Task Panes)
This article is the third in a series of navigating and choosing commands in Word, Excel and PowerPoint using a keyboard. In this instalment, we'll review working with task panes. You can use these keyboard navigation and selection strategies in Microsoft Word, Excel, PowerPoint, Access, Outlook, Project and Publisher.
Using Keyboard Only Navigation in Word, Excel and PowerPoint (Part 1: The Ribbon)
You have the ability to work in Microsoft Word, Excel and PowerPoint as well as many other programs using just your keyboard. This can be useful for those working with laptops or for any user that has difficulty using a mouse including users with disabilities (particularly those with mobility impairments). For those that use assistive technology such as a screen reader, Microsoft uses a standard called Microsoft Active Accessibility (MSAA) so that users with visual impairments will be able to navigate in the Office programs. You can use these keyboard navigation strategies in Microsoft Word, Excel, PowerPoint, Access, Outlook, Project and Publisher.
Using Keyboard Only Navigation in Word, Excel and PowerPoint (Part 2: Dialog Boxes)
This article is the second in a series of navigating and choosing commands in Word, Excel and PowerPoint using a keyboard. You can use several tricks and shortcuts when navigating and selecting in dialog boxes without using a mouse. You can use these keyboard navigation and selection strategies in Microsoft Word, Excel, PowerPoint, Access, Outlook, Project and Publisher.
Microsoft, the Microsoft logo, Microsoft Office and related Microsoft applications and logos are registered trademarks of Microsoft Corporation in Canada, US and other countries. All other trademarks are the property of the registered owners.
Avantix Learning | 1 Yonge Street, Suite 1801 (Toronto Star Building), Toronto, Ontario, Canada M5E 1W7 | info@avantixlearning.ca