
Capture Screenshots in PowerPoint, Word and Other Programs Using the Windows Snipping Tool
by Avantix Learning Team | Updated October 18, 2018
Applies to: Windows®8 or 10 and Microsoft® PowerPoint® and Word® 2013, 2016, 2019 and 365
The surprisingly useful Windows Snipping Tool is available in Windows 7 and later versions. You can capture screenshots using the Snipping Tool and insert them into Microsoft Word, PowerPoint, Excel and other Office programs. The Snipping Tool is a utility program or accessory in Windows so it's free and has already been installed with Windows. So where is this tool?
Recommended articles: How to Insert Screenshots in PowerPoint and Word (Part 1: Office Tools)
Do you want to learn more about Microsoft Word? Check out our virtual classroom or live classroom Word courses >
Opening the Snipping Tool in Windows 8 or 10
There are a number of ways to access the Snipping Tool in Windows 8 or 10. One of the easiest ways to open the tool is by using Search.
To open the Snipping Tool using Search in Windows 8:
- In the Start Screen, swipe from right to left to view the Search icon (if necessary).
- Click the Search icon and enter "snipping tool". The Snipping Tool icon should appear.
- Click the Snipping Tool icon. The Snipping Tool dialog box appears.

To open the Snipping Tool using Search in Windows 10:
- Click in the Search box on the bottom left of the screen.
- Enter "snipping tool".
- Click the Snipping Tool icon. The Snipping Tool toolbar appears.
Pinning the Snipping Tool to the Taskbar in Windows 8 or 10
To pin the Snipping Tool to the Taskbar in Windows 8:
- In the Start Screen, swipe from right to left to view the Search icon (if necessary).
- Click the Search icon and enter "snipping tool". The Snipping Tool icon should appear.
- Right-click the Snipping Tool and choose Pin to Taskbar. The Snipping Tool will now be available in the Taskbar when you are in an application or on the Desktop. To quickly access the Desktop, press the Windows button (beside the Alt key) + D.
To pin the Snipping Tool to the Taskbar in Windows 10:
- Click in the Search box on the bottom left of the screen.
- Enter "snipping tool".
- Right-click the Snipping Tool and choose Pin to Taskbar.
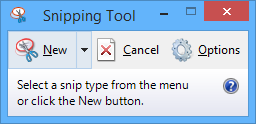
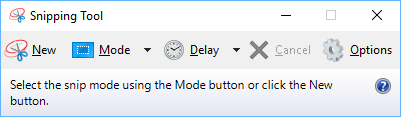
Snipping Tool toolbar
The Snipping Tool toolbar is very similar in Windows 8 and 10. In Windows 10, there are 2 more buttons on the toolbar.
The Snipping Tool toolbar in Windows 8 has three buttons:
- New
- Cancel
- Options
The Snipping Tool toolbar in Windows 10 has five buttons:
- New
- Mode
- Delay
- Cancel
- Options
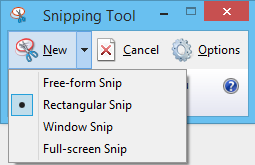
Types of screenshots
When you click the down arrow beside the New button in Windows 7 or 8 or the Mode button in Windows 10 in the Snipping Tool toolbar, you can choose from a menu of 4 options:
- The Free-form Snip allows you to draw an irregular line around an area.
- The Rectangular Snip allows you to take a screenshot as a rectangle by dragging the cursor around an area.
- Window Snip allows you to select an open window or dialog box.
- Full-screen Snip allows you to capture the entire screen.
Capturing a screenshot
To capture a screenshot in Windows 8:
- Open the Snipping Tool (as above).
- Click the down arrow next to the New button and choose Free-form Snip, Rectangular Snip, Window Snip or Full-screen Snip from the list.
- If using Free-form Snip or Rectangular Snip, drag around the area of the screen that you want to capture. If using Window Snip, navigate to the window you want to capture. If using Full-screen Snip, a screenshot will be taken of the current screen. The Snipping Tool window appears with the screenshot.
To capture a screenshot in Windows 10:
- Open the Snipping Tool (as above).
- Click the down arrow next the Mode button and select a drawing mode.
- Select the down arrow next to the Delay button and select a delay (this is useful for capturing screenshots of menus).
- Click the New button.
- If using Free-form Snip or Rectangular Snip, drag around the area of the screen that you want to capture. If using Window Snip, navigate to the window you want to capture. If using Full-screen Snip, a screenshot will be taken of the current screen. The Snipping Tool window appears with the screenshot.
Capturing a screenshot of a menu in Windows 8
Since you don't have a delay option in earlier versions of the Snipping Tool, it's a bit more difficult to capture a screenshot of a menu.
To capture a screenshot of a menu:
- Open the Snipping Tool (as above).
- Press ESC. It will appear as if nothing has occurred.
- Open the menu that you want to capture.
- Press Control + Print Screen (PrtScn).
- In the Snipping Tool dialog box, click the down arrow beside the New button and select Free-form Snip or Rectangular Snip from the list.
- Select the area of your screen that you want to capture. The screenshot will appear in the Snipping Tool window.
Note: This didn't work when we tested it in the Start Screen in Windows 8, but did work correctly in a menu within an application such as PowerPoint.
Copying a screenshot
If you wish to copy a Snipping Tool screenshot:
- In the Snipping Tool window, click the Edit menu and then select Copy or press Ctrl + C.
- Open a Word, PowerPoint or other file and paste the image by pressing Ctrl + V.
Saving a screenshot
If you wish to save a Snipping Tool screenshot:
- In the Snipping Tool window, click the File menu and choose Save As, press Ctrl + S or click the Save button.
- In the dialog box that appears, choose the desired file type (such as JPG or PNG), enter a name and navigate to the desired folder.
- Click Save. You will then be able to insert the screenshot using the Insert Picture command in Word, PowerPoint or other Office programs.
Emailing a screenshot
If you wish to email a Snipping Tool screenshot:
- In the Snipping Tool window, click the File menu and choose Send Snip or click on the Send Snip button.
- Choose E-mail Recipient or E-mail Recipient (as attachment). You will need an email client such as Outlook installed.
- In the email client, choose the desired recipient and send the message.
Customizing the Snipping Tool
After you open the Snipping Tool, you can click on the Options button to set your preferences. Options can also be specified in the Snipping Tools window through the Tools menu. Below is the Snipping Tools Options dialog box:
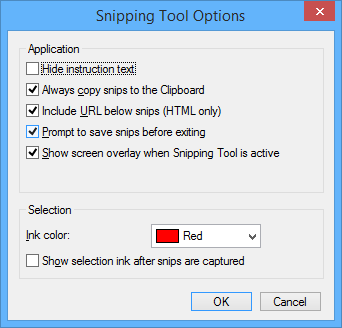
The Application section enables you to check or uncheck the following:
- Hide Instruction Text – hides the instruction text in the Snipping Tool window.
- Always copy snips to the Clipboard – copies all screenshots to the Clipboard so you can paste them into other programs.
- Include URL below snips (HTML only) – saves your snips as a Single File HTML or MHT documents. If a shot is taken from an Internet Explorer window, it also shows the URL of the webpage included in the screenshot.
- Prompt to save snips before exiting – prompts you if you have any screenshots that you have not saved before closing the program.
- Show screen overlay – is usually enabled and displays the screen as a white overlay when you are taking a screenshot.
The Selection area enables you to change options related to border colour:
- Ink Color – changes the color of the selection border when you create a snip.
- Show selection ink after snips are captured – when enabled, the selection border is shown around the snip, using the color selected in the "Ink Color" list.
The Snipping Tool really is a great little free utility and it's shipped with Windows. There are some other screenshot features that have been added in Windows 8.1 that we'll explore in a future article.
Subscribe to get more articles like this one
Did you find this article helpful? If you would like to receive new articles, join our email list.
More resources
How to Show or Hide White Space in Word Documents
10+ Great Microsoft Word Navigation Shortcuts to Move Around Quickly in Your Documents
14 Shortcuts to Quickly Select Text in Microsoft Word
Related courses
Microsoft Word: Intermediate / Advanced
Microsoft Word: Styles, Templates and Tables of Contents
Microsoft Word: Designing Dynamic Word Documents Using Fields
Microsoft Word: Long Documents Master Class
Microsoft Word: Accessible Word Documents
Our instructor-led courses are delivered in virtual classroom format or at our downtown Toronto location at 18 King Street East, Suite 1400, Toronto, Ontario, Canada (some in-person classroom courses may also be delivered at an alternate downtown Toronto location). Contact us at info@avantixlearning.ca if you'd like to arrange custom instructor-led virtual classroom or onsite training on a date that's convenient for you.
Copyright 2024 Avantix® Learning
You may also like

10 Word Shortcuts to Select Text Using a Keyboard
You can use several shortcuts in Word to select text in your documents using only your keyboard. When you select text, it will typically be highlighted in grey. After you select text, you can cut, copy, or delete the selected text or apply character or paragraph formatting.

How to Insert or Type E with an Accent Mark in PowerPoint (È, É, Ê, Ë, è, é, ê, or ë)
You can insert or type e with an accent mark in PowerPoint using built-in tools or keyboard shortcuts (including Alt code shortcuts). The letter e can be inserted with an accent in both upper or lower case in text boxes or placeholders on slides, the slide master or layouts. The following are common accents in upper or lower case – È, É, Ê, Ë, è, é, ê, or ë.

How to Fade a Picture or Part of a Picture in PowerPoint (Using a Gradient)
You can fade a picture in PowerPoint by drawing a rectangle shape on top of the picture and then filling the rectangle with a gradient from opaque to transparent. This technique is often used to fade an image into the background of a slide. Since the rectangle is placed on top of the image and then text may be placed on top of the rectangle, you may need to reorder the objects.
Microsoft, the Microsoft logo, Microsoft Office and related Microsoft applications and logos are registered trademarks of Microsoft Corporation in Canada, US and other countries. All other trademarks are the property of the registered owners.
Avantix Learning |18 King Street East, Suite 1400, Toronto, Ontario, Canada M5C 1C4 | Contact us at info@avantixlearning.ca