

Scheduling Tasks in Microsoft Project as Manual or Auto Scheduled
by Avantix Learning Team | Updated June 11, 2022
Applies to: Microsoft® Project® 2010, 2013, 2016, 2019 and 365 (Standard and Professional)
Starting with Microsoft Project 2010, you have the option of scheduling tasks using manual or auto scheduling. Prior to 2010, Microsoft Project used auto scheduling which takes advantage of Project's scheduling engine to schedule tasks. This process is called dynamic scheduling.
Recommended article: How to Create a Timeline in Microsoft Project
Do you want to learn more about Microsoft Project? Check out our virtual classroom or live classroom Project courses >
Overview of manual scheduling
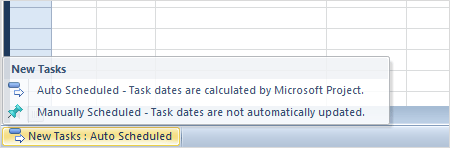
Microsoft Project is set with manual scheduling as the default. You'll notice a status pop-up on the bottom left of the screen when you open or create a new a project indicating the scheduling method that is being used for new tasks.
In the Task Mode column (which should be displayed by default in the Entry table), a pushpin icon appears for manually scheduled tasks:

If you use manual scheduling, keep in mind that you are not taking advantage of the scheduling engine in Project. Manual scheduling can be useful in the early stages of a project when high-level target dates have been set but the detailed tasks and timing have not. Tasks should be changed to autoscheduled as the plan starts to take shape. For experienced Microsoft Project users, manual scheduling seems a lot like entering project tasks in Excel.
Create tasks in manual scheduling mode
Tasks entered in manual scheduling mode:
- Can have no duration
- Can have no start date
- Can have no end date
- Can include text values instead of durations or dates
Durations and dates can be entered as text like "First Quarter" or "3-4 weeks". With manual scheduling, summary tasks do not roll up to calculate dates and durations based on subtasks. If subtasks are manually scheduled and linked, the start and finish dates are not calculated unless you enforce the links using the Respect Links button.
Notably, manually scheduled tasks are not affected by constraints.
Switch tasks from manual to auto scheduled
When you switch tasks to auto scheduled, Microsoft Project uses its scheduling engine to schedule tasks based on duration, dependencies, calendars, constraints and resources assigned in the project.
To switch a task from manual to auto scheduled using the Ribbon:
- Click in a task or select multiple tasks.
- Click the Task tab in the Ribbon.
- Click Auto Schedule in the Tasks group.

To switch a task from manual to auto scheduled by right-clicking:
- Click in a task or select multiple tasks.
- Right-click any of the selected tasks.
- Select Auto Schedule from the menu.

To use keyboard shortcuts to set the scheduling method:
- Click in a task or select multiple tasks.
- Press Ctrl + Shift + M to set to manually schedule or Ctrl + Shift + A to set to auto schedule.
A task that is changed from manual to auto scheduled will set duration and dates according to Project's default settings. For example, Project will change a manually scheduled task with a duration of "Approx two weeks" to the default of "1 day?" A task with a manually entered start date of "Beginning of the month" will have the start changed to the project start date when it is changed to an automatically scheduled task.
A task that is changed from automatically to manually scheduled will initially keep its duration and dates. However, after the task is set to manually scheduled, the duration and dates can be changed to a number, text or date.
Set auto scheduled as the default mode in the current project
To set auto scheduled as the default mode in the current project for new tasks:
- Click the scheduling menu on the bottom left of the screen in the status bar.
- Select Auto Scheduled – Task dates are calculated by Microsoft Project.
Although manual scheduling is now an option in Microsoft Project, tasks should be changed to auto scheduled as the project moves into the later stages.
Subscribe to get more articles like this one
Did you find this article helpful? If you would like to receive new articles, JOIN our email list.
More resources
Send Microsoft Project Data to Excel with Visual Reports
10 Microsoft Project Tips for Working Efficiently with Tables
10 Timesaving Microsoft Project Shortcuts in Gantt Chart View
7 Microsoft Project Navigation and Selection Shortcuts in Task Lists
10 Shortcuts to Zoom and Move Quickly in Microsoft Project's Gantt Chart Timescale
Related courses
Microsoft Project: Introduction
Microsoft Project: Intermediate / Advanced
Microsoft Project: Introduction to VBA (Visual Basic for Applications)
Our instructor-led courses are delivered in virtual classroom format or at our downtown Toronto location at 18 King Street East, Suite 1400, Toronto, Ontario, Canada (some in-person classroom courses may also be delivered at an alternate downtown Toronto location). Contact us at info@avantixlearning.ca if you'd like to arrange custom instructor-led virtual classroom or onsite training on a date that's convenient for you.
Copyright 2024 Avantix® Learning
You may also like

7 Microsoft Project Navigation and Selection Shortcuts in Task Lists
If you are working in Gantt Chart view, you can use these keyboard shortcuts to quickly move and select in your task list.
10 Microsoft Project Shortcuts to Zoom and Move Quickly in the Gantt Chart Timescale
Zoom in, out and move using these great shortcuts in the Microsoft Project Gantt Chart timescale. The timescale in the Gantt Chart view appears on the right side and displays units of time.

How to Create a Timeline in Microsoft Project
Timelines are a great way to view key tasks and milestones in a project. You can add tasks to a timeline and then format it any way you'd like. Copy a timeline into an email or Word or PowerPoint file to present the timeline.
Microsoft, the Microsoft logo, Microsoft Office and related Microsoft applications and logos are registered trademarks of Microsoft Corporation in Canada, US and other countries. All other trademarks are the property of the registered owners.
Avantix Learning |18 King Street East, Suite 1400, Toronto, Ontario, Canada M5C 1C4 | Contact us at info@avantixlearning.ca


