Use PowerPoint's Enhanced Clipboard to Cut, Copy, Store and Paste Objects
by Avantix Learning Team | Updated March 12, 2021
Applies to: Microsoft® PowerPoint® 2013, 2016, 2019 and 365 (Windows)
There's a hidden tool in PowerPoint that is extremely useful for copying (or cutting) and storing images, shapes or other objects much like a temporary library. The technical name for this tool is the Spike and it is available in various Microsoft Office programs.
The Spike is different from the standard Clipboard which holds only one cut or copied item at a time. With this tool, you can collect multiple objects as you cut or copy them and then paste them on various slides. The trick is to display the Clipboard task pane while you're cutting or copying in PowerPoint.
Recommended article: How to Quickly Remove All Animations in PowerPoint Presentations
Do you want to learn more about PowerPoint? Check out our virtual classroom or live classroom PowerPoint courses >
Displaying the Clipboard task pane
To display the Clipboard task pane or the Spike in PowerPoint:
- Click the Home tab in the Ribbon.
- In the Clipboard group, click the dialog box launcher (the button on the bottom right of the Clipboard group). The Clipboard task pane appears.
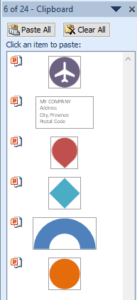
Below is the Clipboard task pane in PowerPoint (it can hold up to 24 items):
Adding items to the Clipboard task pane
If the Clipboard task pane is displayed, when you cut or copy a text placeholder or box, shape, image or other object, it will be added to the Clipboard task pane automatically.
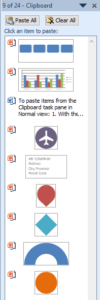
The Clipboard below is storing a chart and SmartArt as well as images and shapes:
You can also cut items and add them to the Spike by pressing Control + F3 if the task pane is not displayed.
Pasting items from the Clipboard task pane
To paste items from the Clipboard task pane to slides in Normal view:
- With the Clipboard task pane displayed, display the slide on which you wish to paste an object.
- Click the item in the Clipboard task pane and it will be pasted into the slide.
- Repeat for other items.
To paste items from the Clipboard task pane to masters or layouts in Slide Master view:
- Click the View tab in the Ribbon and select Slide Master.
- With the Clipboard task pane displayed, click the slide master or layout on which you wish to paste an object.
- Click the item in the Clipboard task pane and it will be pasted onto the slide master or layout.
- Repeat for other items.
You can even copy items from the enhanced Clipboard to other presentations
Deleting items from the Clipboard task pane
To delete single items from the Clipboard task pane:
- With the Clipboard task pane displayed, point to the item you wish to delete until an arrow appears.
- Click the arrow and select Delete.
- Repeat for other items.
To delete all items from the Clipboard task pane:
- If necessary, display the Clipboard task pane.
- Click Clear All at the top of the task pane.
Note that when you shut down your computer, the Clipboard is cleared automatically.
Changing the Behaviour of the Clipboard or Spike
You can change the behaviour of this enhanced Clipboard or Spike by clicking Options at the bottom of the Clipboard task pane and selecting other options (such as showing the Clipboard automatically).
Subscribe to get more articles like this one
Did you find this article helpful? If you would like to receive new articles, join our email list.
More resources
How to Compress Images in PowerPoint (10 Ways)
How to Turn Off Automatic Text Resizing in PowerPoint
How to Remove the Background of an Image in PowerPoint (2 Ways)
How to Quickly Remove All Speaker Notes in a PowerPoint Presentation
How to Crop an Image into a Circle in PowerPoint (Crop to Shape Method)
Related courses
Microsoft PowerPoint: Intermediate / Advanced
Microsoft PowerPoint: Design for Non-Designers
Microsoft PowerPoint: Animations Bootcamp
Our instructor-led courses are delivered in virtual classroom format or at our downtown Toronto location at 18 King Street East, Suite 1400, Toronto, Ontario, Canada (some in-person classroom courses may also be delivered at an alternate downtown Toronto location). Contact us at info@avantixlearning.ca if you'd like to arrange custom instructor-led virtual classroom or onsite training on a date that's convenient for you.
Copyright 2024 Avantix® Learning
You may also like
10 Word Shortcuts to Select Text Using a Keyboard
You can use several shortcuts in Word to select text in your documents using only your keyboard. When you select text, it will typically be highlighted in grey. After you select text, you can cut, copy, or delete the selected text or apply character or paragraph formatting.
How to Replace Zeros (0) with Blanks in Excel
There are several strategies to replace zero values (0) with blanks in Excel. If you want to replace zero values in cells with blanks, you can use the Replace command or write a formula to return blanks. However, if you simply want to display blanks instead of zeros, you have two formatting options – create a custom number format or a conditional format.
What is Power Query in Excel?
Power Query in Excel is a powerful data transformation tool that allows you to import data from many different sources and then extract, clean, and transform the data. You will then be able to load the data into Excel or Power BI and perform further data analysis. With Power Query (also known as Get & Transform), you can set up a query once and then refresh it when new data is added. Power Query can import and clean millions of rows of data.
Microsoft, the Microsoft logo, Microsoft Office and related Microsoft applications and logos are registered trademarks of Microsoft Corporation in Canada, US and other countries. All other trademarks are the property of the registered owners.
Avantix Learning |18 King Street East, Suite 1400, Toronto, Ontario, Canada M5C 1C4 | Contact us at info@avantixlearning.ca


