

Comparing Versions of a Presentation
by Avantix Learning Team | Updated November 15, 2014
Applies to: Microsoft® PowerPoint® 2010 and 2013
PowerPoint 2010 and 2013 include a useful Compare command which enables you to compare two different copies of a presentation, merge them, view the differences and then accept or reject the changes.
Recommended article: How to Print PowerPoint Presentations with Notes
Do you want to learn more about PowerPoint? Check out our virtual classroom or live classroom PowerPoint courses >
Using the Compare tool
To compare two versions of a presentation and merge in a new copy of the presentation:
- Open the original version of the presentation (for example, SalesPitch1).
- Save a copy of the original presentation (for example, SalesPitch3).
- In the copy of the original presentation, click the Review tab on the Ribbon.
- Click Compare in the Compare group. A dialog box appears.
- Navigate to the location of the revised version of the presentation (for example, SalesPitch2).
- Click the revised presentation and click Merge. PowerPoint opens the revised version of the presentation and merges the two presentations while keeping track of the differences between the two.
- View the changes in the Reviewing Pane that appears on the right side of the PowerPoint window.
The Reviewing Pane
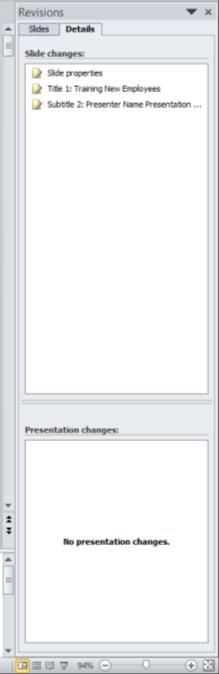
The Reviewing Pane appears automatically when presentations are merged. It appears by default on the right side of the PowerPoint window. Click on the Details tab to view changes on the current slide and at a presentation level. A check box icon will appear on the slide beside any item that has been changed.
There are two parts to the Reviewing Pane (with the Details tab selected). The top area shows changes on the slide you are viewing. The bottom area shows changes throughout the presentation.
Reviewing changes at the slide level
To review the changes/differences at the slide level:
- In Normal view, display the slide with the changes you wish to review.
- In the Reviewing Pane, click the Details tab.
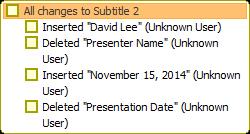
- Under Slide Changes, click one of the items in the list and PowerPoint will display a description of the change(s) on the slide.
- Navigate to subsequent slides and repeat the process.
Reviewing changes at the presentation level
To review the changes/differences at the presentation level (such as a theme change):
- In the Reviewing Pane, click the Details tab.
- Under Presentation Changes, click one from the list of changes and PowerPoint will show a description of the change.
Accepting or rejecting the changes
Once you have reviewed the changes, you can accept and/or reject the changes:
- Click the first slide in Normal view.
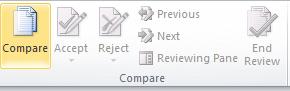
- On the Review tab, in the Compare group, click Next. PowerPoint will select the first change.
- Click either Accept or Reject in the Compare group on the Review tab in the Ribbon. From Accept options, you can accept changes one by one, accept all changes to the current slide, or accept all changes to the presentation. There are also options to reject individual changes or all changes.
- Click Next in the Compare group to move to the next change.
- Repeat until you have accepted or rejected all changes.
- When the process is complete, click End Review in the Compare group and close and save the file.
Subscribe to get more articles like this one
Did you find this article helpful? If you would like to receive new articles, join our email list.
More resources
How to Insert Slide Numbers in PowerPoint
PowerPoint Slide Show Shortcuts (50+ Shortcuts)
How to Print a PowerPoint Presentation with Notes
How to Loop a PowerPoint Slide Show to Repeat Automatically
How to Compress Images in PowerPoint to Reduce File Size (10 Strategies)
Related courses
Microsoft PowerPoint: Intermediate / Advanced
Microsoft PowerPoint: Design for Non-Designers
Microsoft PowerPoint: Animations Bootcamp
Our instructor-led courses are delivered in virtual classroom format or at our downtown Toronto location at 18 King Street East, Suite 1400, Toronto, Ontario, Canada (some in-person classroom courses may also be delivered at an alternate downtown Toronto location). Contact us at info@avantixlearning.ca if you'd like to arrange custom instructor-led virtual classroom or onsite training on a date that's convenient for you.
Copyright 2024 Avantix® Learning
You may also like

How to Insert or Type E with an Accent Mark in PowerPoint (È, É, Ê, Ë, è, é, ê, or ë)
You can insert or type e with an accent mark in PowerPoint using built-in tools or keyboard shortcuts (including Alt code shortcuts). The letter e can be inserted with an accent in both upper or lower case in text boxes or placeholders on slides, the slide master or layouts. The following are common accents in upper or lower case – È, É, Ê, Ë, è, é, ê, or ë.

How to Fade a Picture or Part of a Picture in PowerPoint (Using a Gradient)
You can fade a picture in PowerPoint by drawing a rectangle shape on top of the picture and then filling the rectangle with a gradient from opaque to transparent. This technique is often used to fade an image into the background of a slide. Since the rectangle is placed on top of the image and then text may be placed on top of the rectangle, you may need to reorder the objects.

How to Lock an Image, Shape or Other Object in PowerPoint
You can now lock an image, shape or other object in PowerPoint. Objects can be locked in Normal View or Slide Master View. Only PowerPoint 365 users can lock objects to prevent moving and resizing. This is helpful if you want to select and move other objects on the slide or prevent others from moving or resizing an object. You can lock items using the context menu or the Selection Pane.
Microsoft, the Microsoft logo, Microsoft Office and related Microsoft applications and logos are registered trademarks of Microsoft Corporation in Canada, US and other countries. All other trademarks are the property of the registered owners.
Avantix Learning |18 King Street East, Suite 1400, Toronto, Ontario, Canada M5C 1C4 | Contact us at info@avantixlearning.ca


